Moorish Nursery Design

Meredith McBride Kipp nursery02


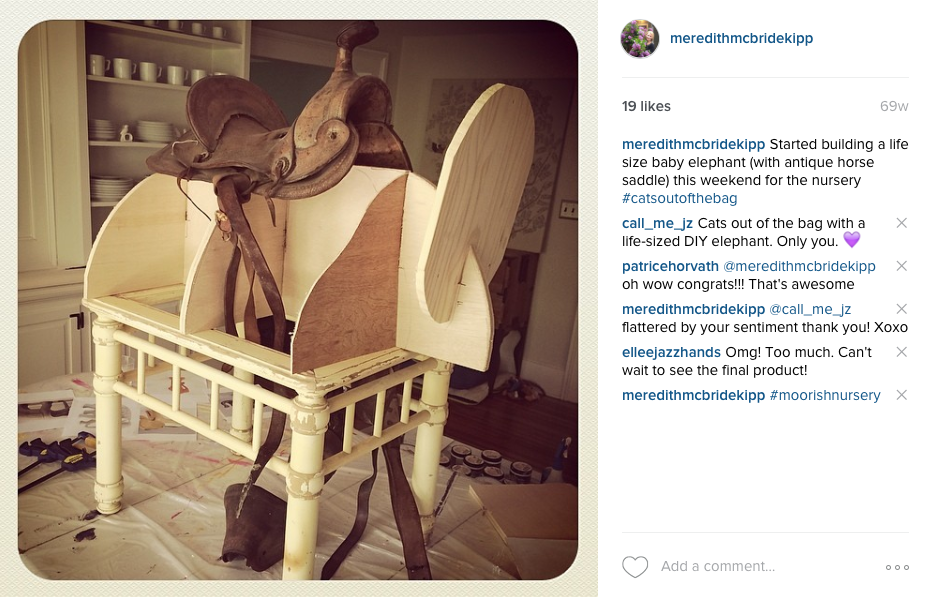
I celebrated my child’s first birthday yesterday. ‘Has a whole year passed?!’ Indeed it has! It’s hard to believe my lifesize-elephant-sculpture is now a distant memory or—if you are a new mom you’ll get it—barely a memory at all.

The past year has been a blur to say the least! In this order; I had a baby (while working like a dog at a shelter magazine), got laid off (decided there is a first and last time for everything), totally panicked, came up with a million hair-brained ideas to get by, scrapped them all, focused on raising a child (with my amazing husband), started a new business (interior design), and—this past weekend—threw a wedding-size birthday party for the baby & husband. Because why not?!

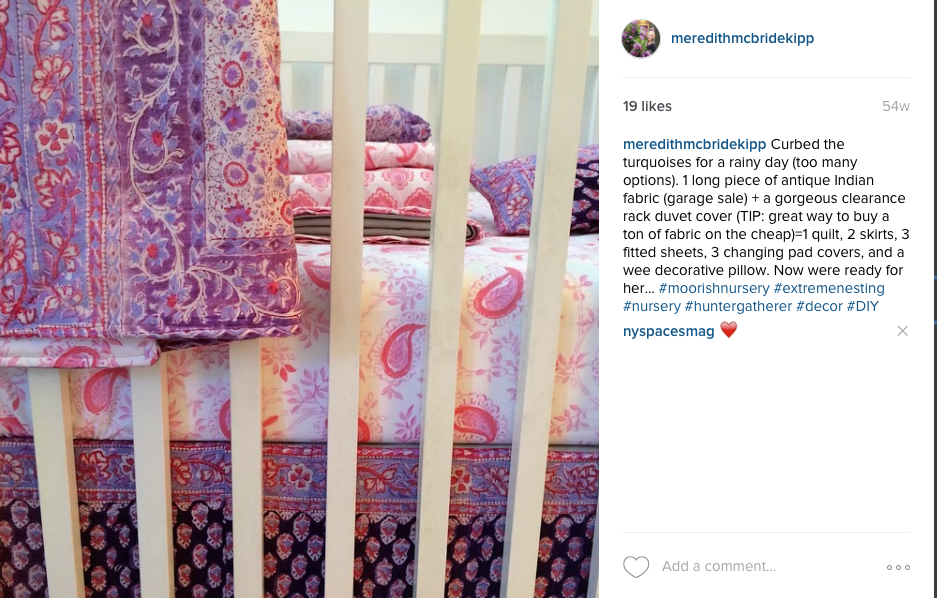
In the chaos of caring for a baby and managing a new business with vibrant clients, I completely forgot a local home magazine was doing a piece on my nursery design! It was such a nice surprise yesterday—and weird timing—to see this delightful article (below)… that I am ever so grateful for. Thank you Brooke!!! I’ve included several photos of the project below and even some process shots (far below).

Through the Years
WRITTEN BY BROOKE PERRY
INTERIOR DESIGN BY MEREDITH McBRIDE KIPP

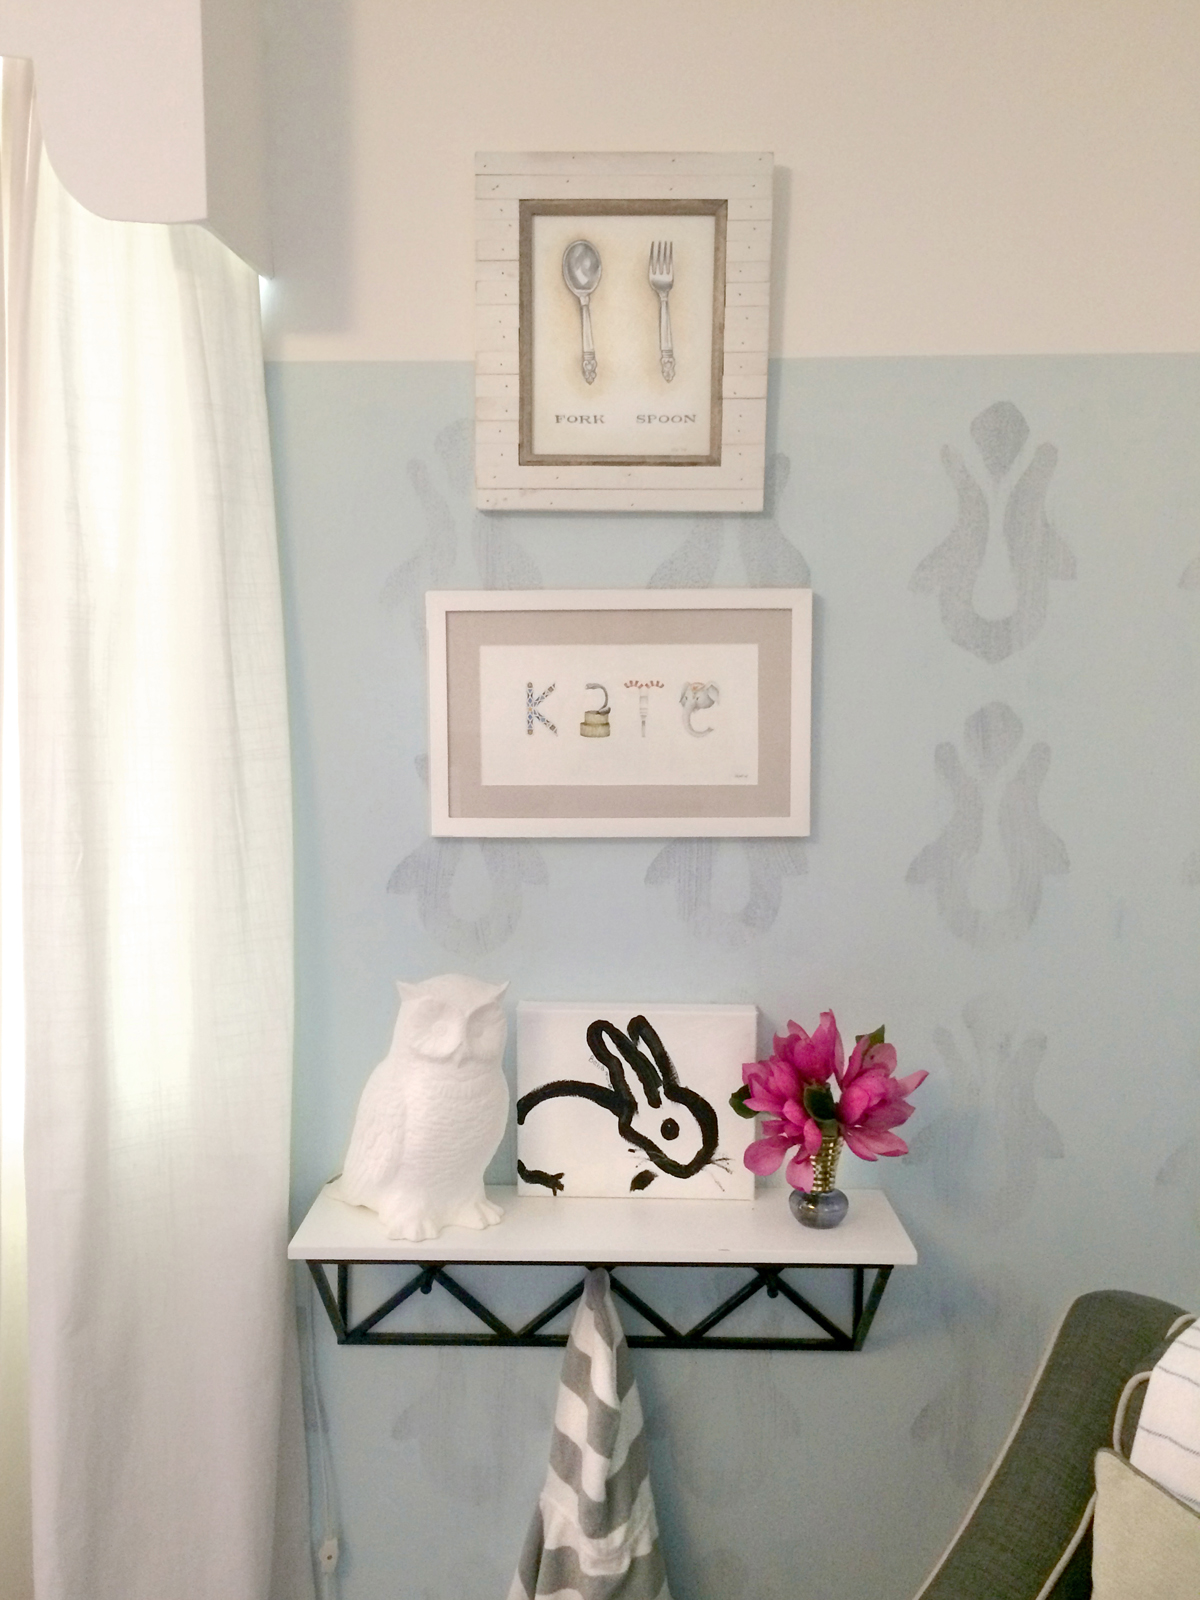
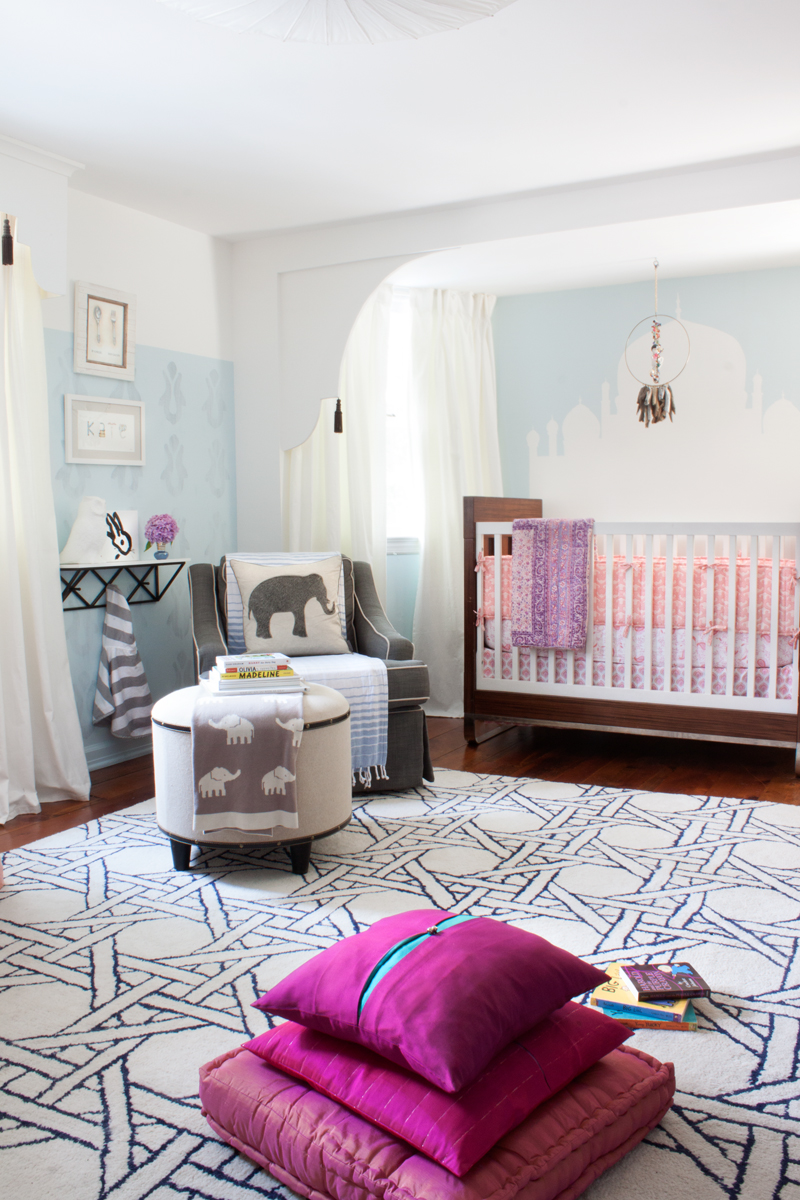
Envisioning a “fun, worldly and adventurous” nursery for her daughter, Franklin Lakes interior designer Meredith McBride Kipp dreamed up a Moorish fantasy highlighted by crisp white drapery, playful elephants and even a hand-painted silhouette of the Taj Mahal. “I didn’t want the room to feel overtly like a nursery;’ says the designer, who chose pieces that can work well in the room or elsewhere in the home over the years.

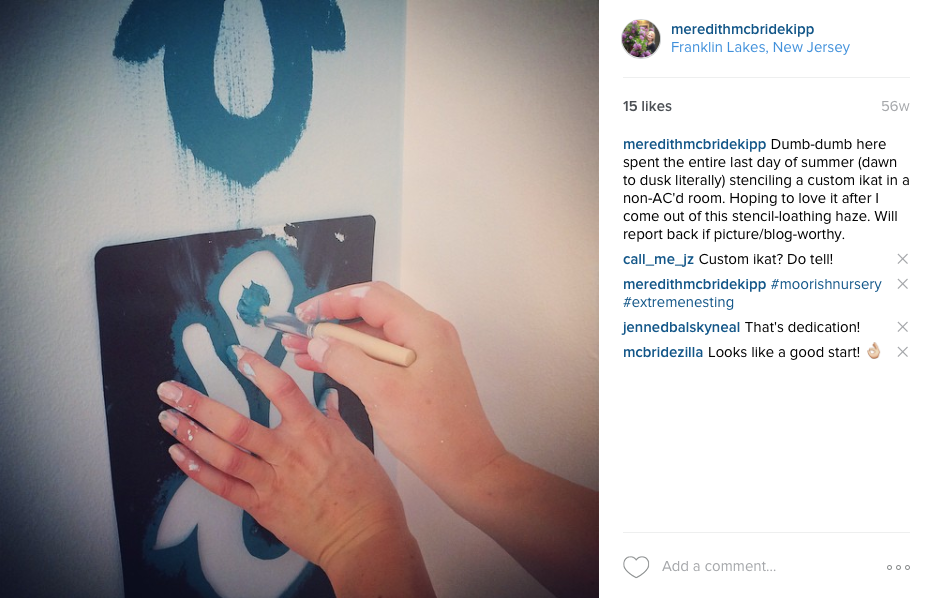
In lieu of a traditional rocking chair, Kipp opted for a classic deep-gray club chair glider with cream piping from HomeGoods, toning down its “serious” feel with a blue and white stripe Turkish cotton throw and a canvas elephant pillow by Tahari Home. A leather and canvas ottoman, also from HomeGoods, is a work anywhere piece. On the walls, Kipp stenciled a custom-muted ikat pattern on light blue three-quarters of the way up the wall, transitioning to matte white to the ceiling.

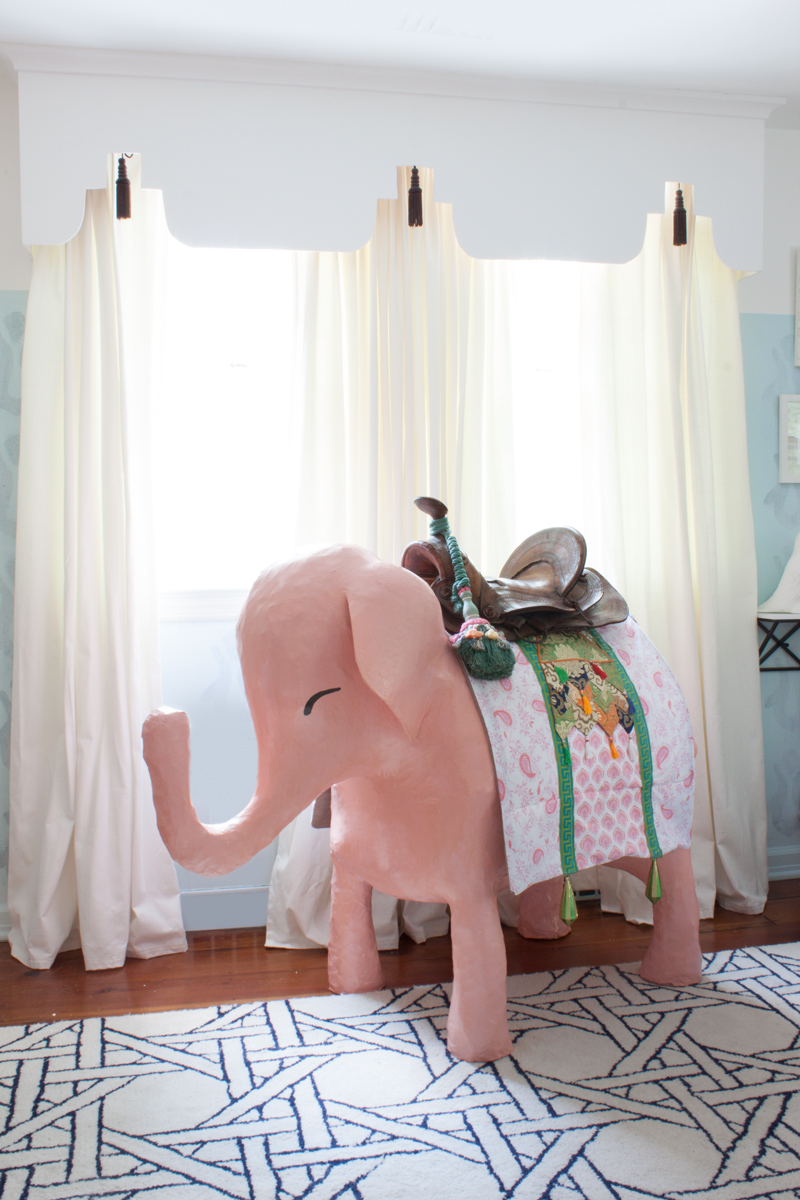
The designer brightened the room’s original wood floors with the addition of a navy and white bamboo fretwork patterned rug from India. Its white background works beautifully with simple white drapes from lkea, which tuck beneath custom-built valences embellished with brown tassels. “They are a decorative homage to beautiful Moorish plasterwork;’ she says.

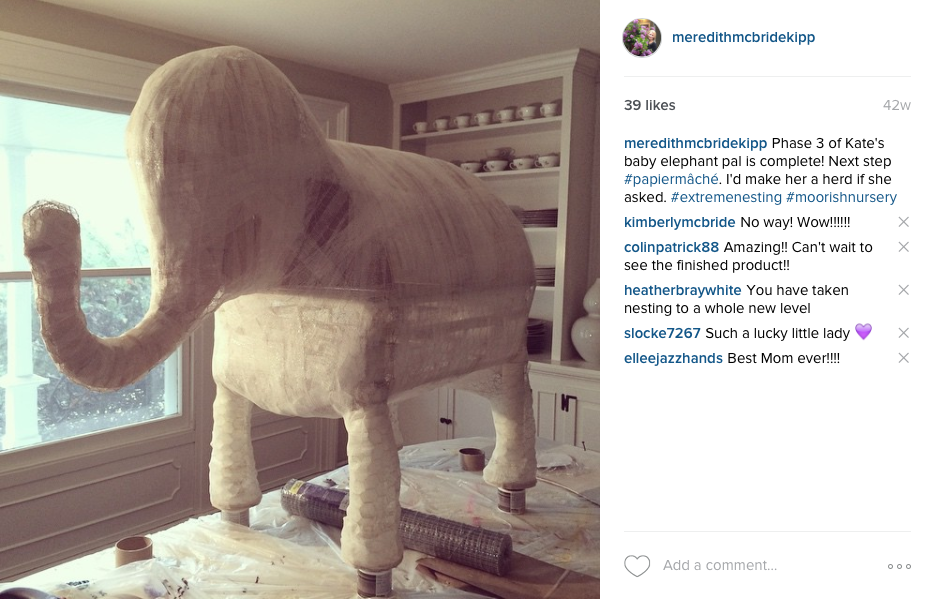
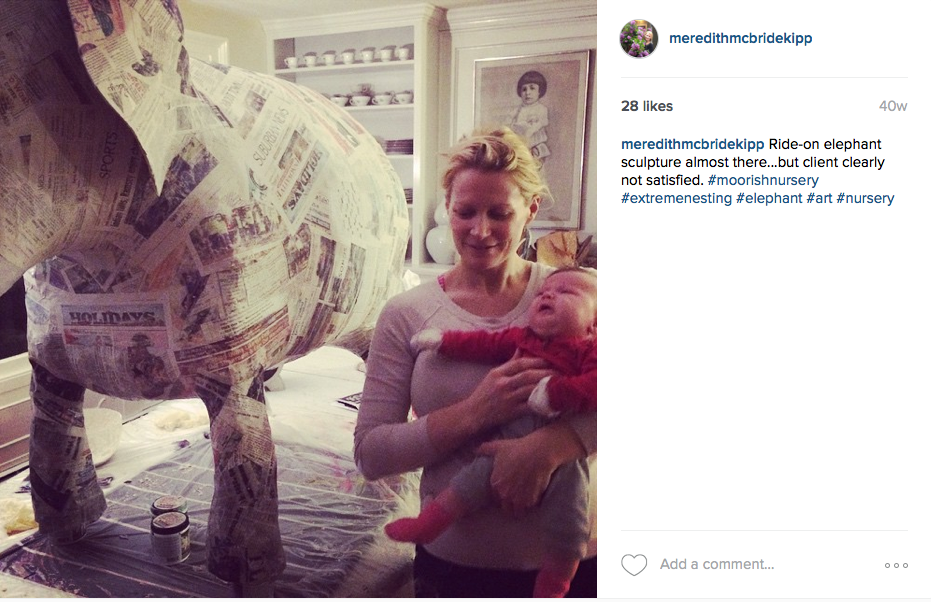
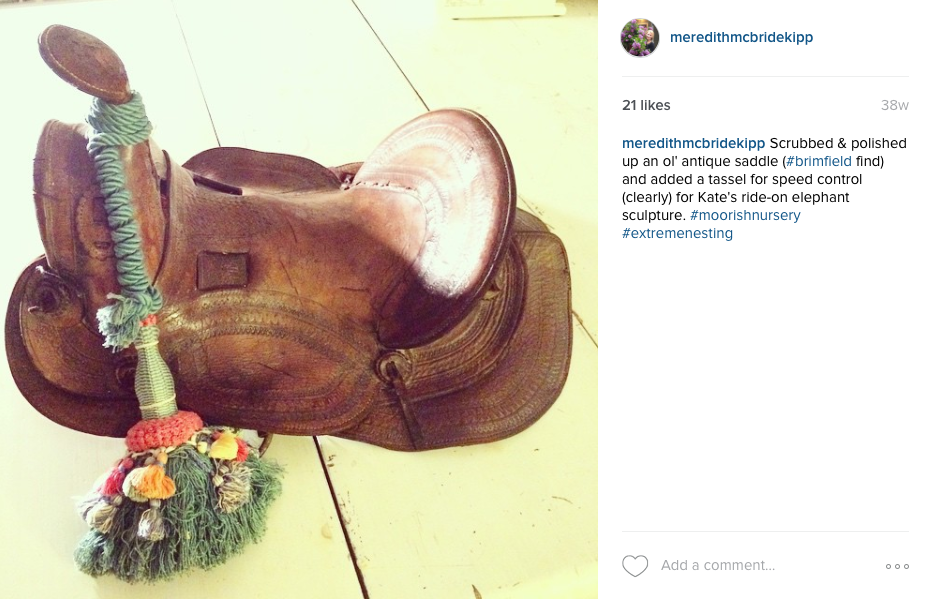
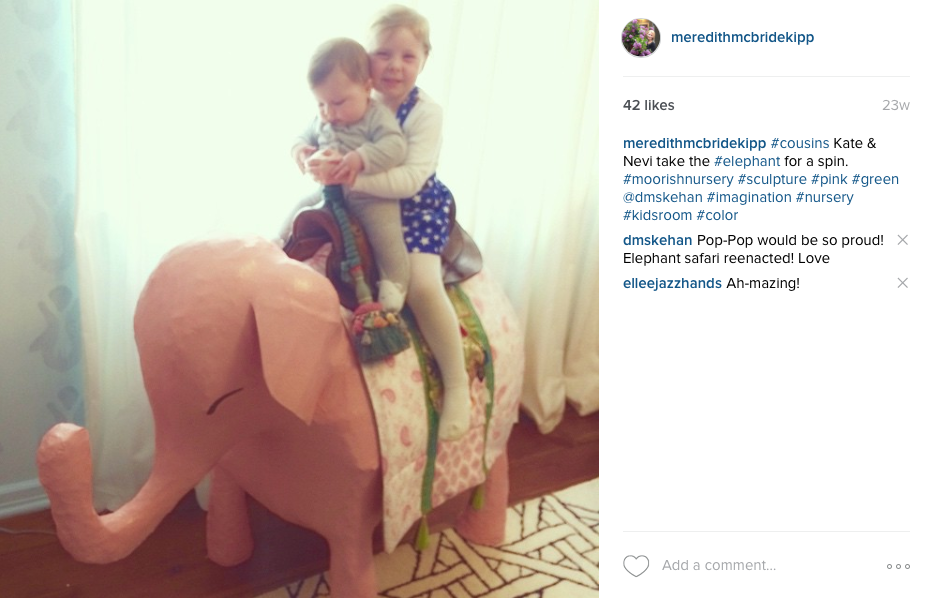
The room’s most charming feature is the nearly life-sized baby elephant topped with an antique riding saddle. A former creative director turned blogger, interior designer and gifted DIYer, Kipp built the playful pink pachyderm herself using a wood frame, chicken wire and papier-mache.

The antique mahogany dining room sideboard, an estate sale find, is repurposed as a changing table (not shown). “I couldn’t bear to paint it,” she says, “so I added a bold band of white contact paper down the front to add interest:’
Meredith McBride Kipp nursery08


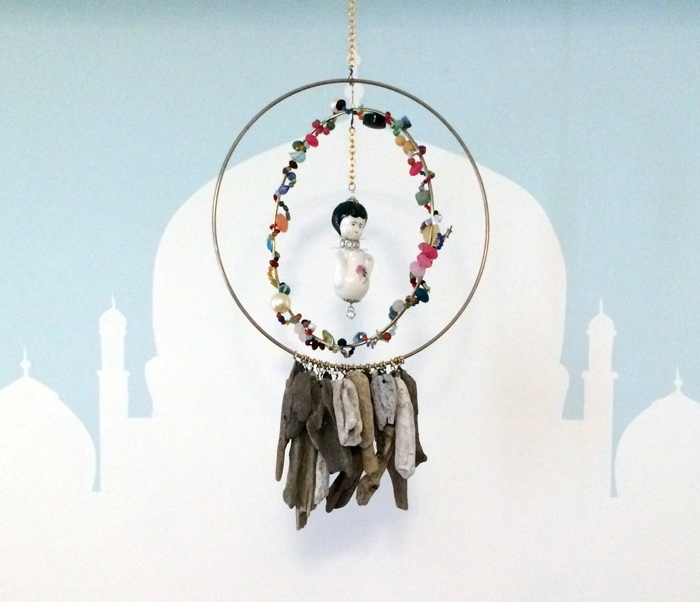
Mobile by Michal Dagan. My hand painted Taj Mahal in the background.

Mobile by Michal Dagan

illustrations by Scott Woods (top) and Sally King (bottom)
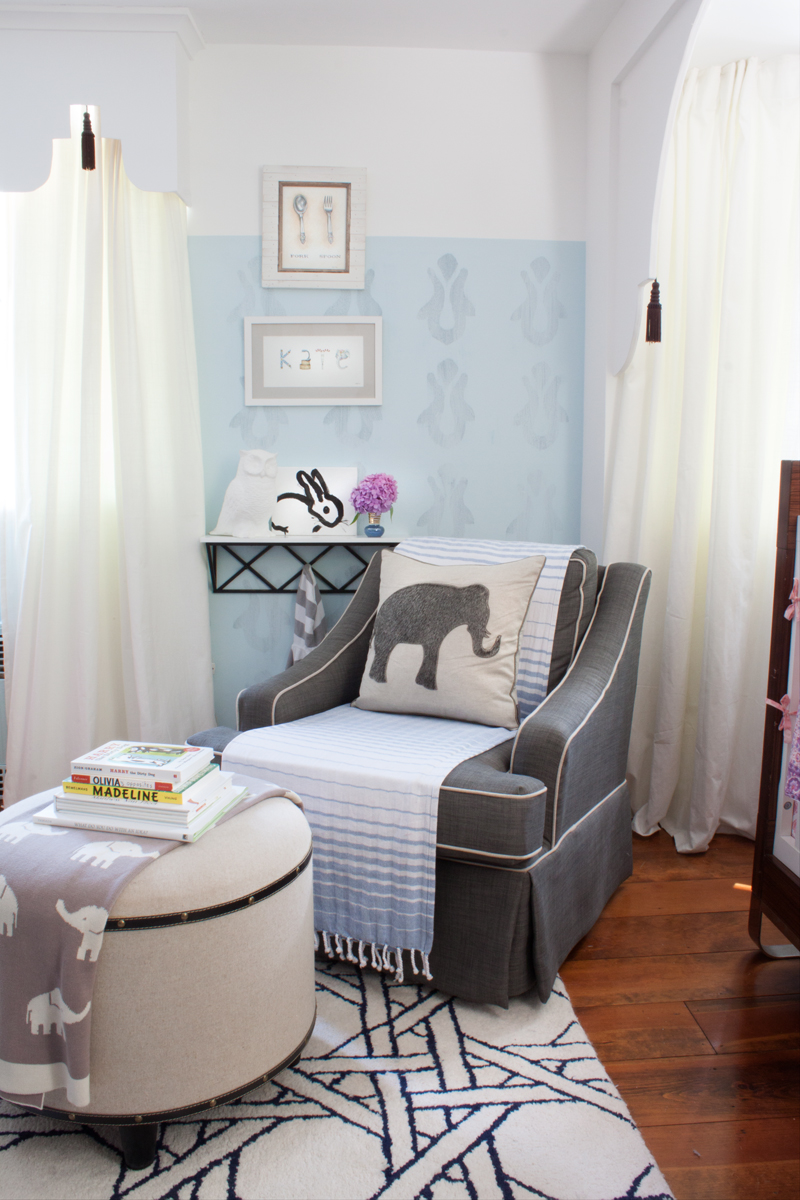
illustrations by Scott Woods (top) and Sally King (bottom)


Meredith McBride Kipp nursery06

PROCESS SHOTS OF THE ELEPHANT ET AL:Screen Shot 2015-10-01 at 7.35.42 AMScreen Shot 2015-10-01 at 7.34.34 AMScreen Shot 2015-10-01 at 7.34.08 AMScreen Shot 2015-10-01 at 7.33.23 AMScreen Shot 2015-10-01 at 7.27.27 AMScreen Shot 2015-10-01 at 7.33.04 AMScreen Shot 2015-10-01 at 7.32.10 AM

Recreational Herb

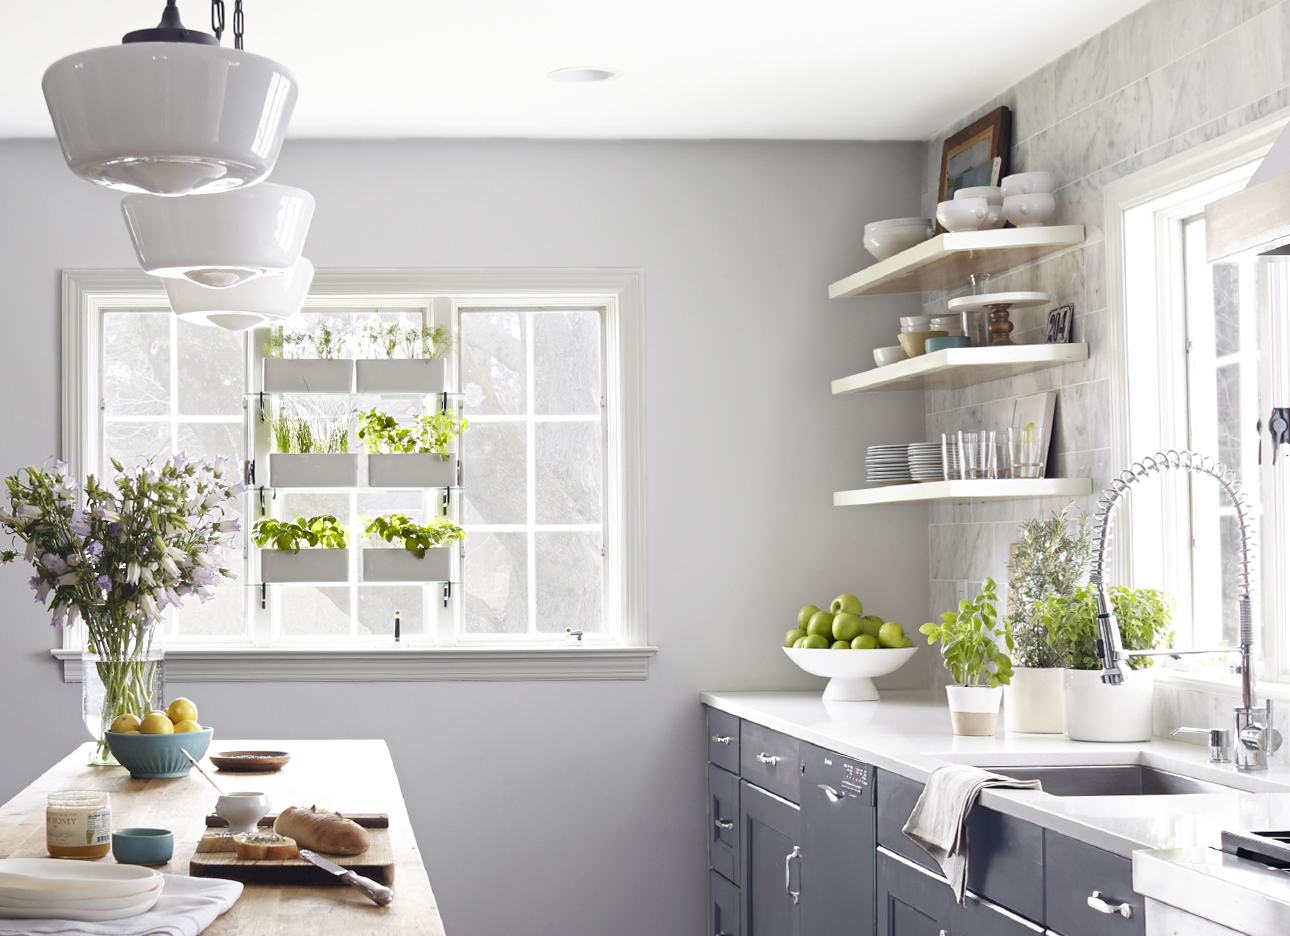
010_overall1_004b_herb
If you’re anything like my husband and me, you are already booking up your weekend with projects and perhaps even picking up some materials on your way home from work. Here’s a quick and easy DIY for your kitchen that will give you lots of satisfaction and good bang for buck.

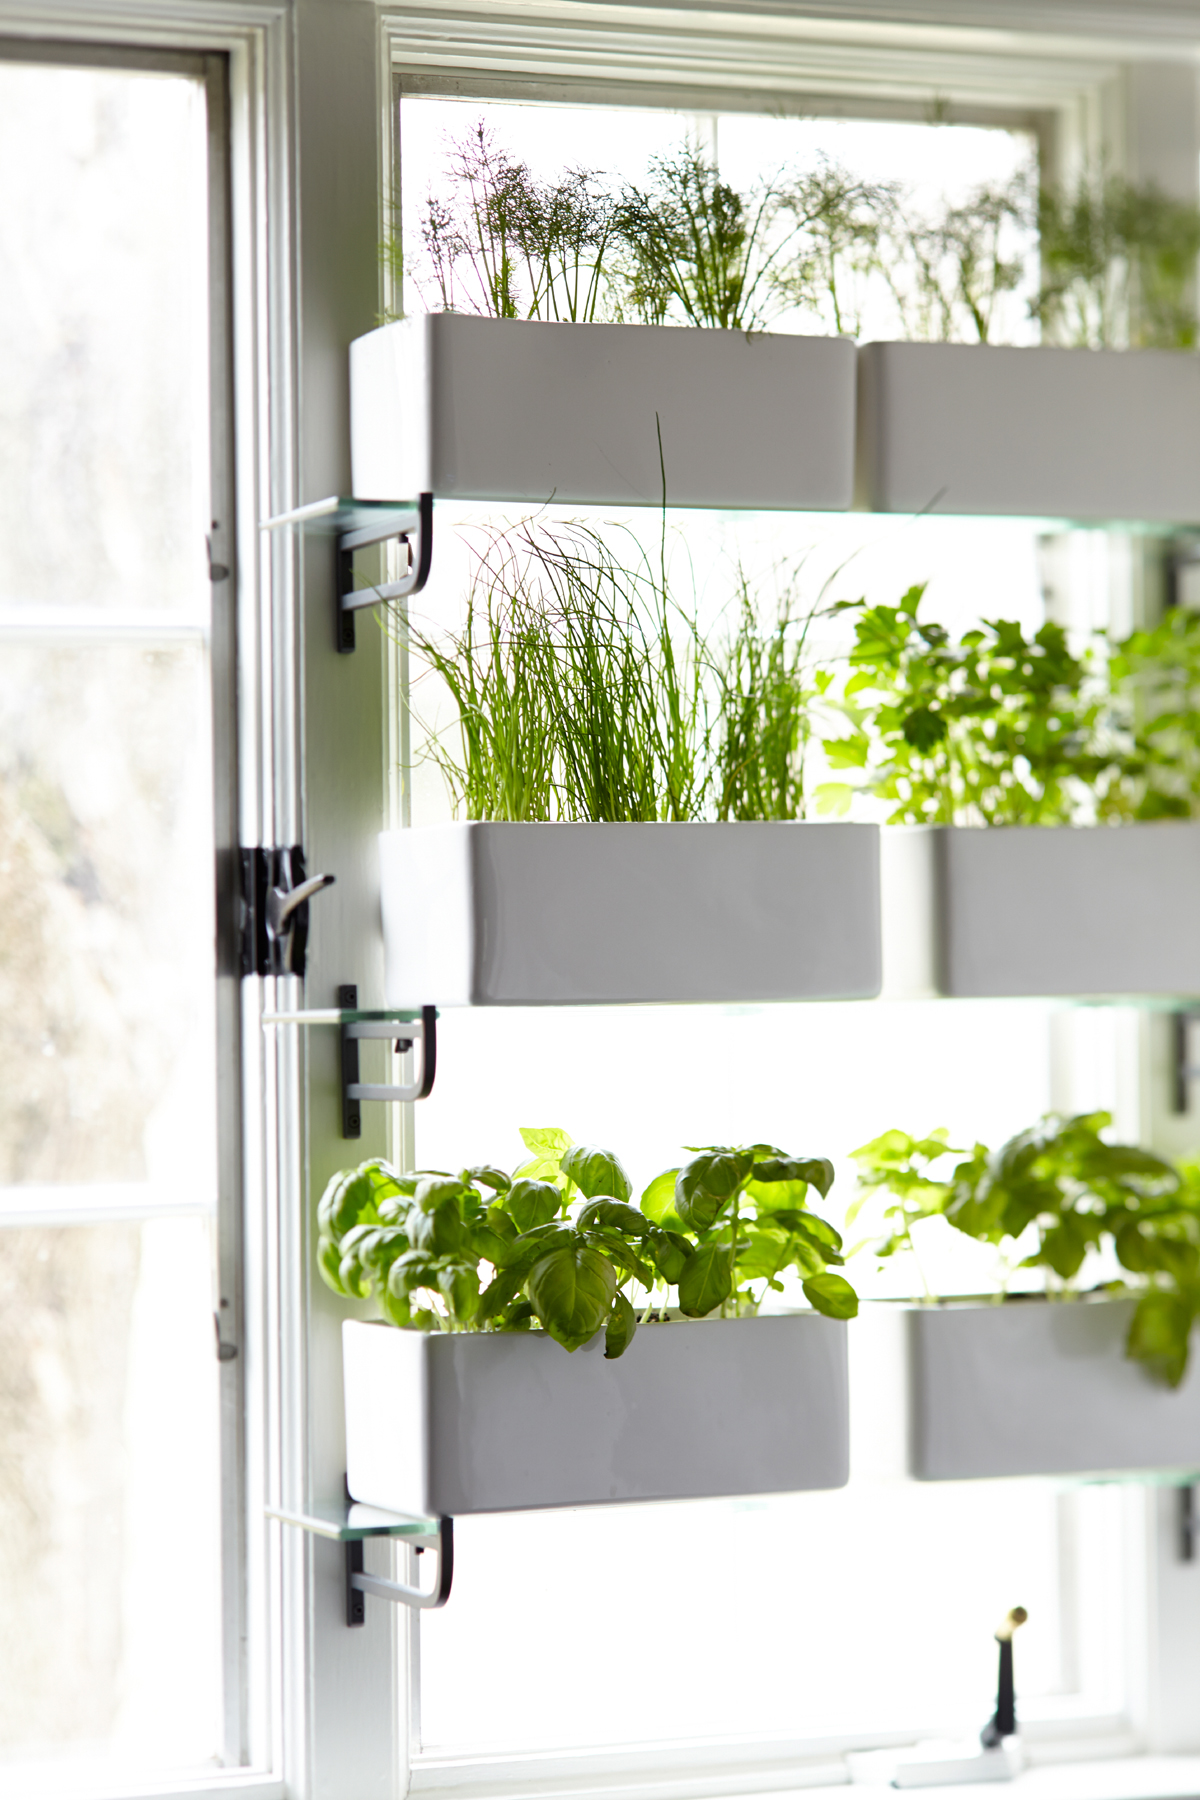
We wanted fresh herbs on hand for all our cooking but don’t like the look of an over-crowded window sill nor did we want to install one of those greenhouse windows because—while luscious from the inside—they look completely tragic from the outside. So I came up with this simple solution—glass bathroom shelves with rectangular planters—and my husband sourced the below materials for a chic, minimalist, and bountiful kitchen herb garden.

Would be a wonderful way to bring greenery (and a little privacy) to a bath or bedroom window as well…they don’t need to be herbs!
Have a wonderful weekend and happy projecting!

Photography by Laura Moss
Glass shelves are 23 5/8″ wide HJÄLMAREN from IKEA and were $18/ea.
The 10x4x5″ ceramic containers we used were similar to this one, $7/ea.

006_herbplanter1_004

Guest Bath Makeover

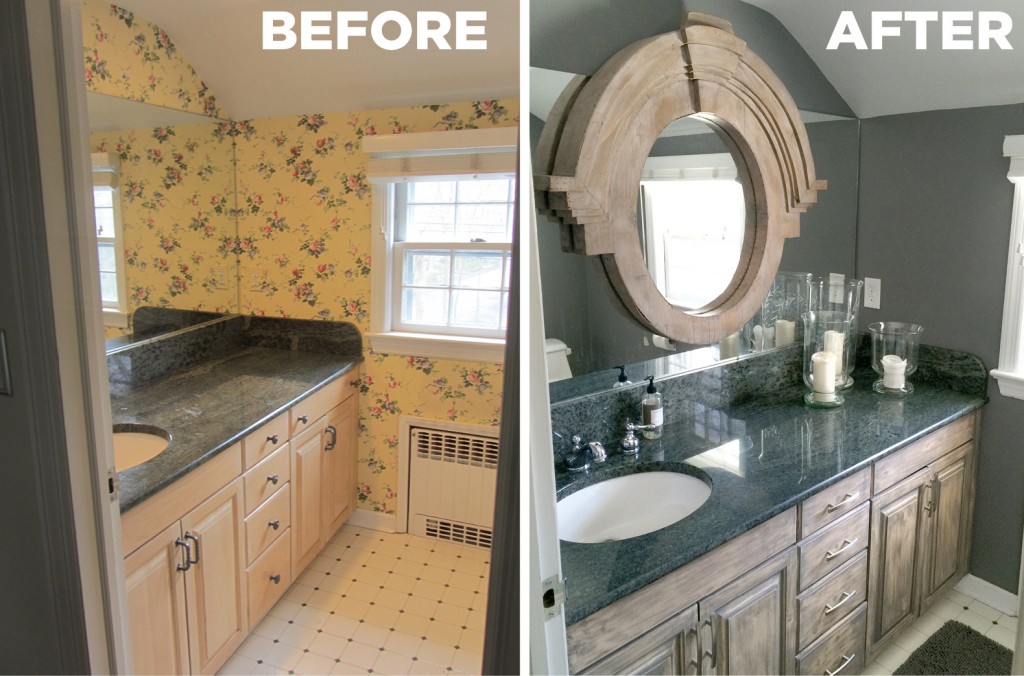
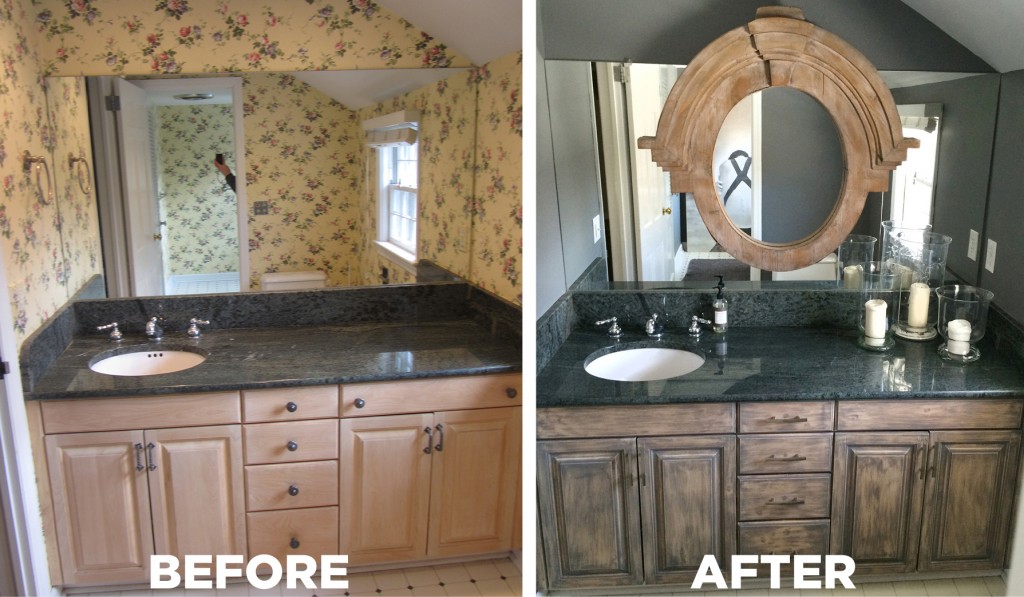
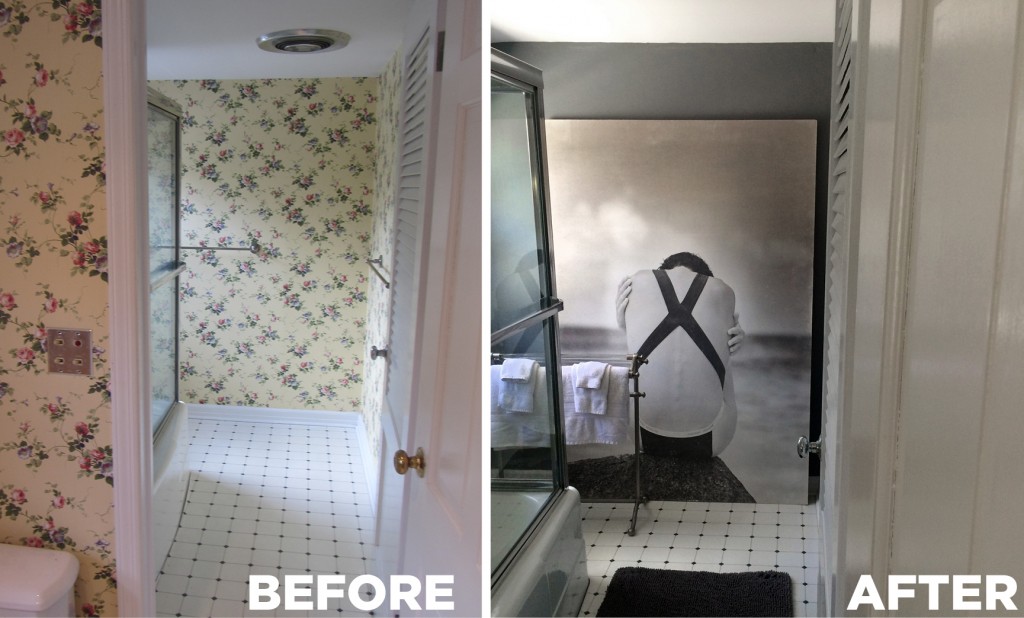
BeforeAfterBathroom2
Here’s a good weekend project for you to tackle on this Saturday morning:
Breathe new life into that awful bathroom you have been aching to change.
Because I used a few items I already had, I only spent $150 to transform my guest bath in one weekend.

Here were my steps for the Guest Bath Transformation:
1. I removed wallpaper (Supplies: $30)
2. patched, primed, painted walls (I chose a cool grey so it would look nice with the existing green stone countertop. Paint: $50)
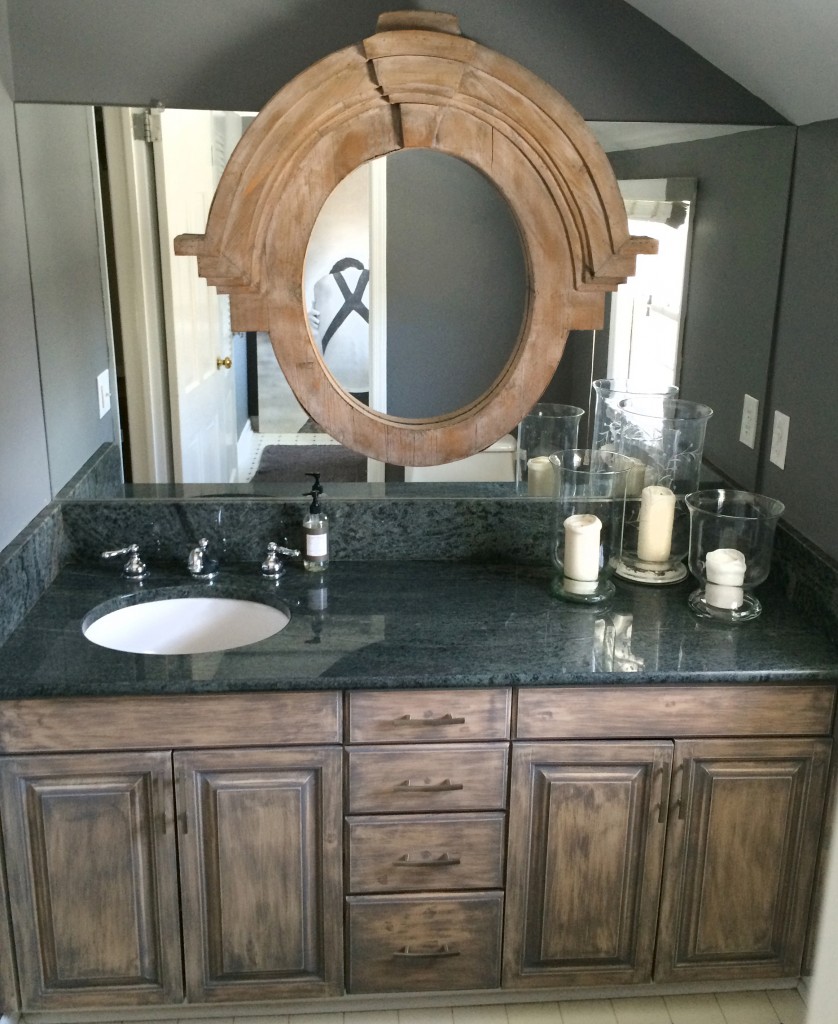
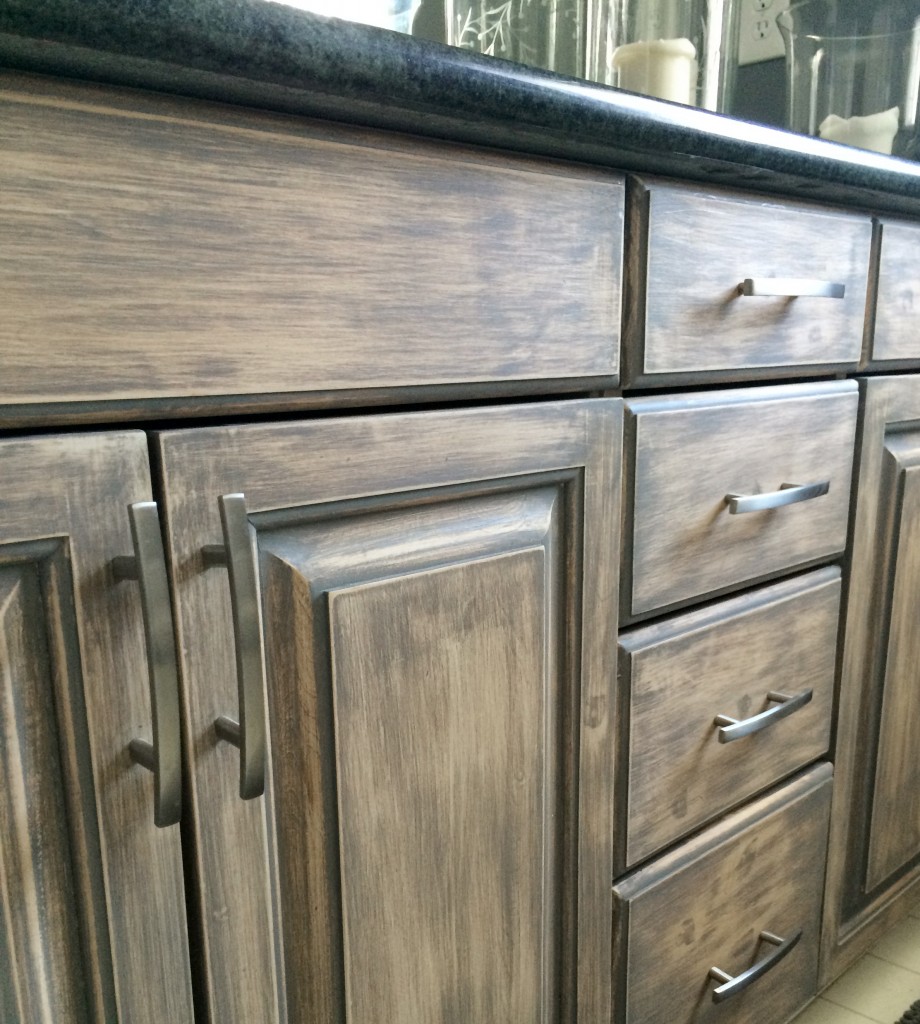
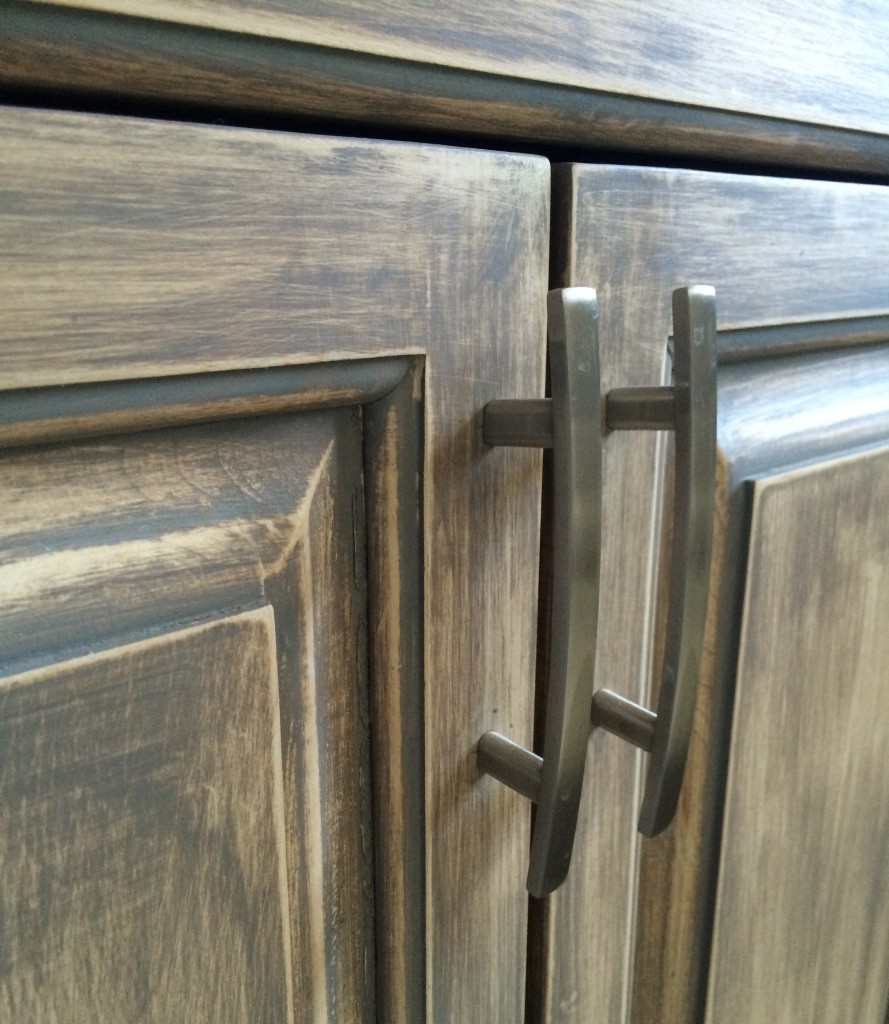
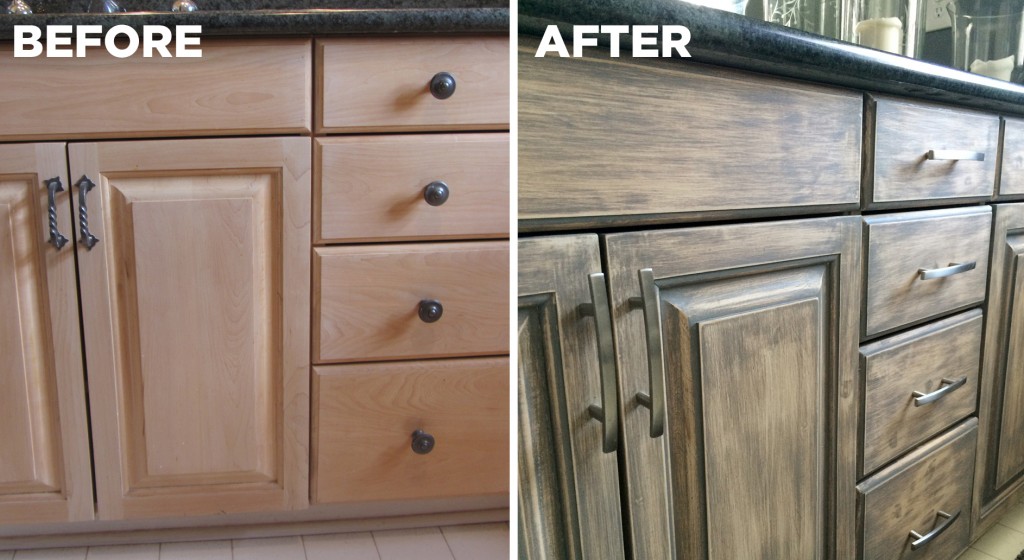
3. cabinetry: removed hardware, filled holes, and sanded the cabinets lightly all over
4. rubbed the cabinets with the wall color on a rag & let it dry
5. sanded the cabinets to the desired amount of distressed
6. drilled holes for new hardware and installed (New hardware: $40)
7. got bath mats to mask the flooring that I didn’t replace (New bath mats: $30)
8. hung a reclaimed wood mirror (that used to hang on the porch of my last house) over the existing mirror (you could do this with just a frame as well. Restoration Hardware Mirror: $$)
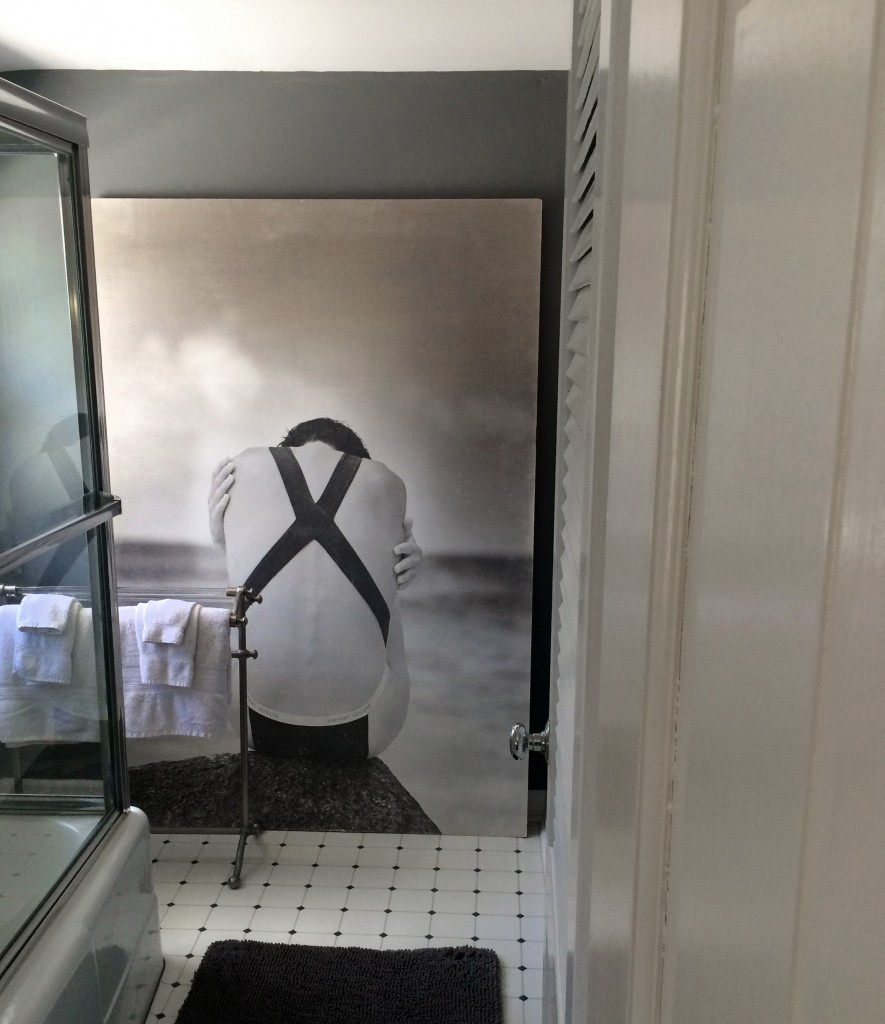
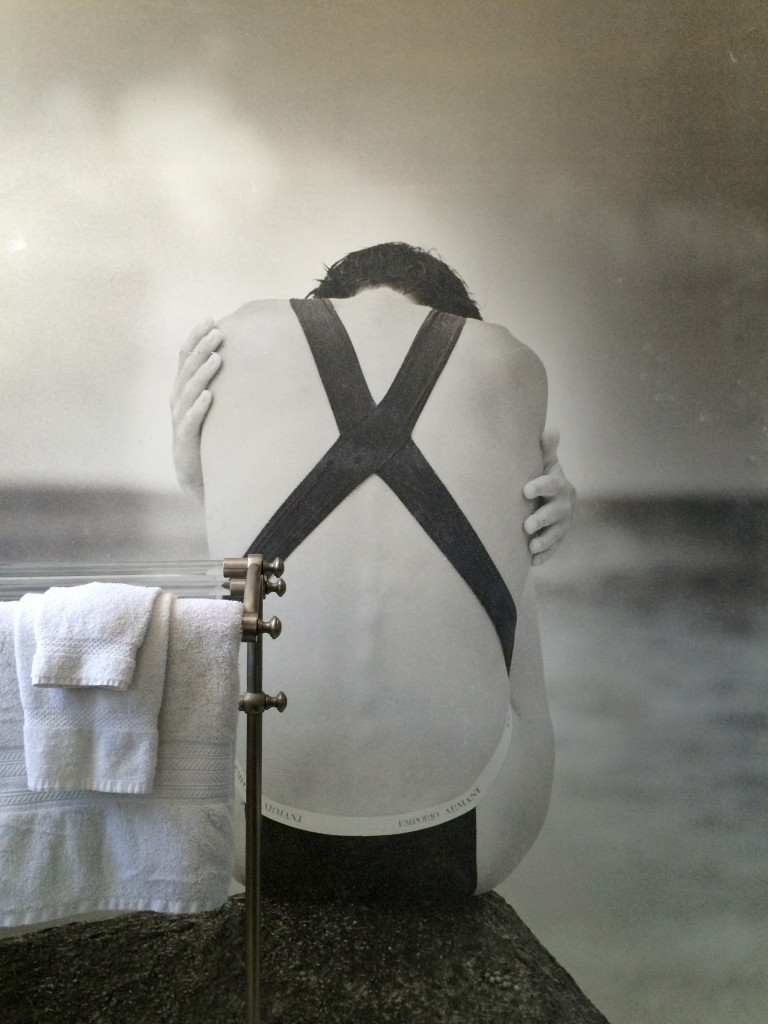
9. leaned an oversized photograph at the far end of the bath for drama (Garage sale from artist $20)
10. used a freestanding towel rack I already had for a little old world charm (Waterworks Towel Rack $$)

_Photo Apr 16, 3 08 46 PM

_Photo Apr 16, 3 00 23 PM_Photo Apr 16, 3 03 01 PM _Photo Apr 16, 2 59 30 PM_Photo Apr 16, 2 59 53 PMBeforeAfterBathroom4BeforeAfterBathroom3BeforeAfterBathroom

You had me at Butler’s Pantry…

Photography by Laura Moss
Styling by Meredith McBride Kipp 

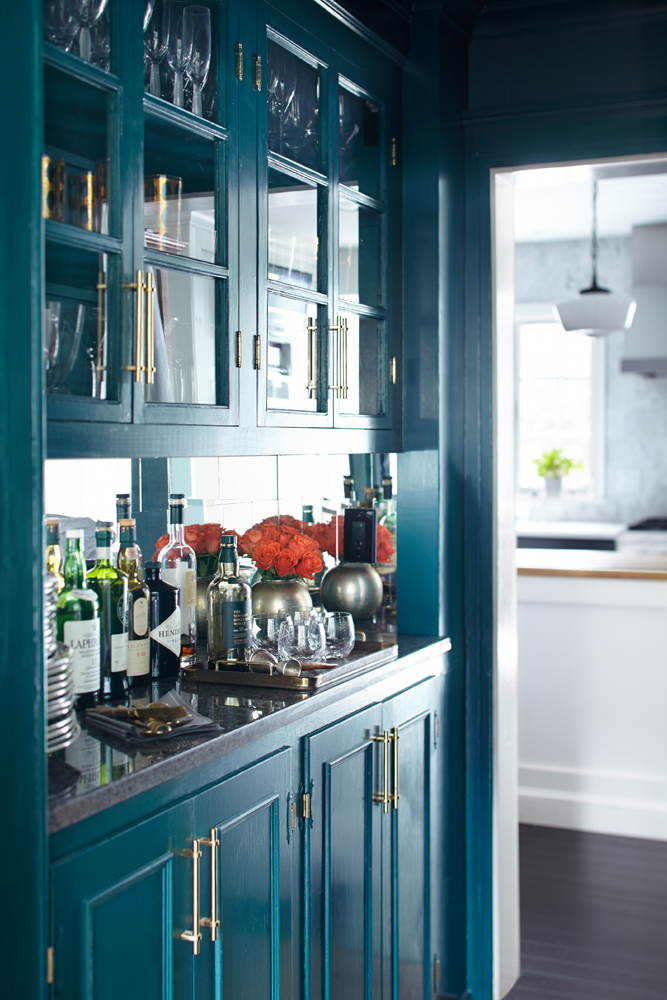
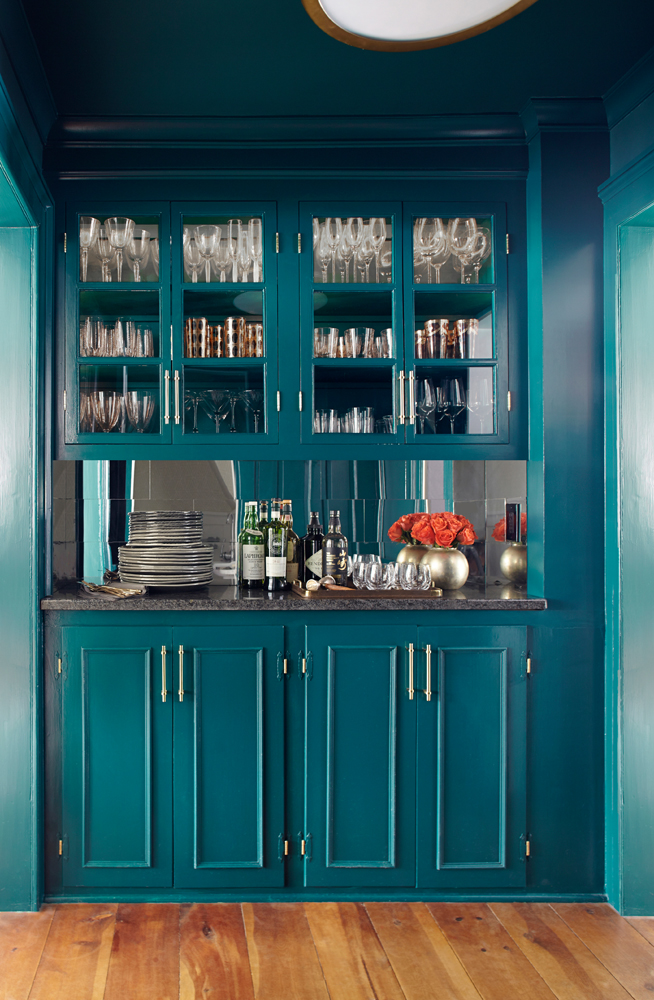
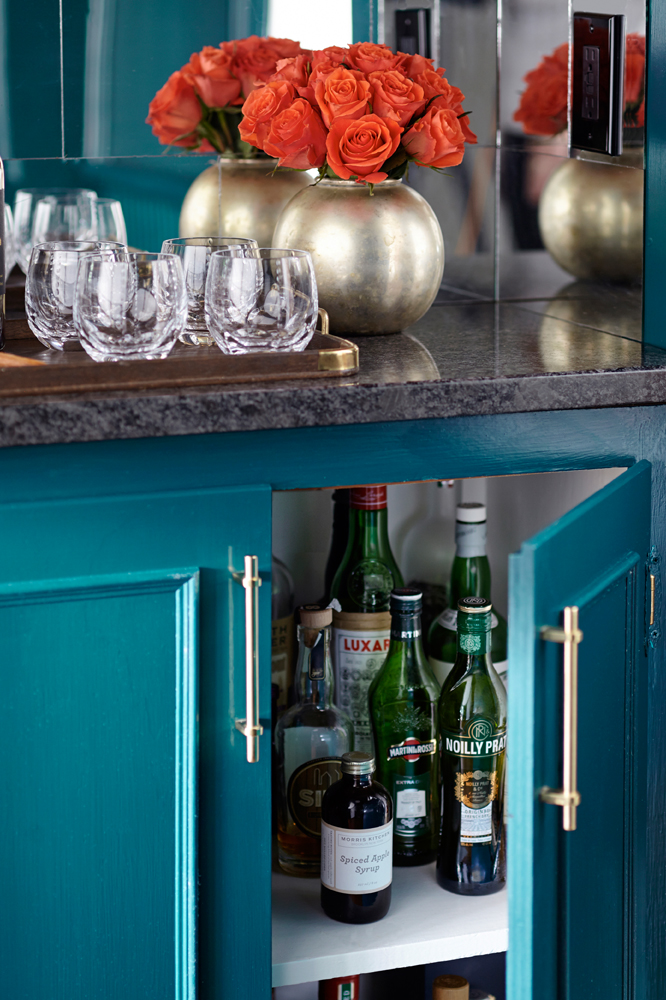
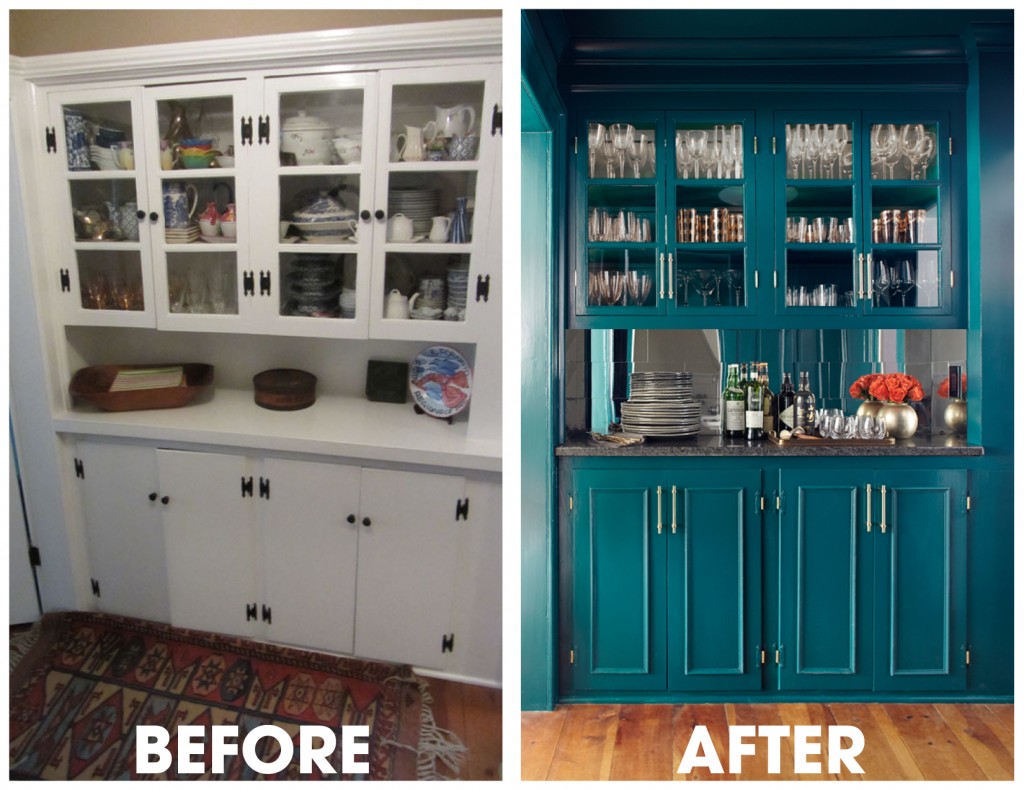
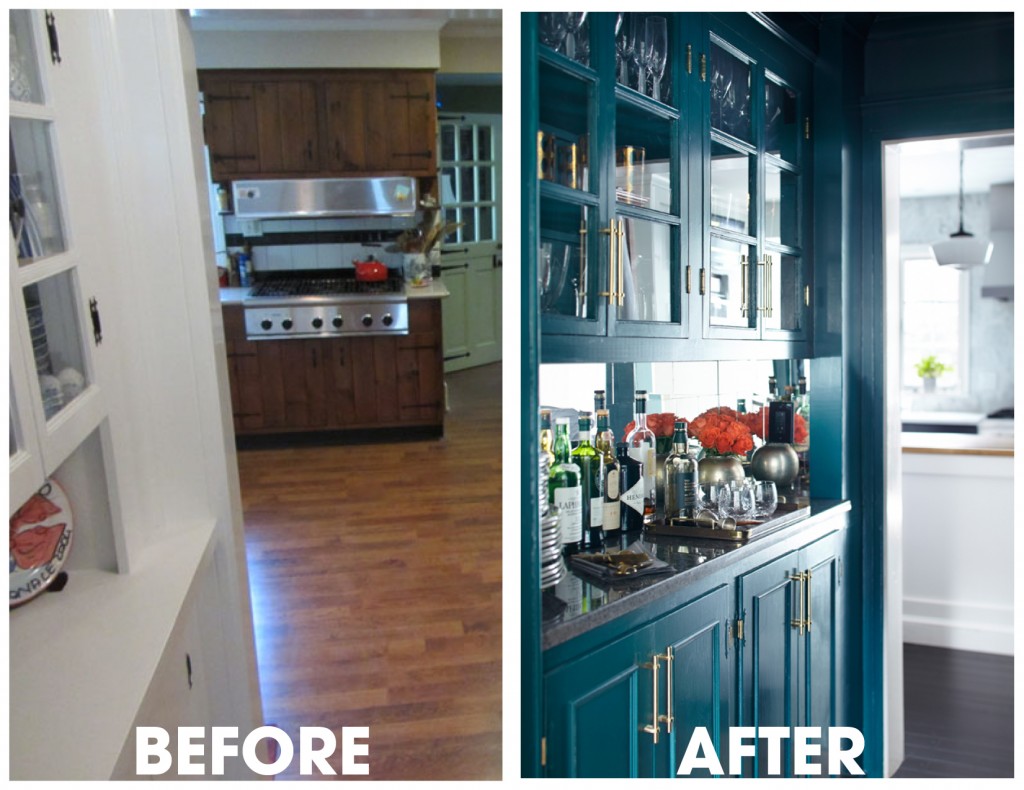
When touring old homes (and new), a butler’s pantry is always the highlight for me. It was one of the selling features when my husband and I bought our 1805 farmhouse. Despite the charm of the home, the butler’s pantry lacked the proper character and polish. We believe it was added in the 1950’s, and was in need of a major facelift. First off, the upper cabinets needed to be moved up nearly a foot in order to actually accommodate the height of a bottle.

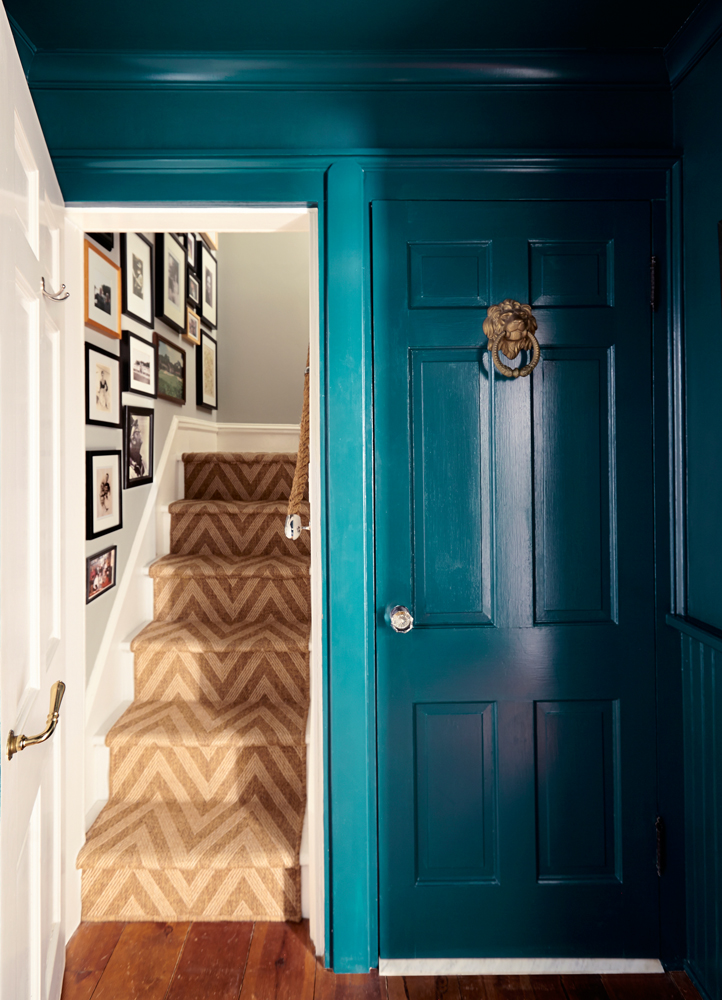
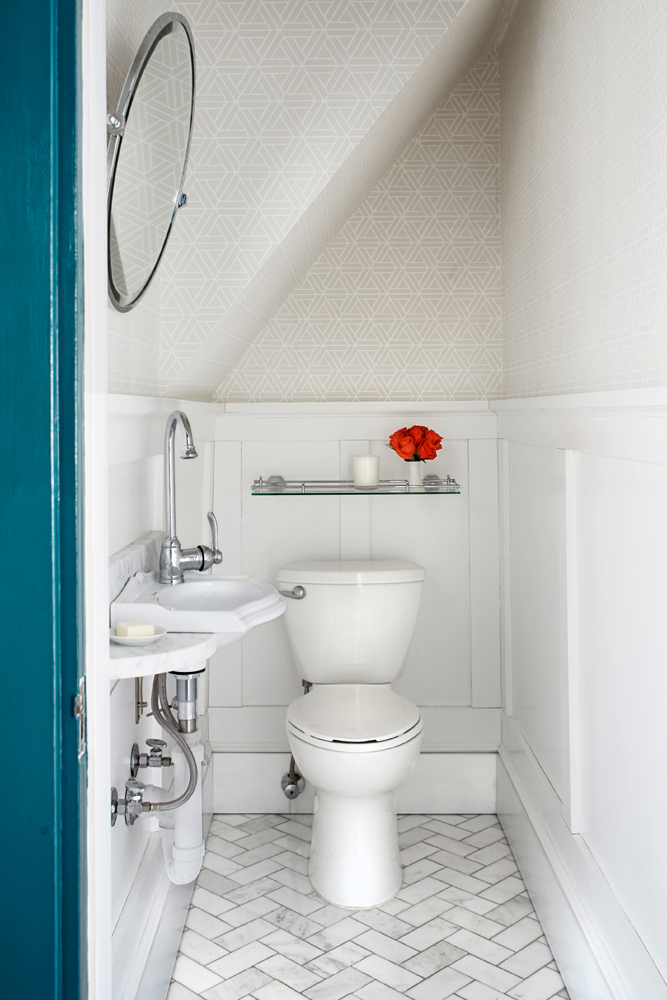
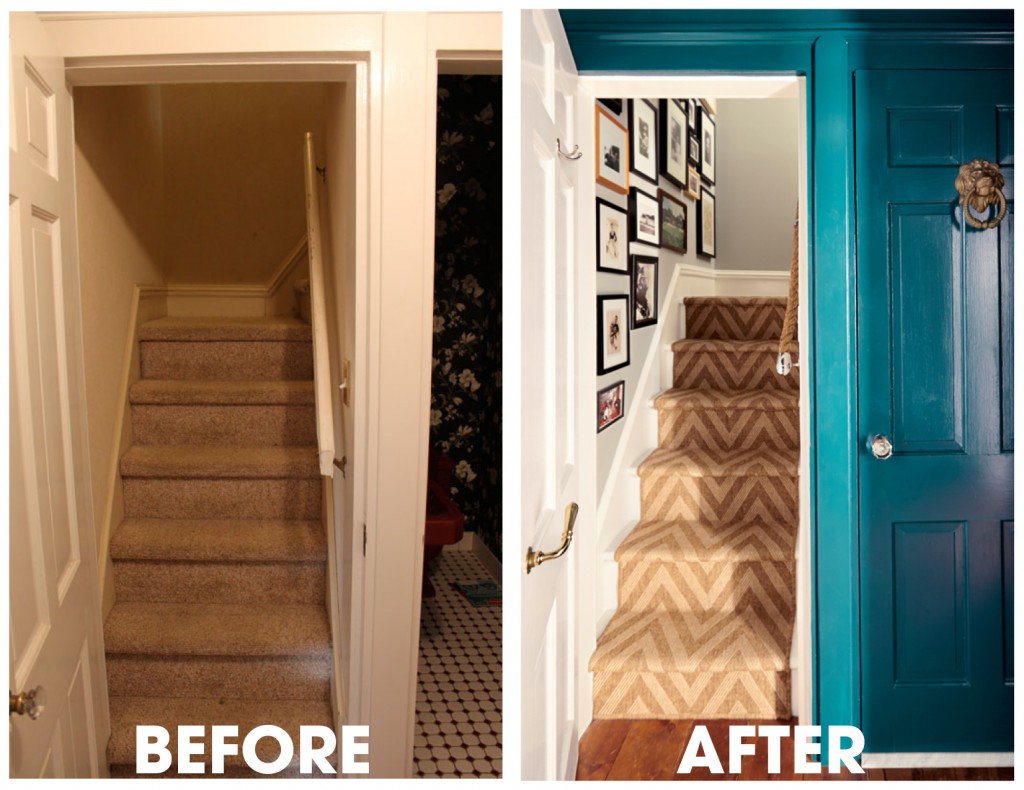
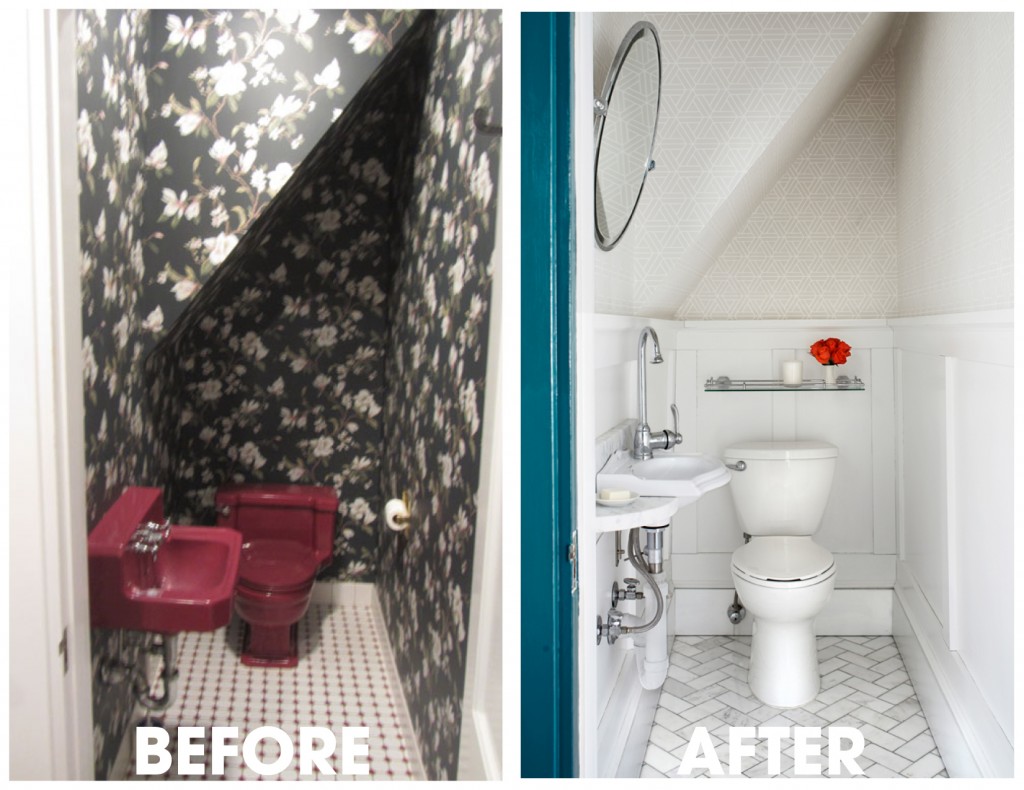
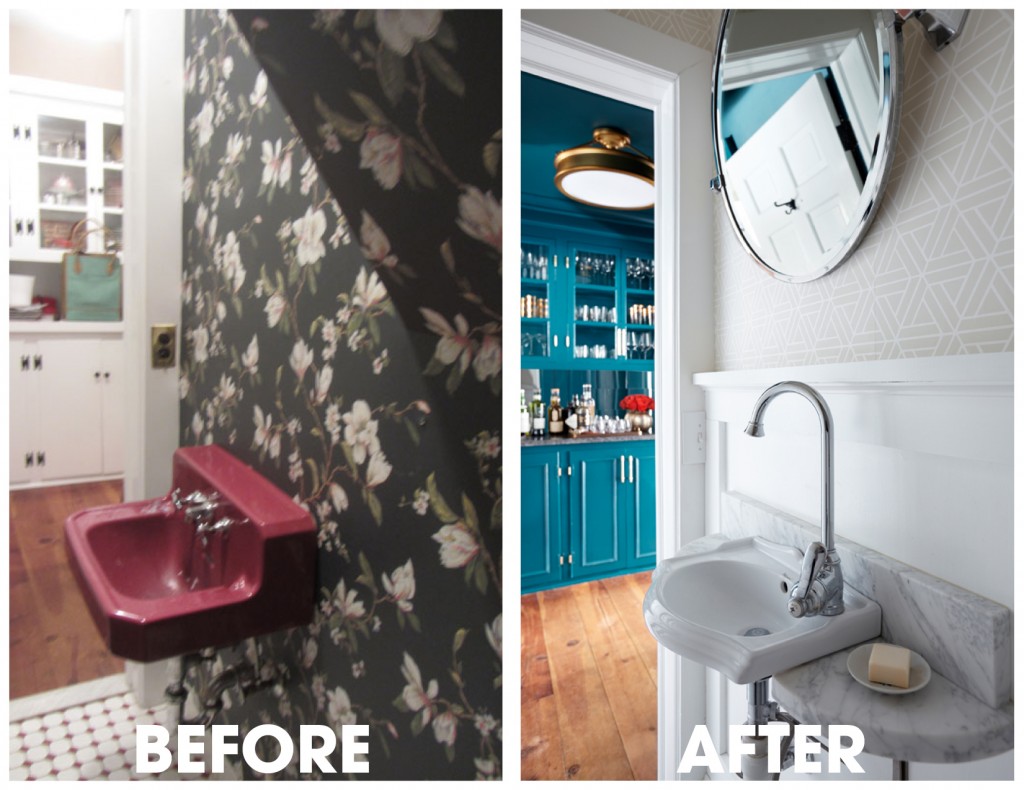
My husband tackled this project with full steam last year while I worked on our soon-to-arrive baby’s nursery upstairs (I will post that decor story soon). Our thought was that ‘if we’re going to have a child, we’re probably going to need a proper place to mix a cocktail.’ (SEE OLD FASHIONED RECIPE BELOW) So we bumped the project to the top of the list. With that he tackled the powder room and the back stairwell. SEE BEFORES AND AFTERS BELOW

Steps for transforming the BUTLER’S PANTRY:
Removed the overhead soffit and upper cabinets
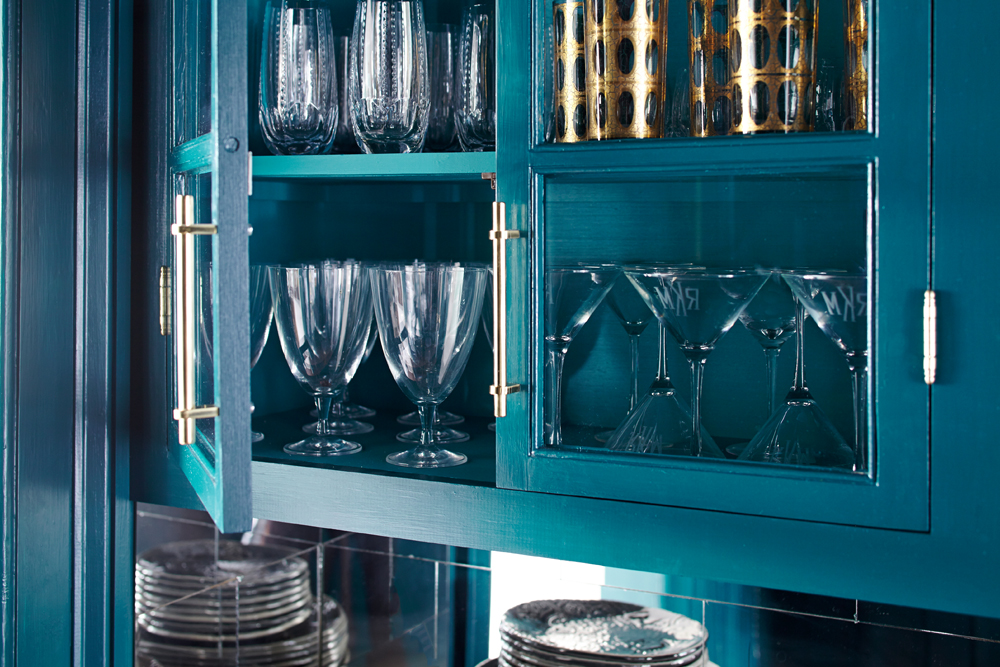
Rebuilt the upper cabinets using only the existing doors (which we think are original from the home’s first kitchen)
Trimmed out the lower cabinet doors
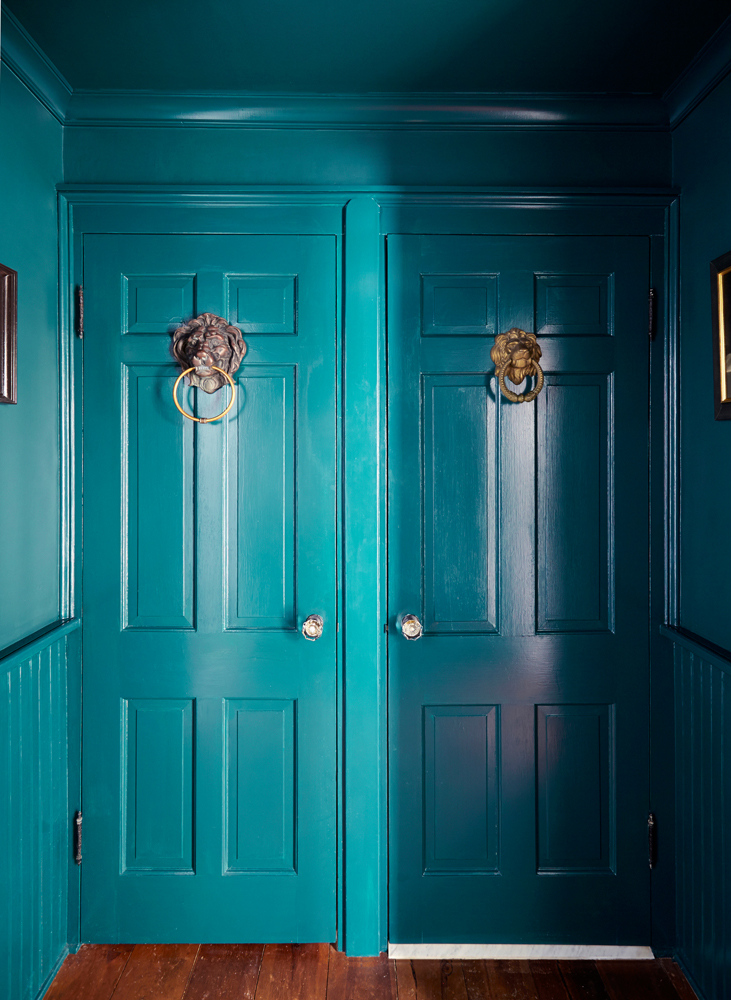
Painted the whole room a delicious prohibition-era-inspired dark teal
Replaced the painted wood counter with black granite
Tiled the backsplash with 6″x12″ (subway style) hand-cut mirror tiles
Installed art spotlights, under-cabinet lighting, interior-cabinet lighting, and electrical outlets
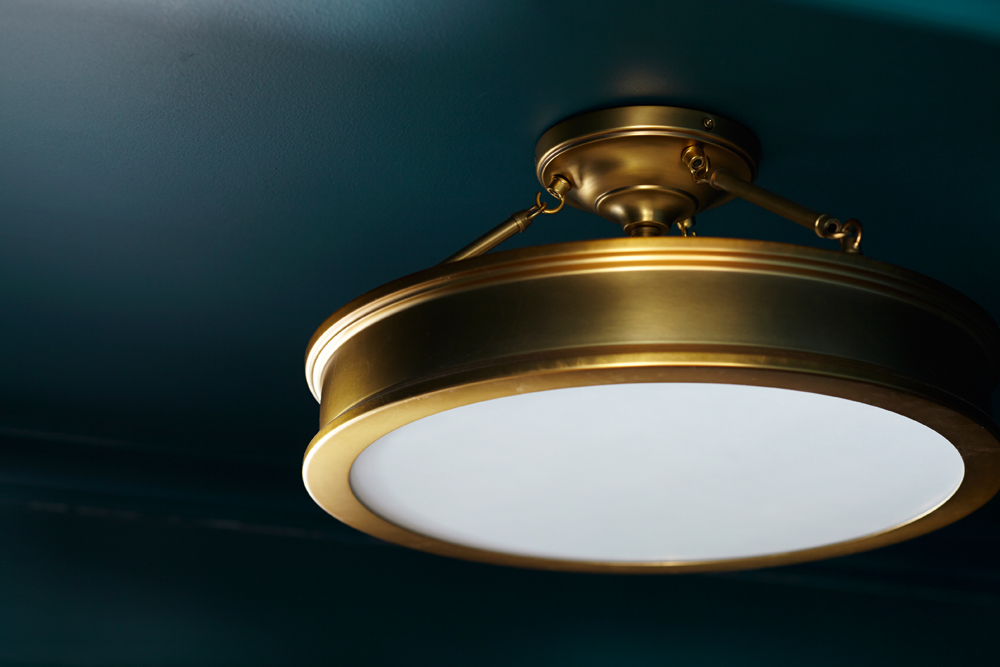
Hung a beautiful oversized, overhead, brass light fixture
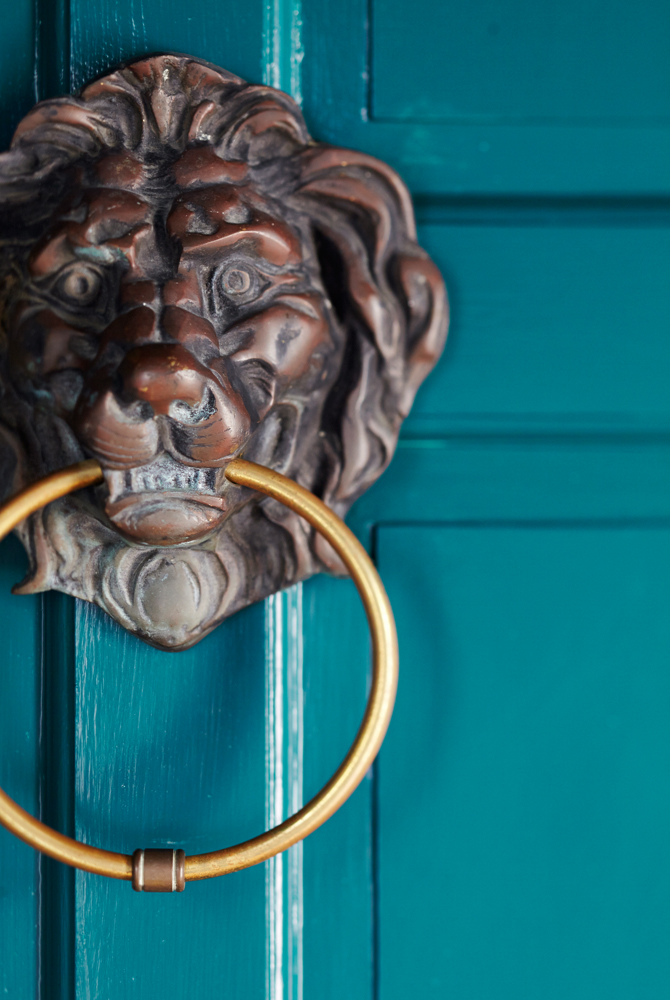
Hung lion-head door knockers for a bit of (Bowie’s) Labyrinth whimsy
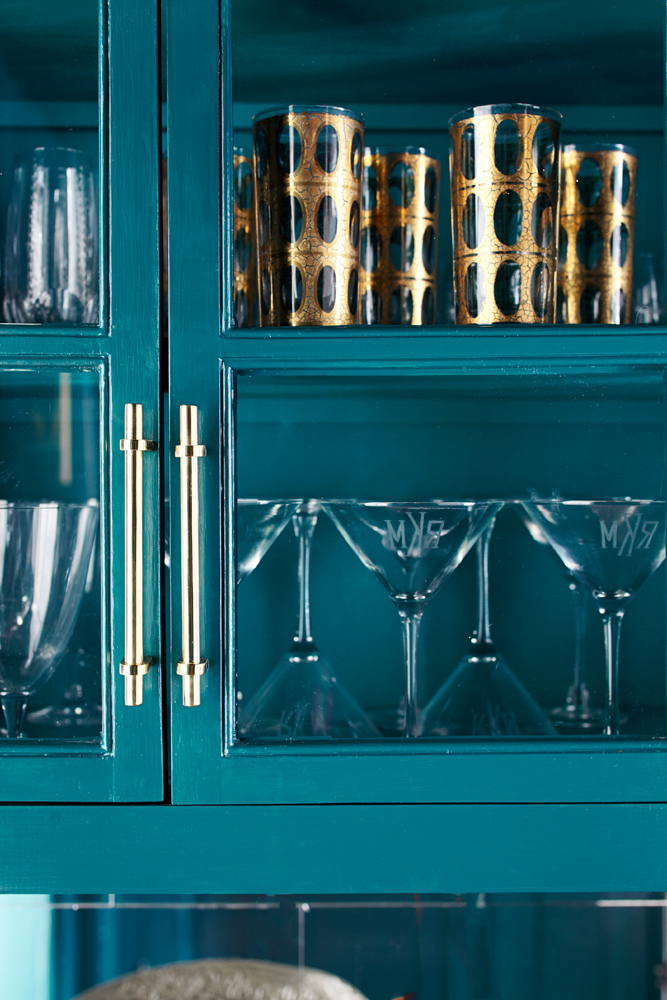
Installed sleek brass hardware

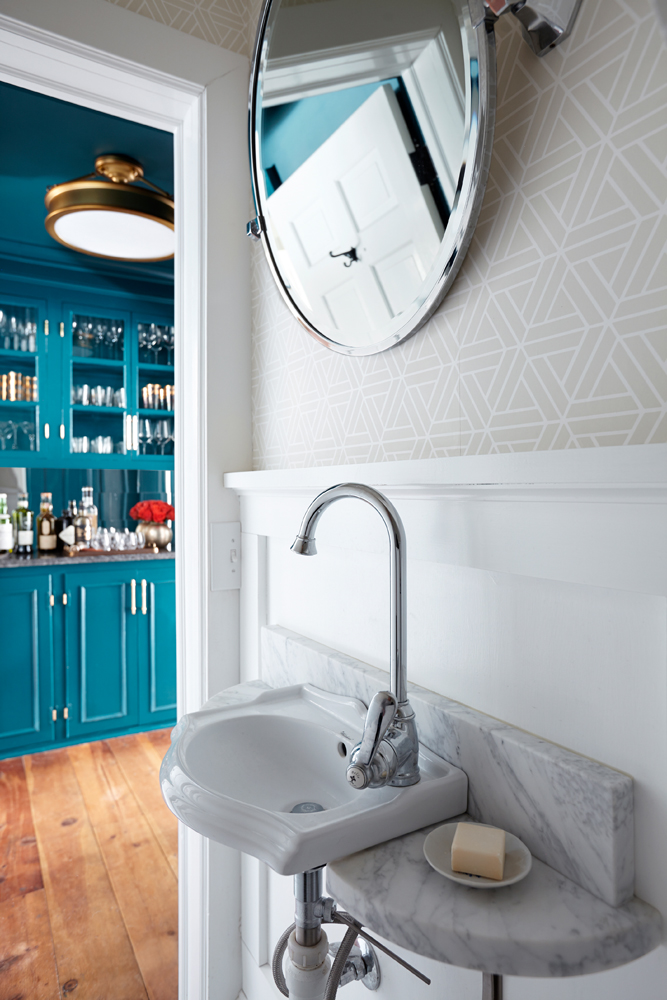
Steps for transforming the POWDER ROOM:
Removed toilet, sink and tile floor
Removed wallpaper and light fixture
Installed paneling on walls and repaired, primed and painted walls and trim
wallpapered above paneling
installed Julisk light
installed new miniature sink with custom-designed marble backsplash and counter
Steps for transforming the BACK STAIRWELL:
Stripped the carpet & wallpaper
Caulked and repaired walls, trim and floors
Primed and painted walls, ceiling and stairs
Cut and stapled floor runners to create continuous look
Framed and hung important historical family photos

BEFORES & AFTERS:

BUTLER’S PANTRY CLICKABLE RESOURCES:
Brass light fixture
Custom teal paint color: click to see image of scannable barcode for home depot BEHR color
Lion head door knockers are antique, but here are some similar ones 

POWDER ROOM CLICKABLE RESOURCES:
Juliska light fixture
Miniature porcelain sink
Marble sink surround and backsplash custom designed by Meredith, cut by Atlas Stone
Marble sink surround and backsplash installed with love by Sebastian Martorana
Rose vase by his talented wife, Amanda Martorana

BACK STAIRS RESOURCES:
Chevron stair runners


DIY Lamp Makeover

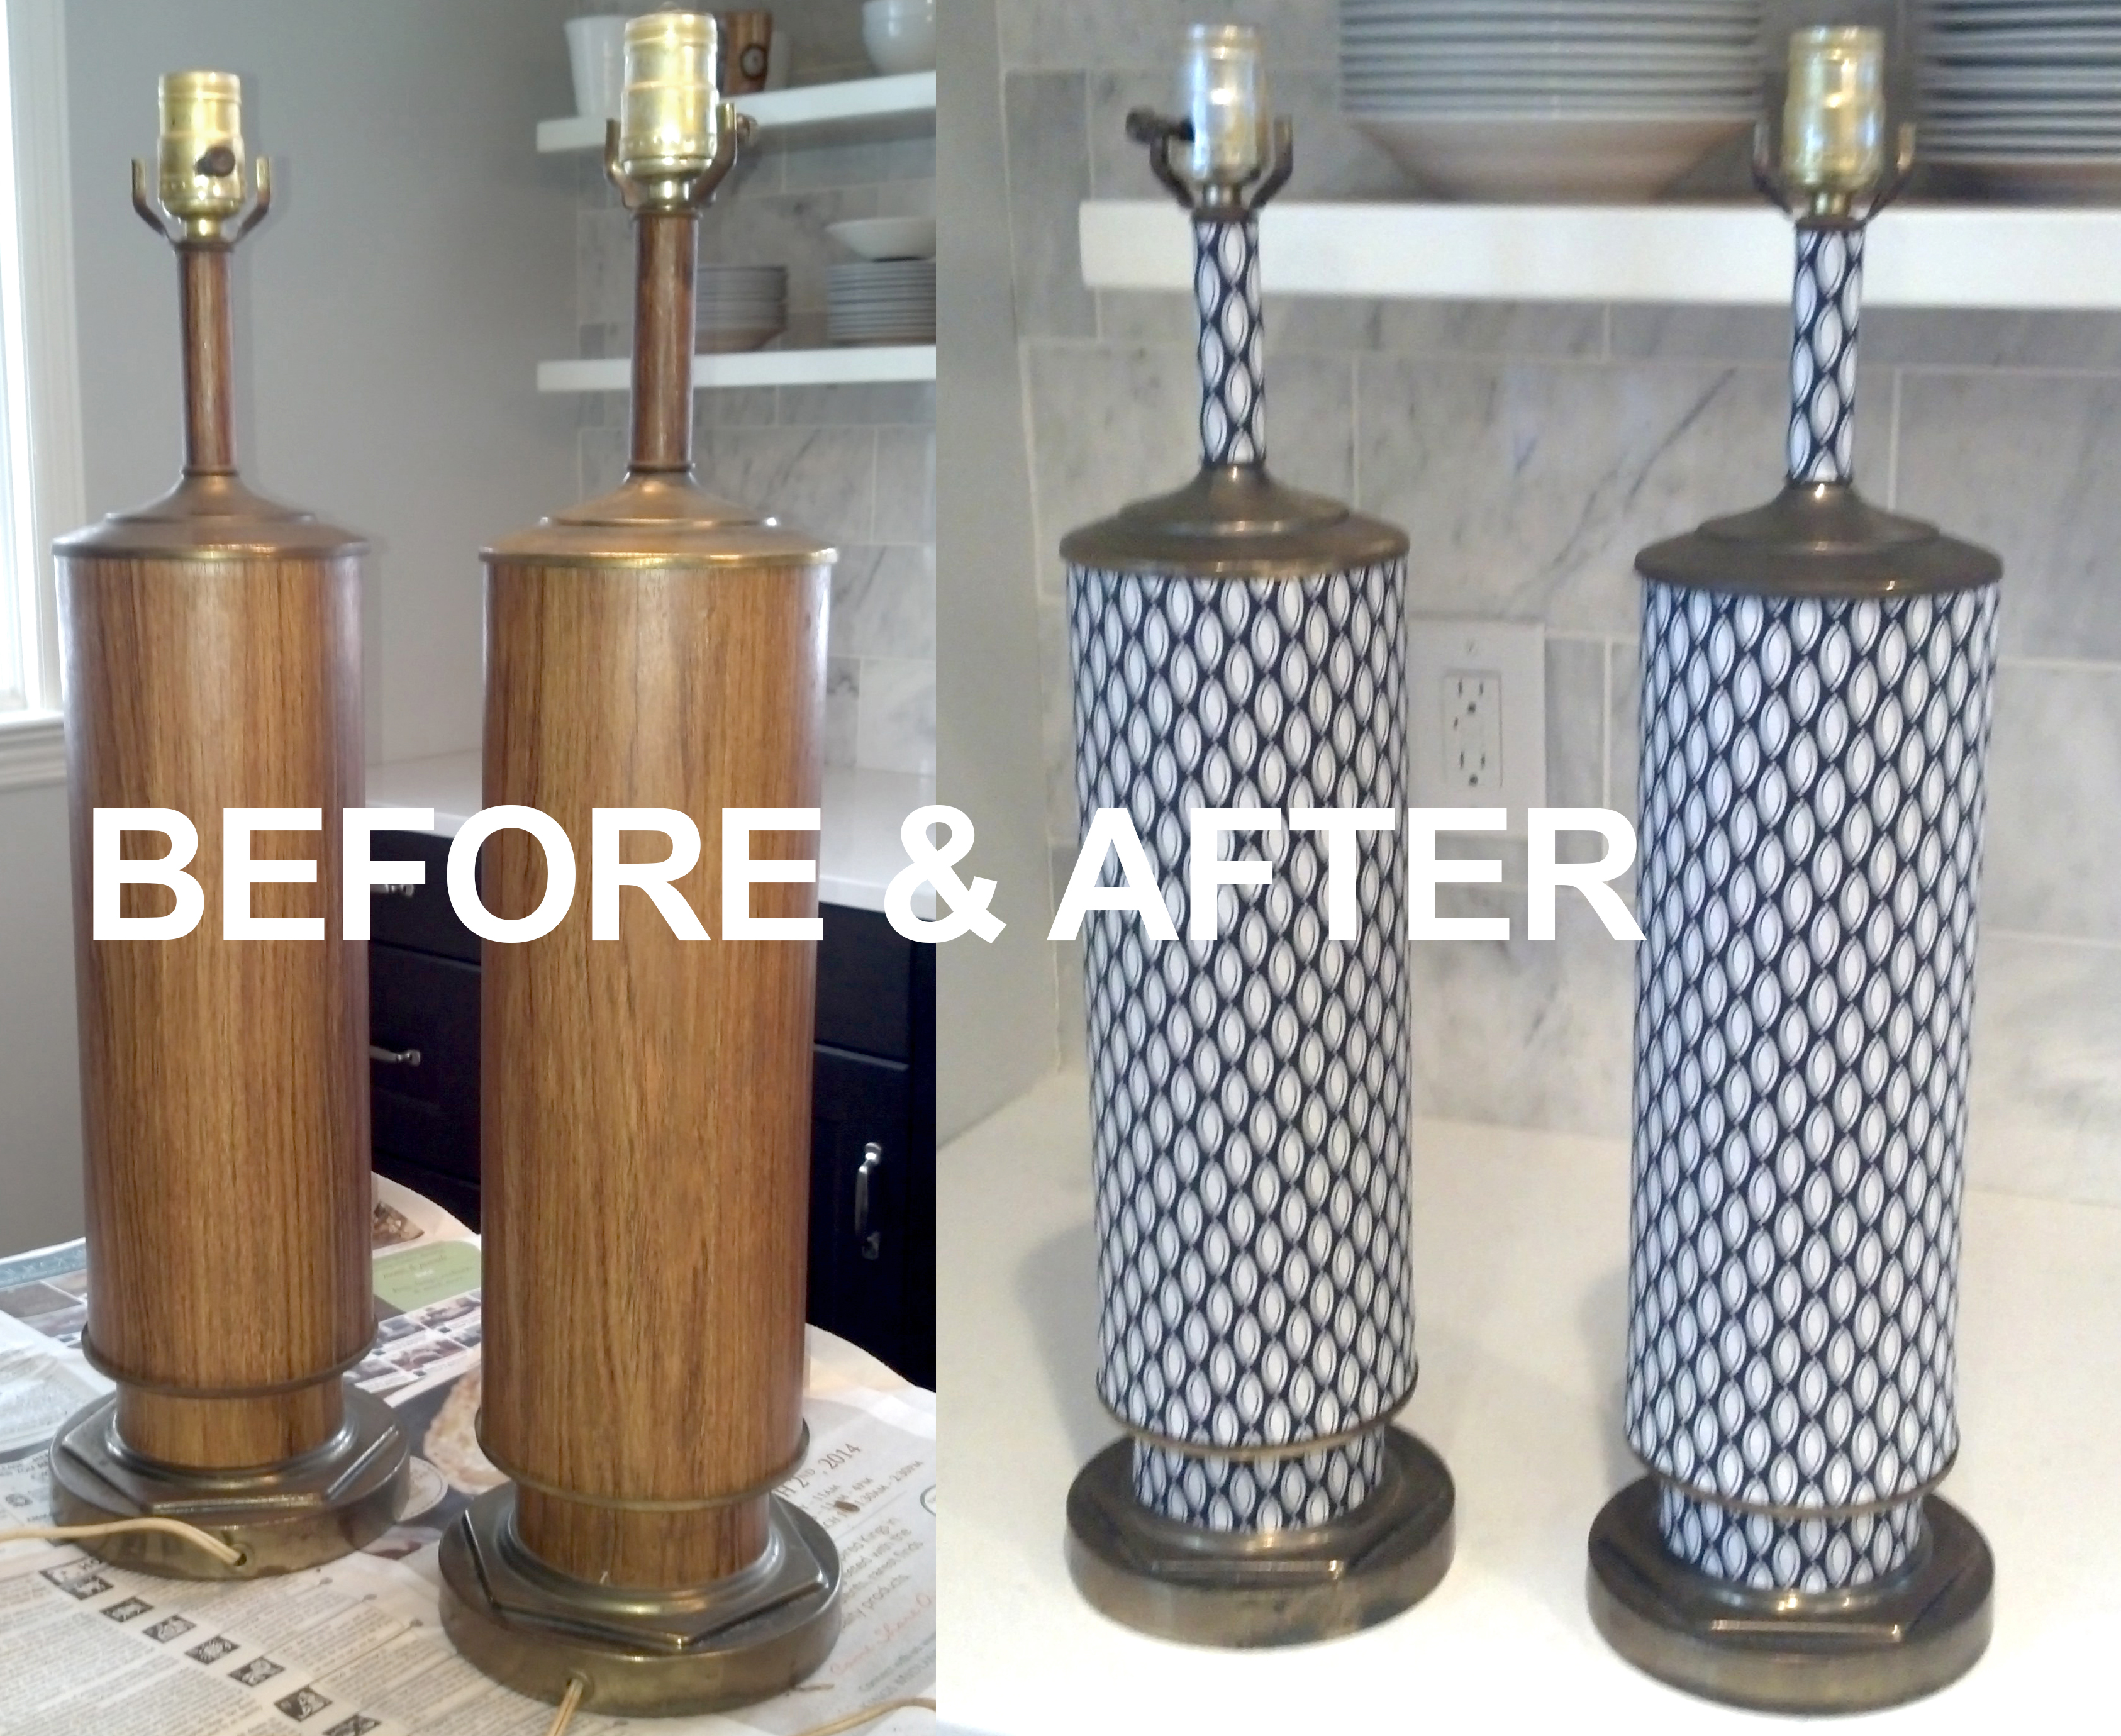
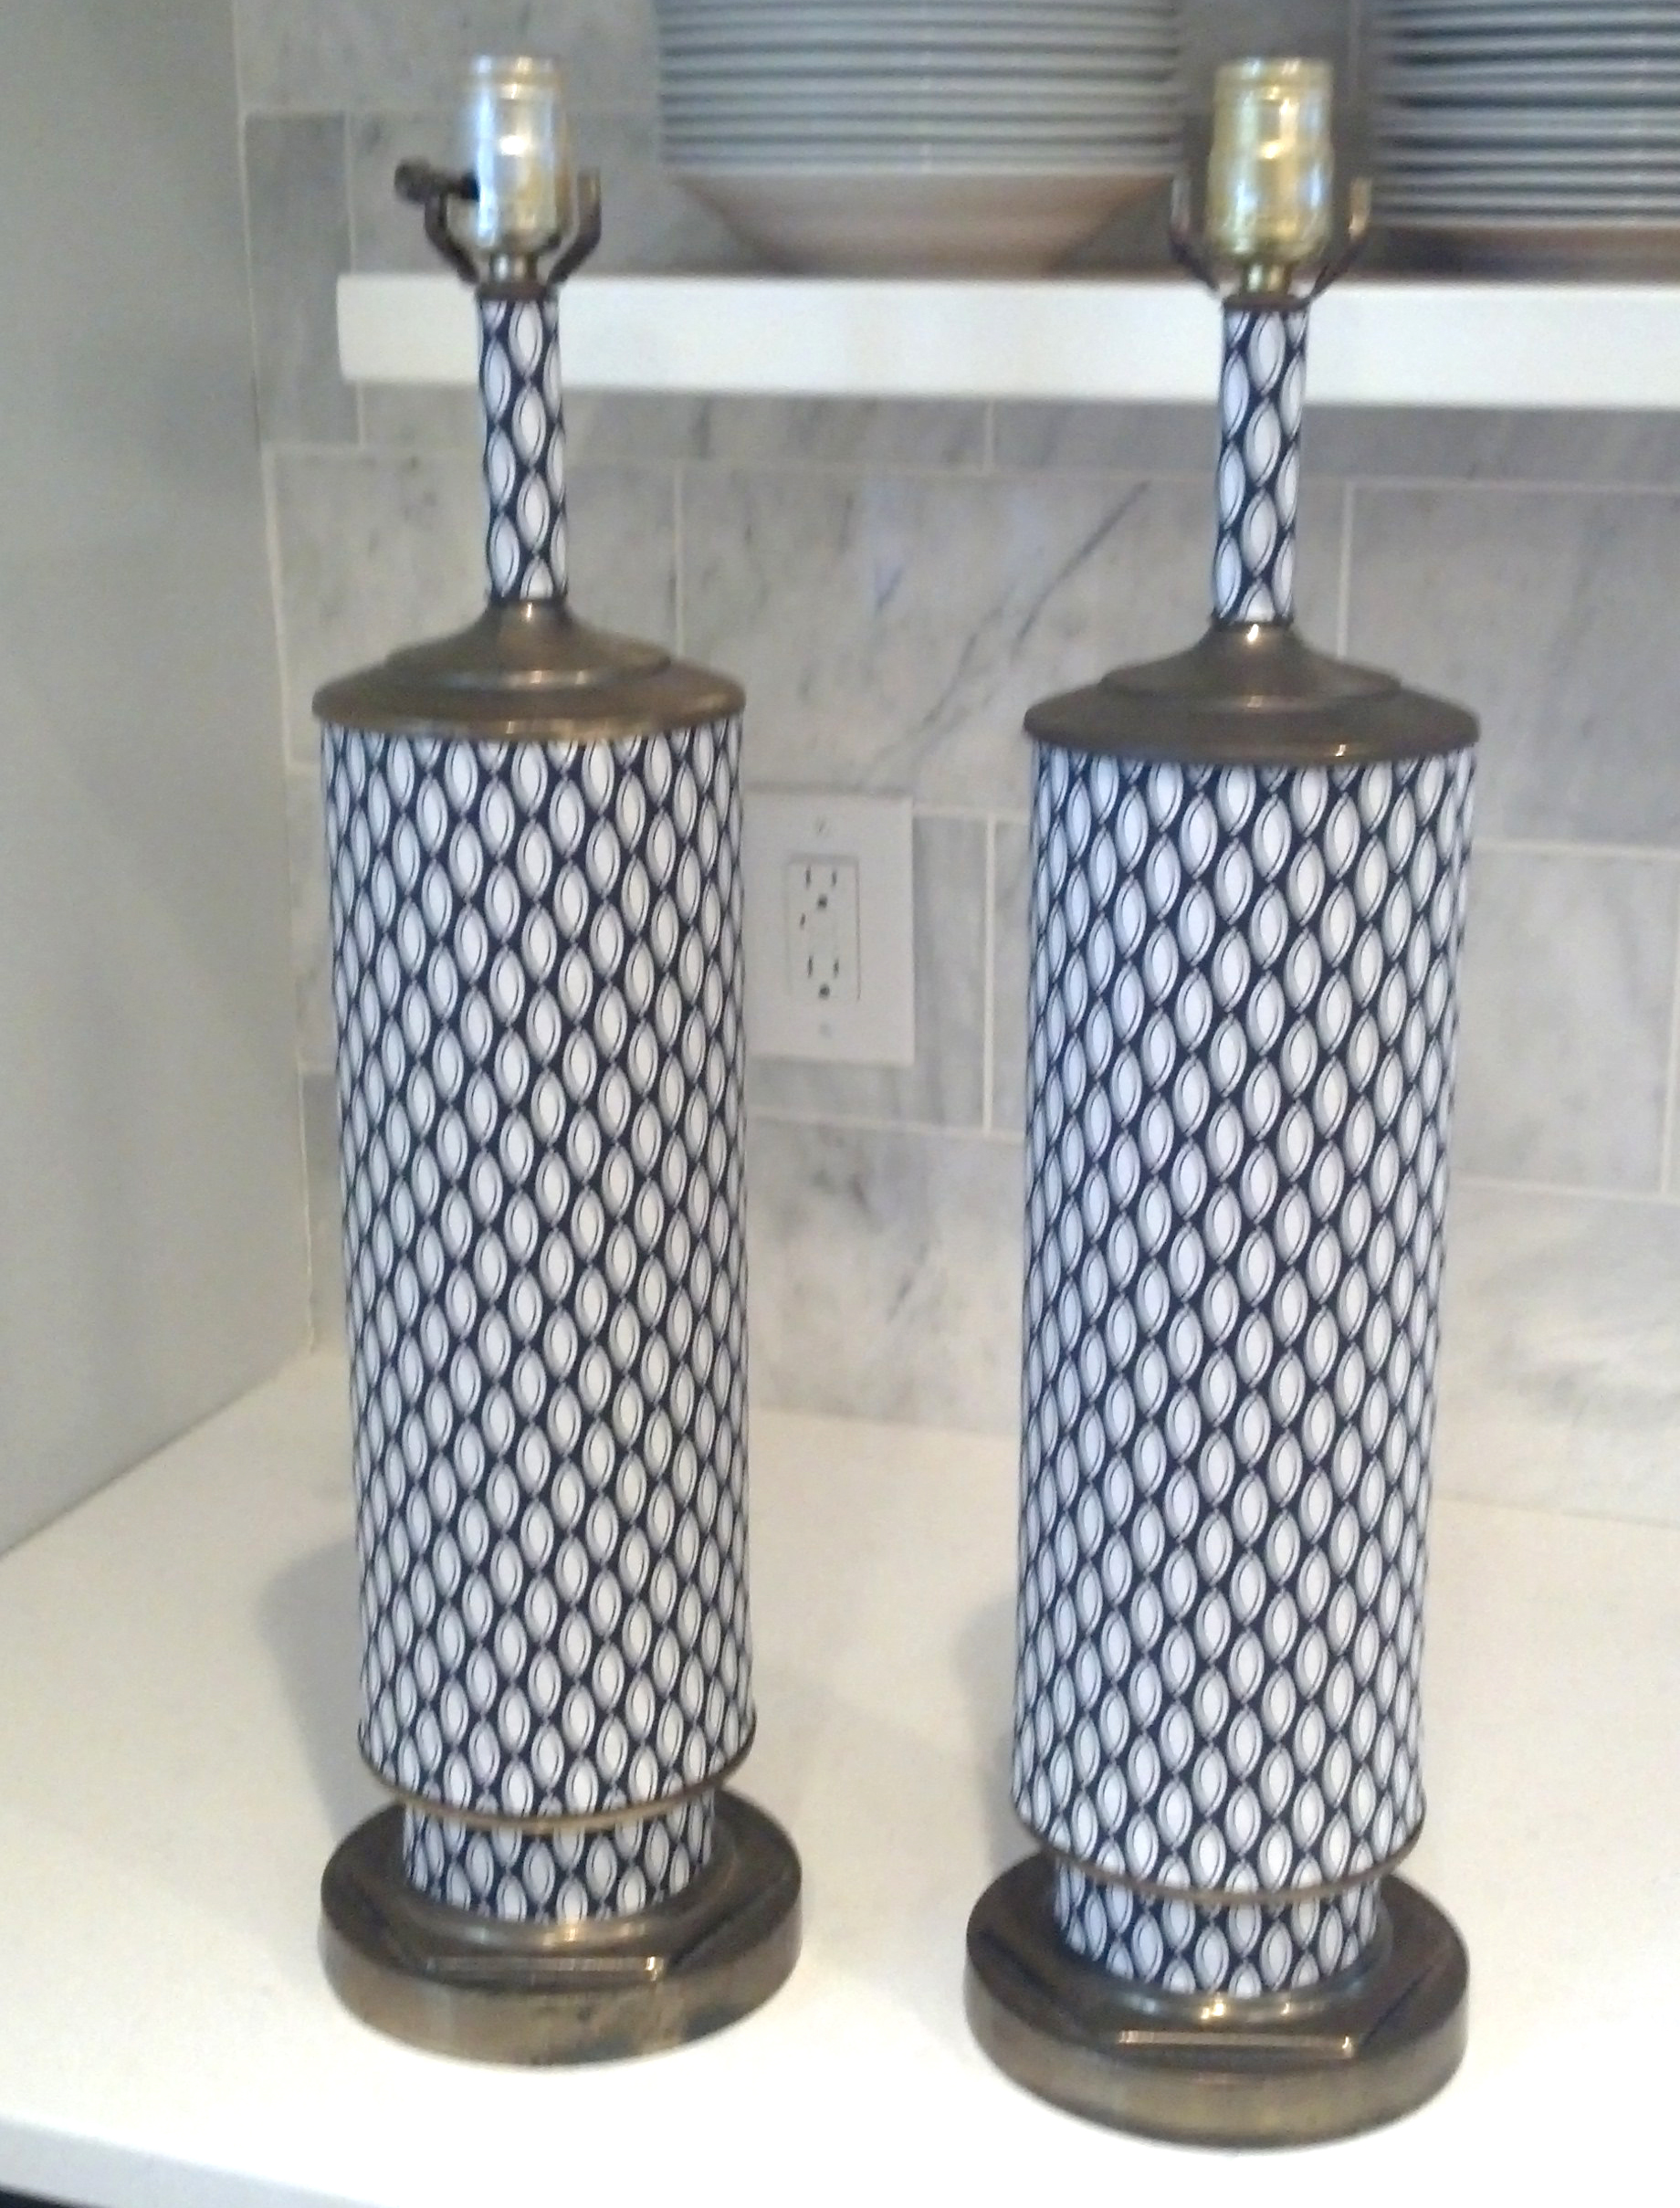
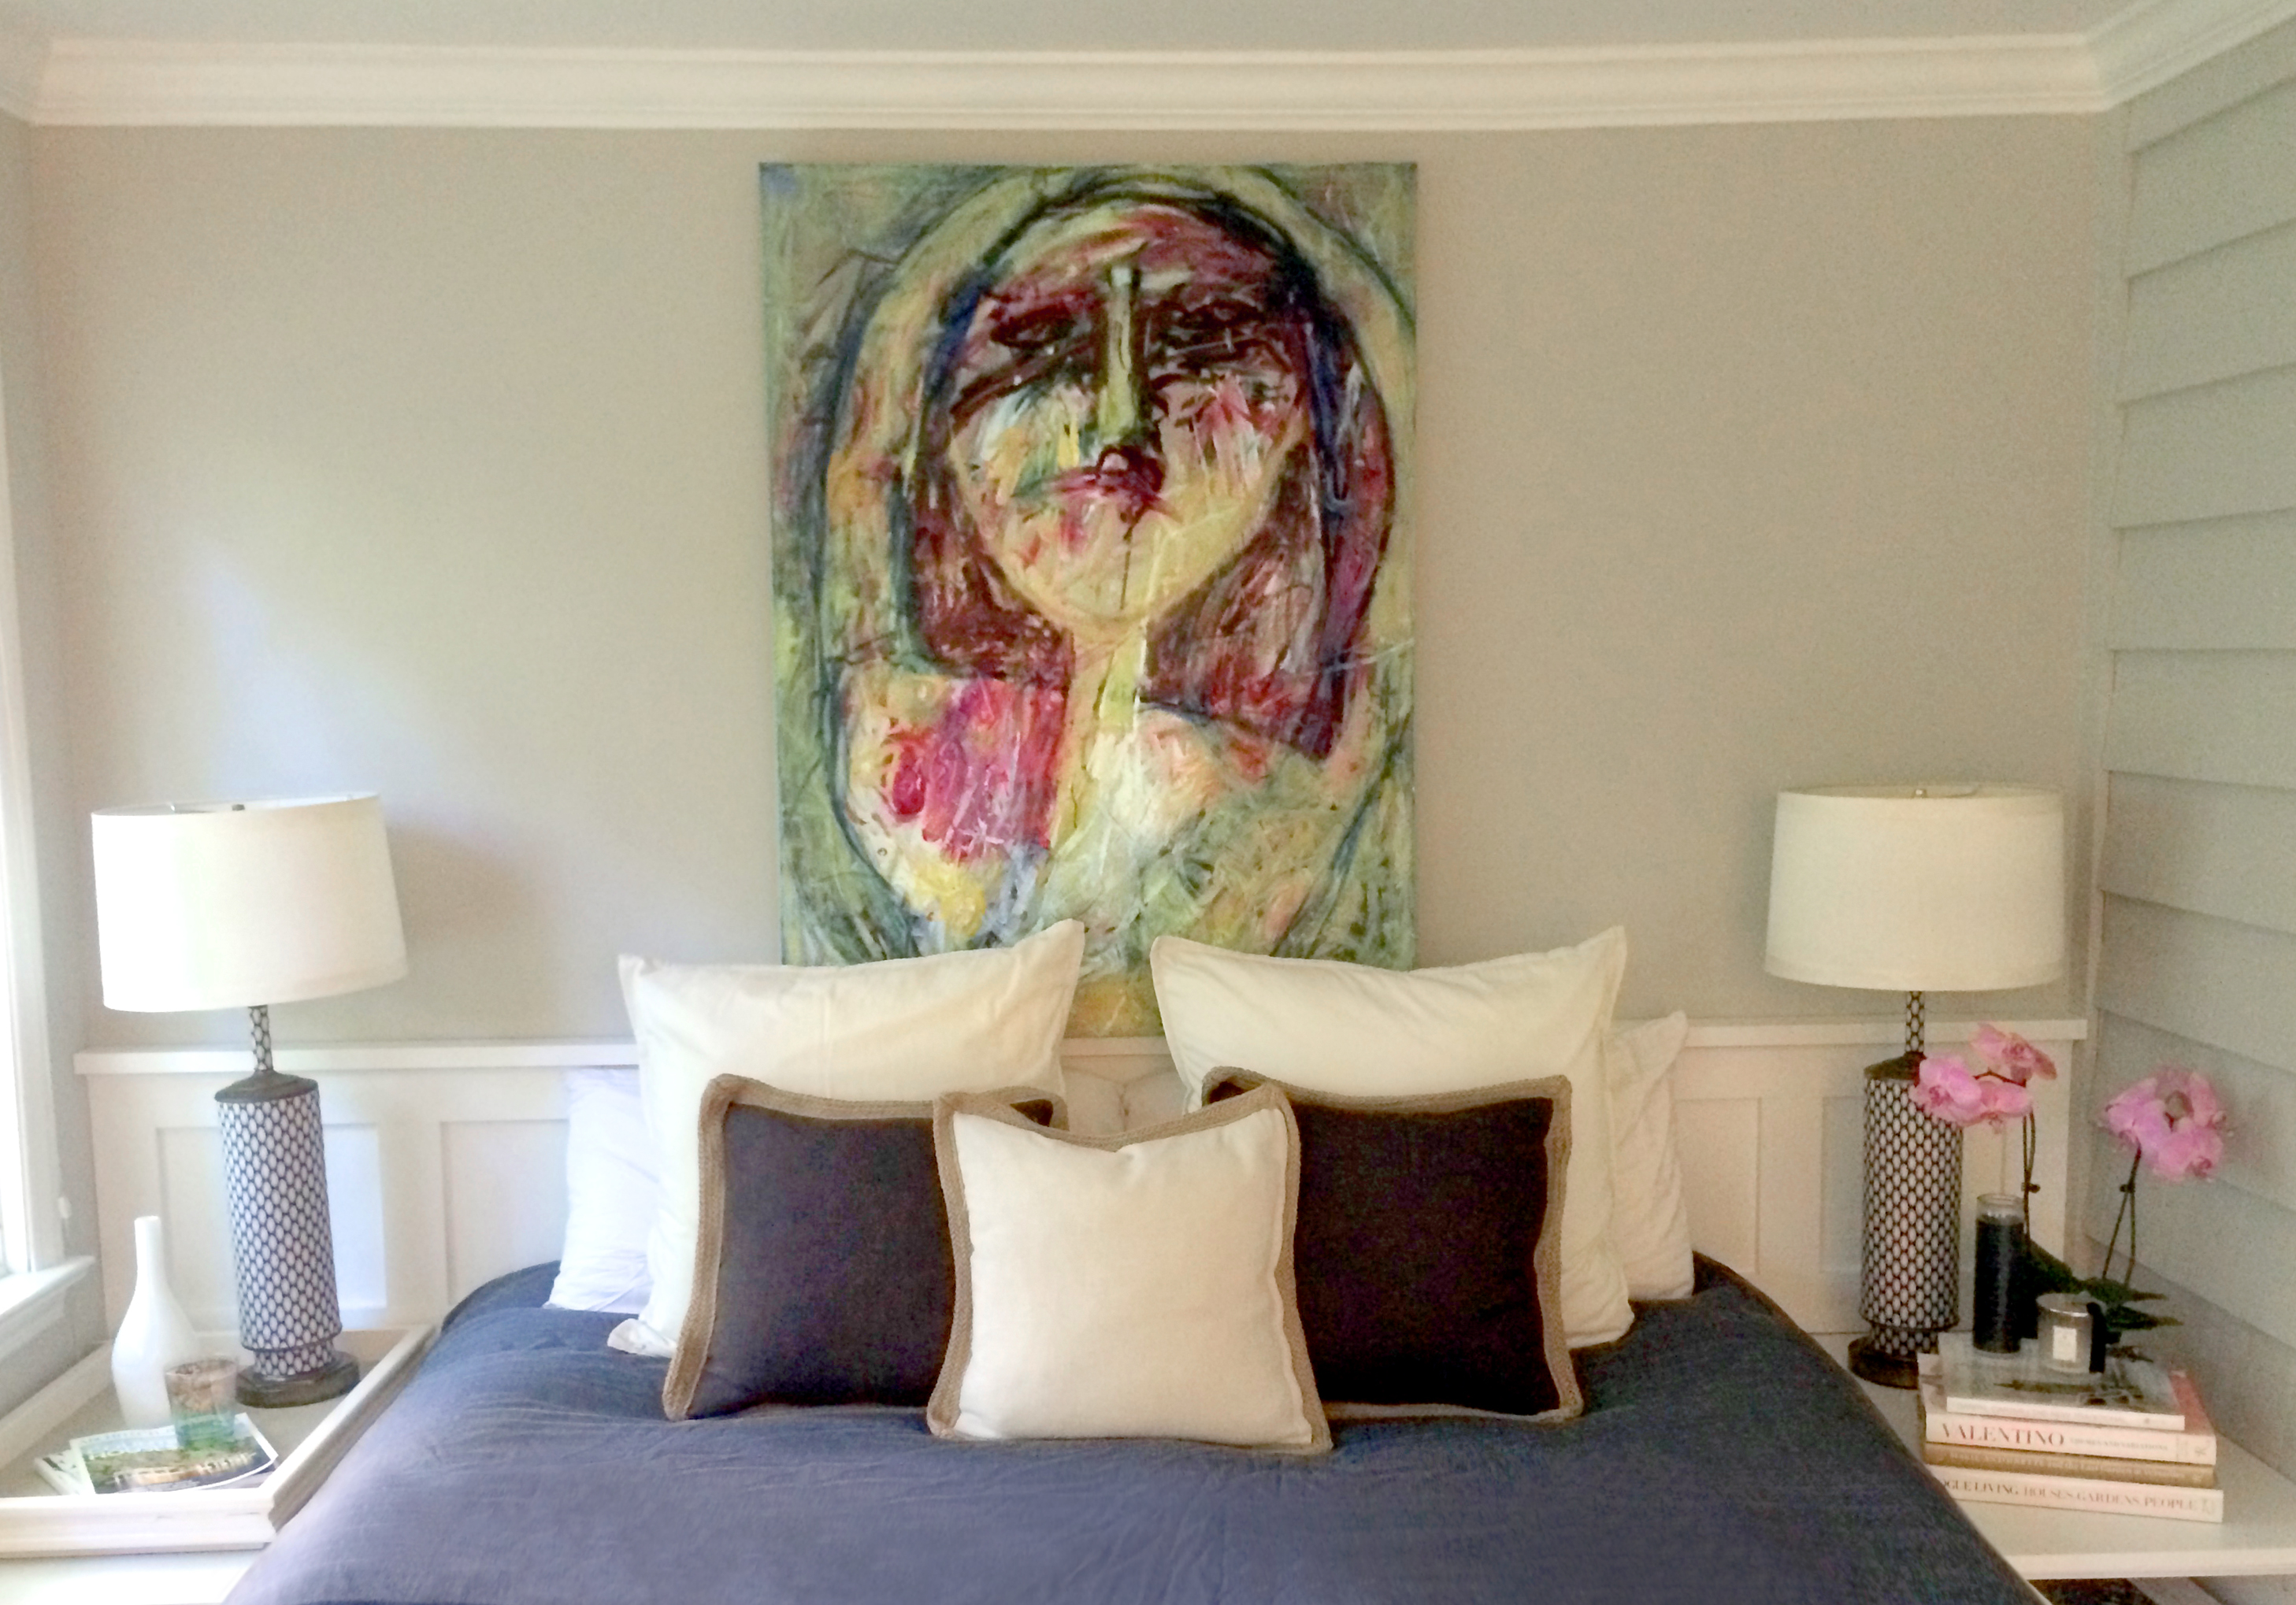
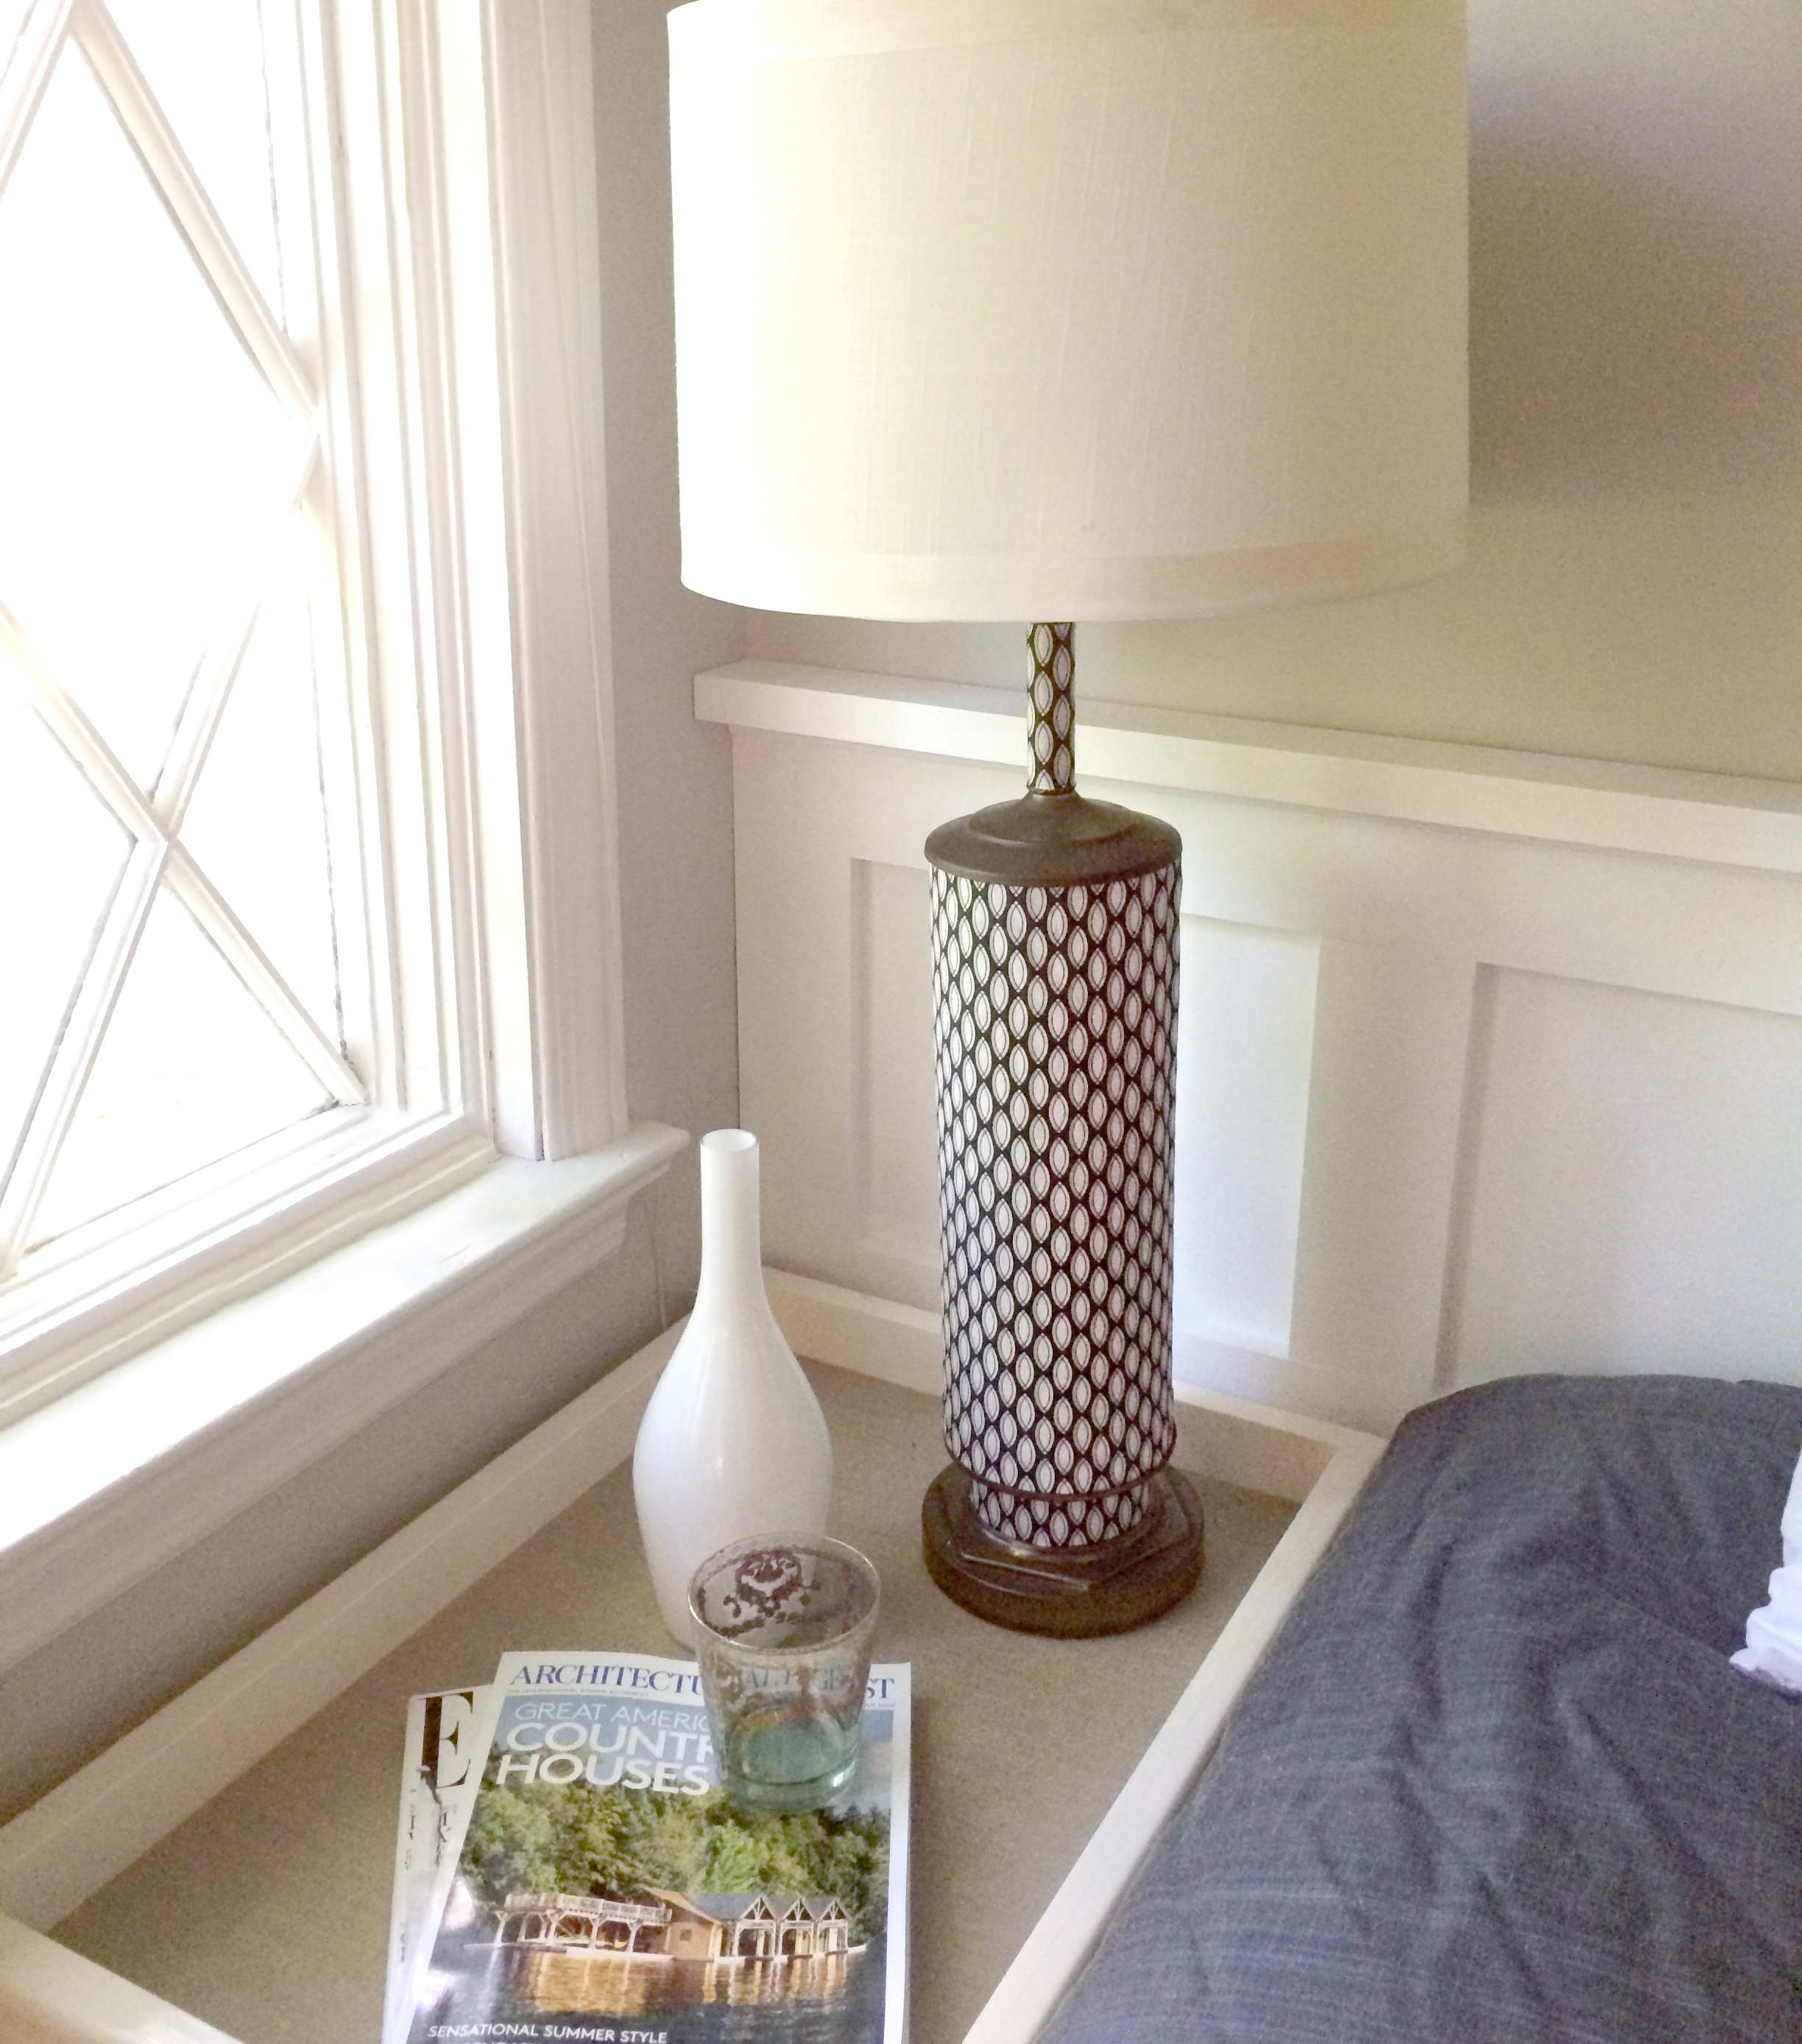
Newly finished lamps in my guest room.

I don’t know about you, but I have a closet of things I should bring to Salvation Army but just can’t part with. I also have a habit of picking up people’s rejects (these 60’s wood veneer lamps for example) and other sad items at antique stores and estate sales that are screaming for a facelift. Here, I help you (and myself) tackle 2 of these afflictions at once and create one beautiful product out of two unwanted ones.

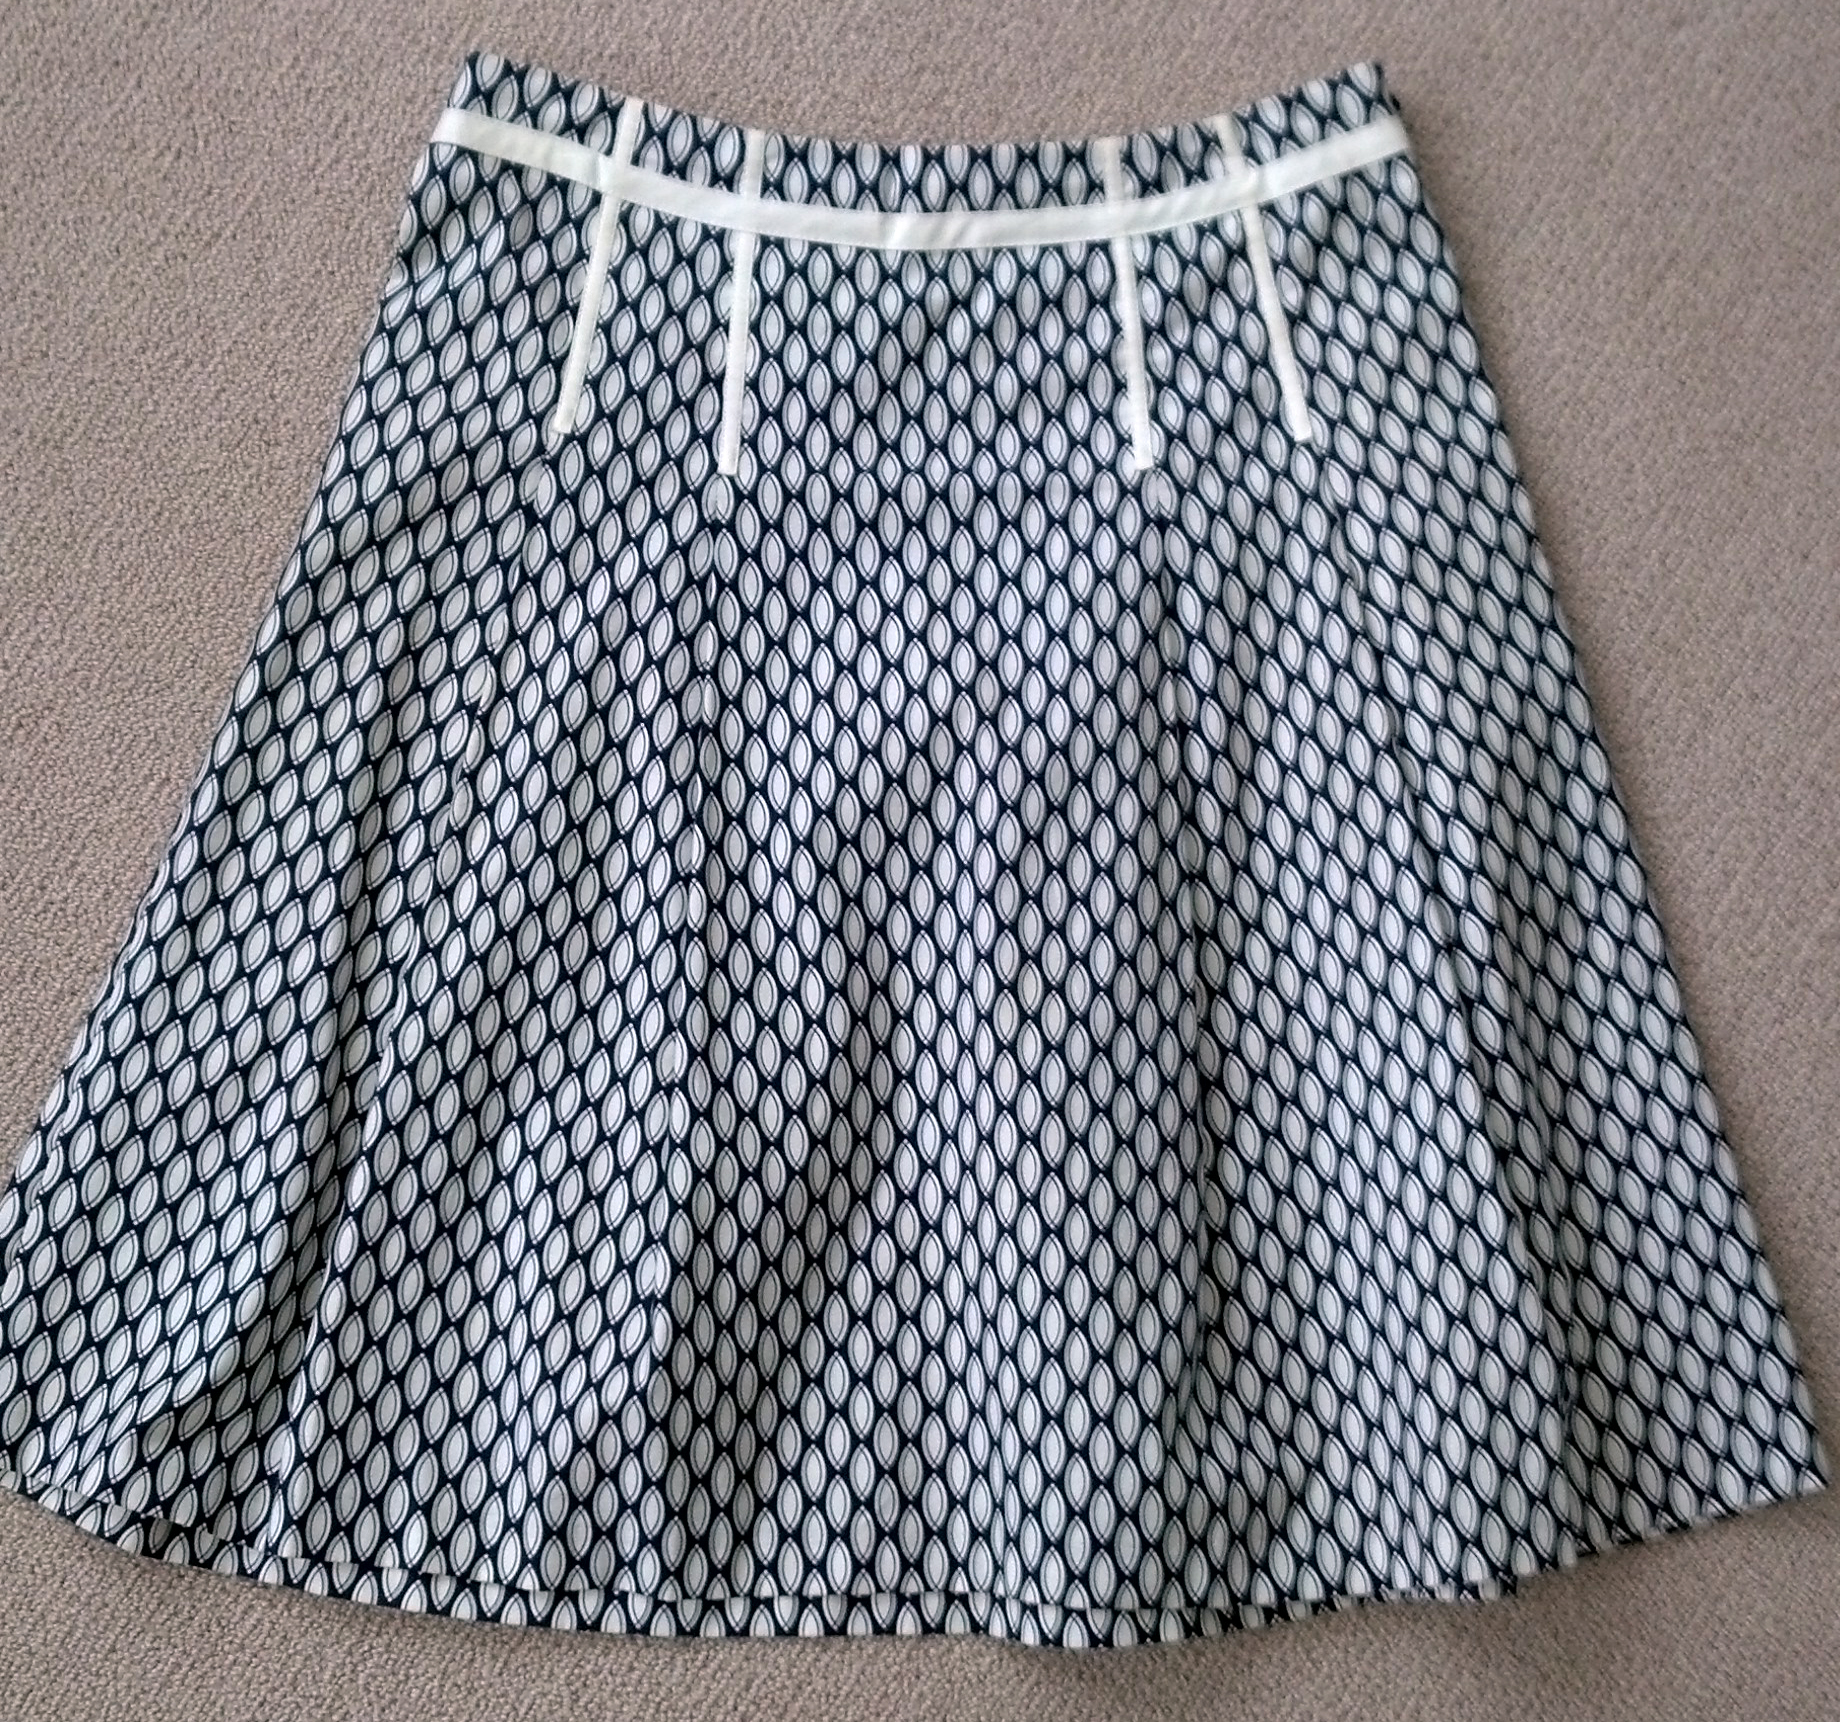
Using a skirt—from about 10 years ago—I reupholster a pair of lamps. Back story on the skirt I only wore once: it was a sweltering summer day in midtown (NYC) and I was working at Elle Decor magazine at the time. We were throwing a book signing party that night in conjunction with PR team LaForce + Stevens for Martha Baker’s coffee table book about beautiful pools, The Swimming Pool: Inspiration and Style from Around the World. I would have paid my small salary to be in a pool at the moment but instead found myself sweaty, running late, and hustling through god-awful Times Sq to get to this event. I detoured into the GAP and in under a minute reappeared refreshed and in this skirt (picture Clark Kent in the phone booth). Both Margaret Russell (EIC of Elle Decor at the time) and author Martha Baker complimented me on the skirt that night, so it only seems appropriate that I’ve—hoarded the skirt until now and—turned it into a pair of lamps.

I think the tight pattern lends itself well to this small-scale project and gives these lamps sort of a French mid-century meets Herend porcelain look. Read below for instructions on how I did it. Happy DIY’ing!

GAP skirt from 10 years ago.


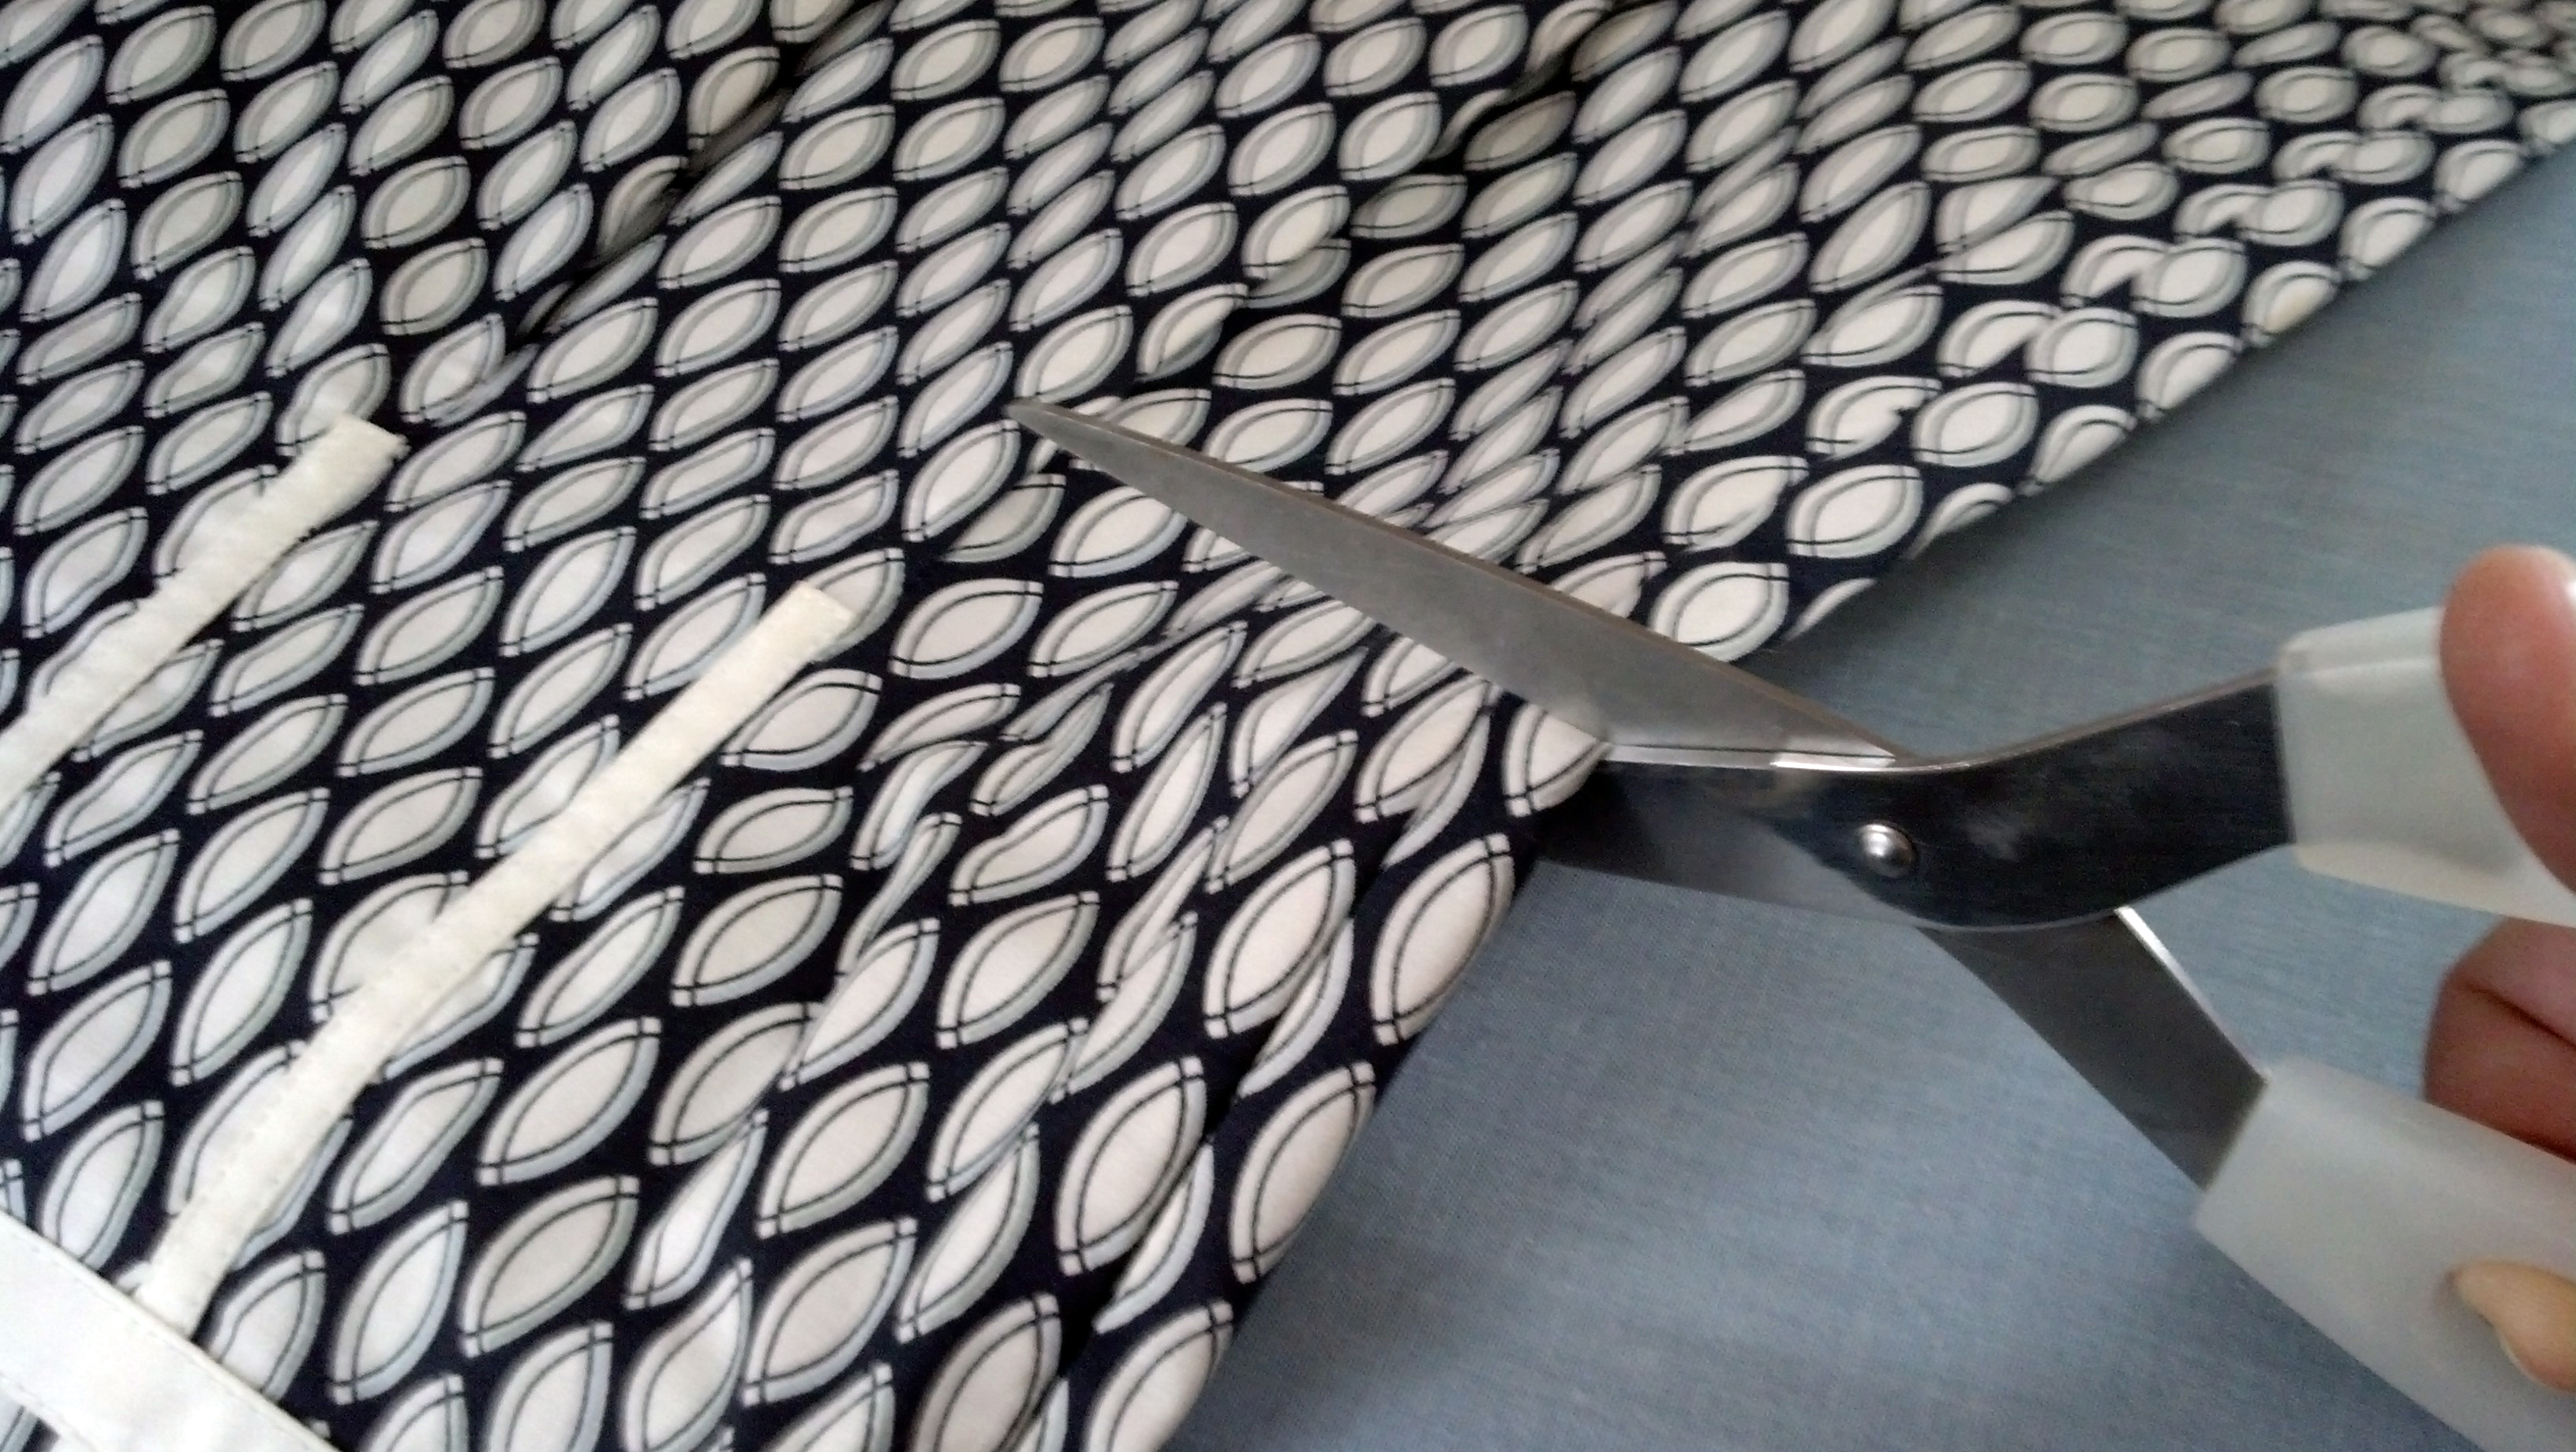
I cut the skirt into clean fabric panels, removing zippers, pleats, etc.

I ironed the fabric to start with a fresh, flat material.

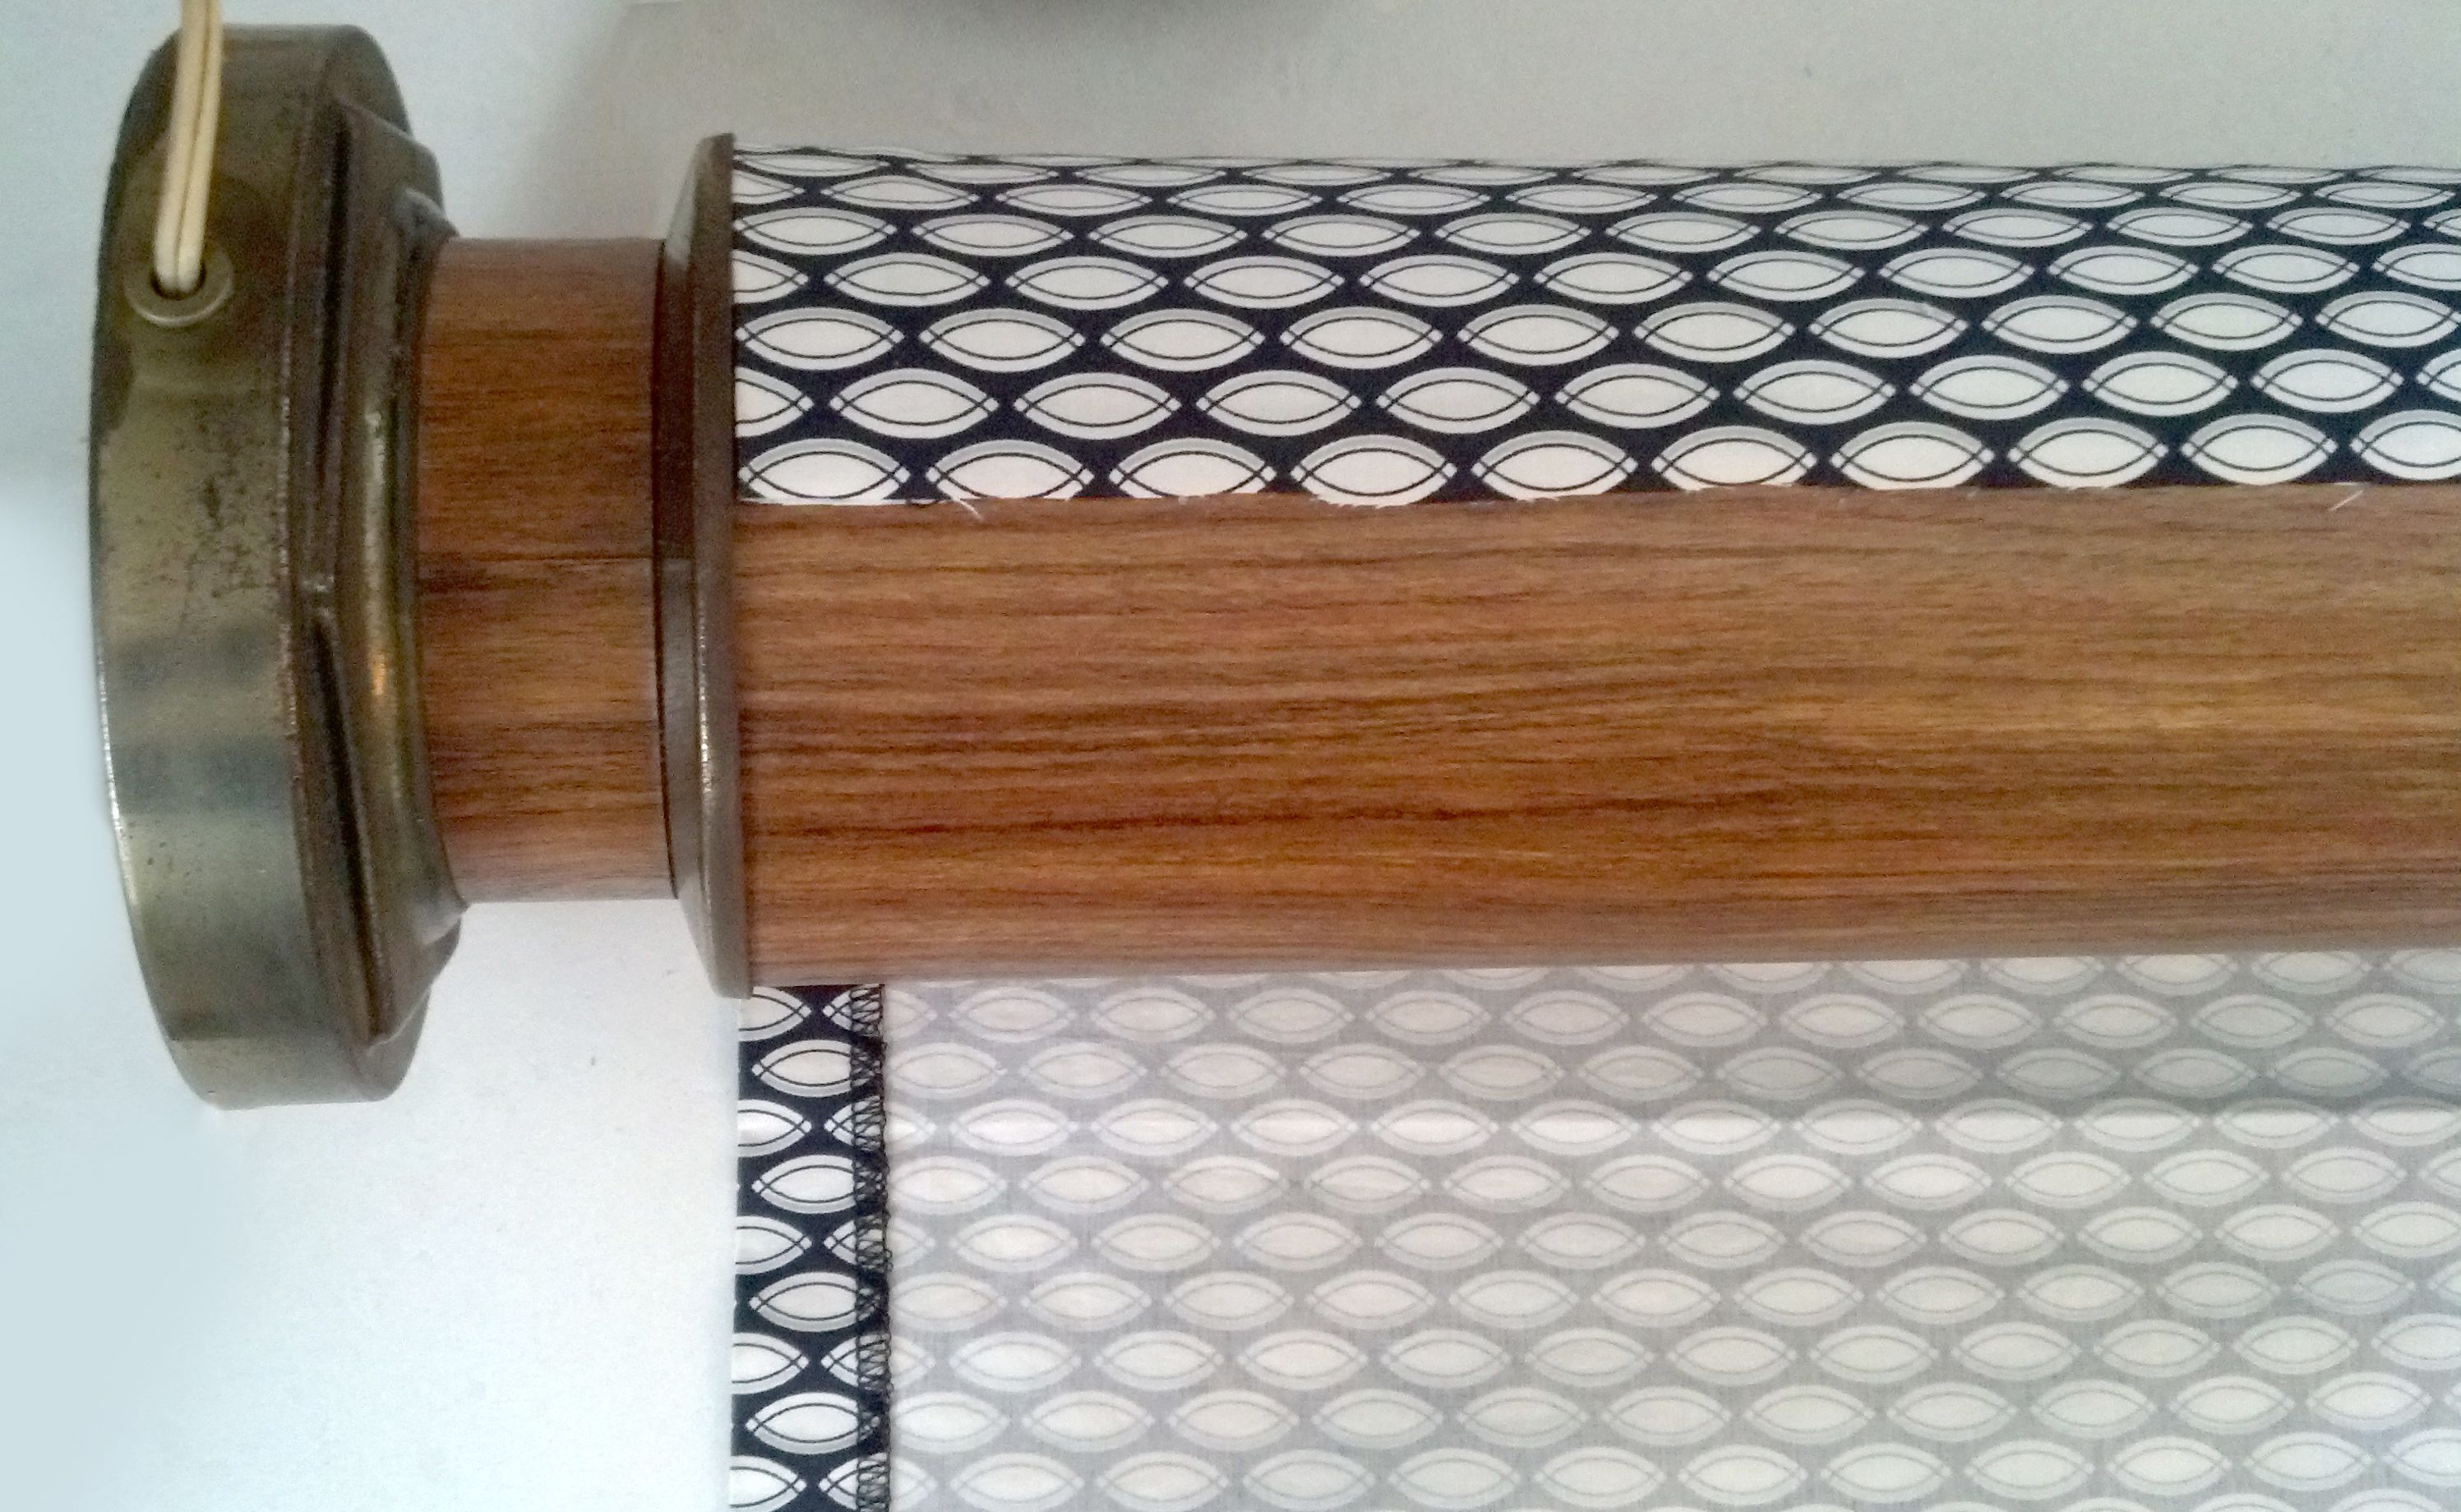
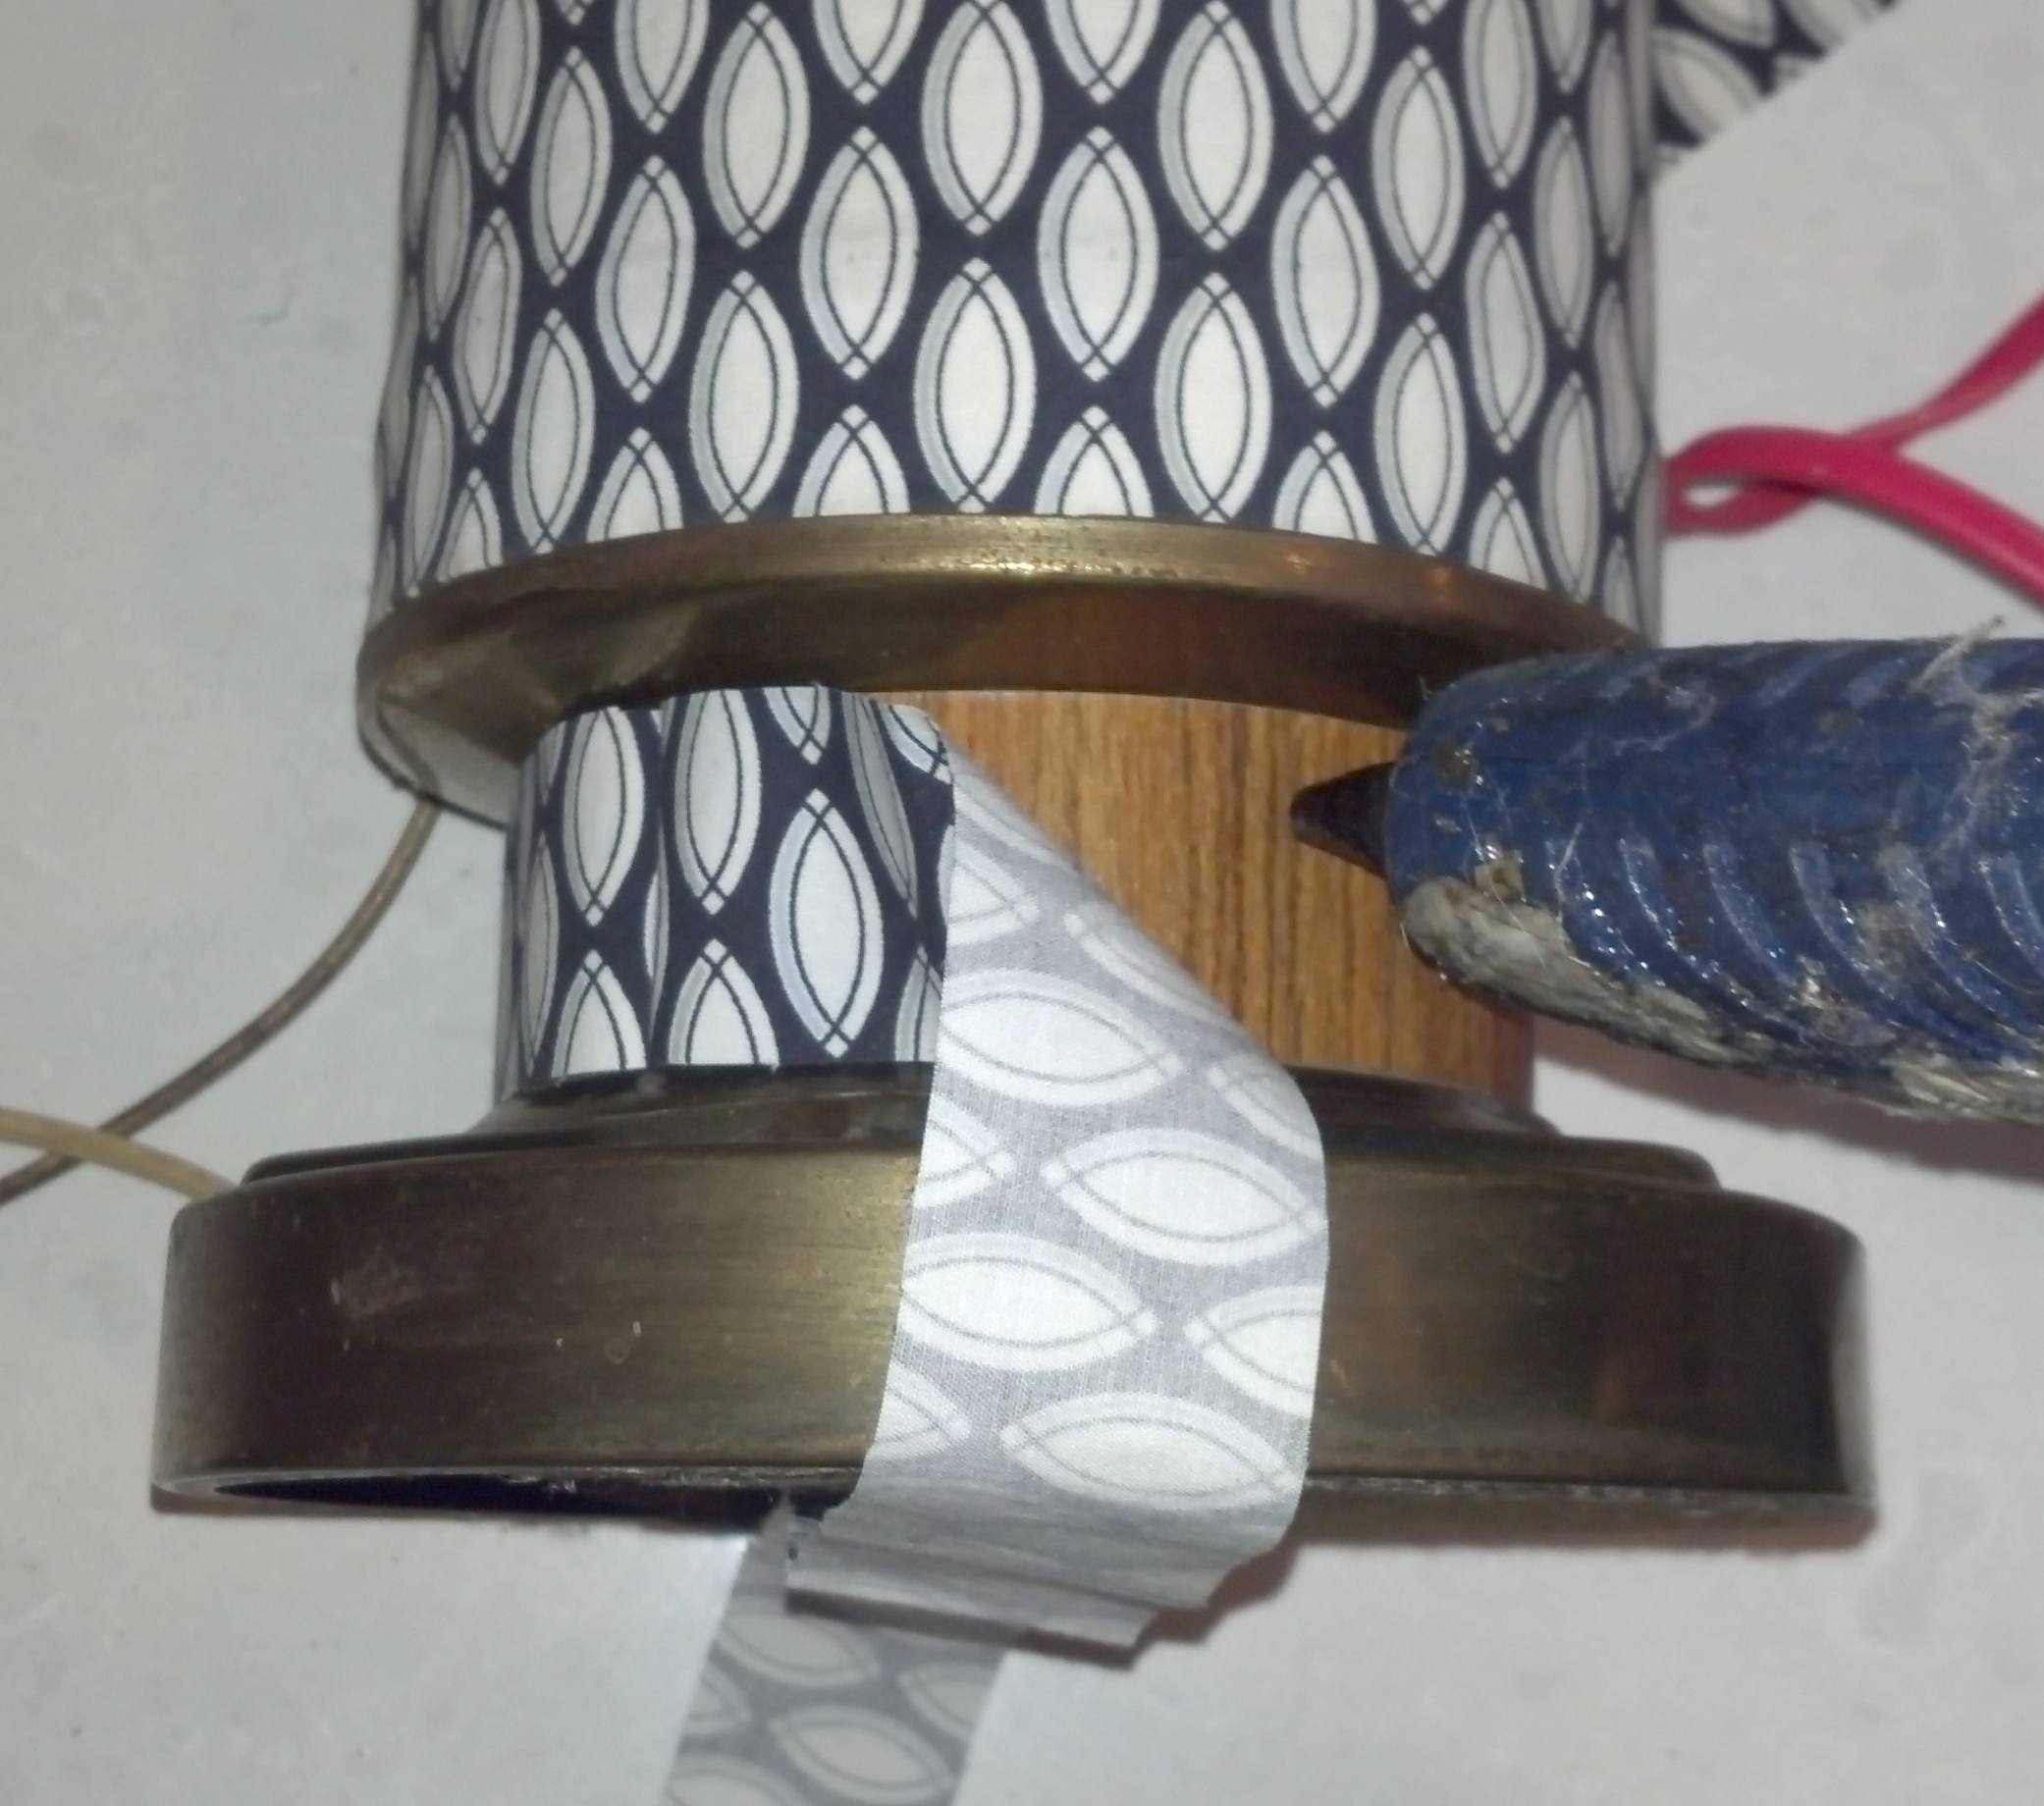
After measuring the height of the lamp base, I cut a panel large enough to wrap the base with a small overlap. I used the factory edge along the bottom of the lamp so I would have one less edge to finish later. With a glue gun, I ran a bead of hot glue along the length of the lamp and slowly fit the fabric to the lamp as i rotated it and glued as I went. I did not hem or fold the finished edge because I had a very clean cut and my final bead of glue was lean and tidy right up agains the edge of the cut.

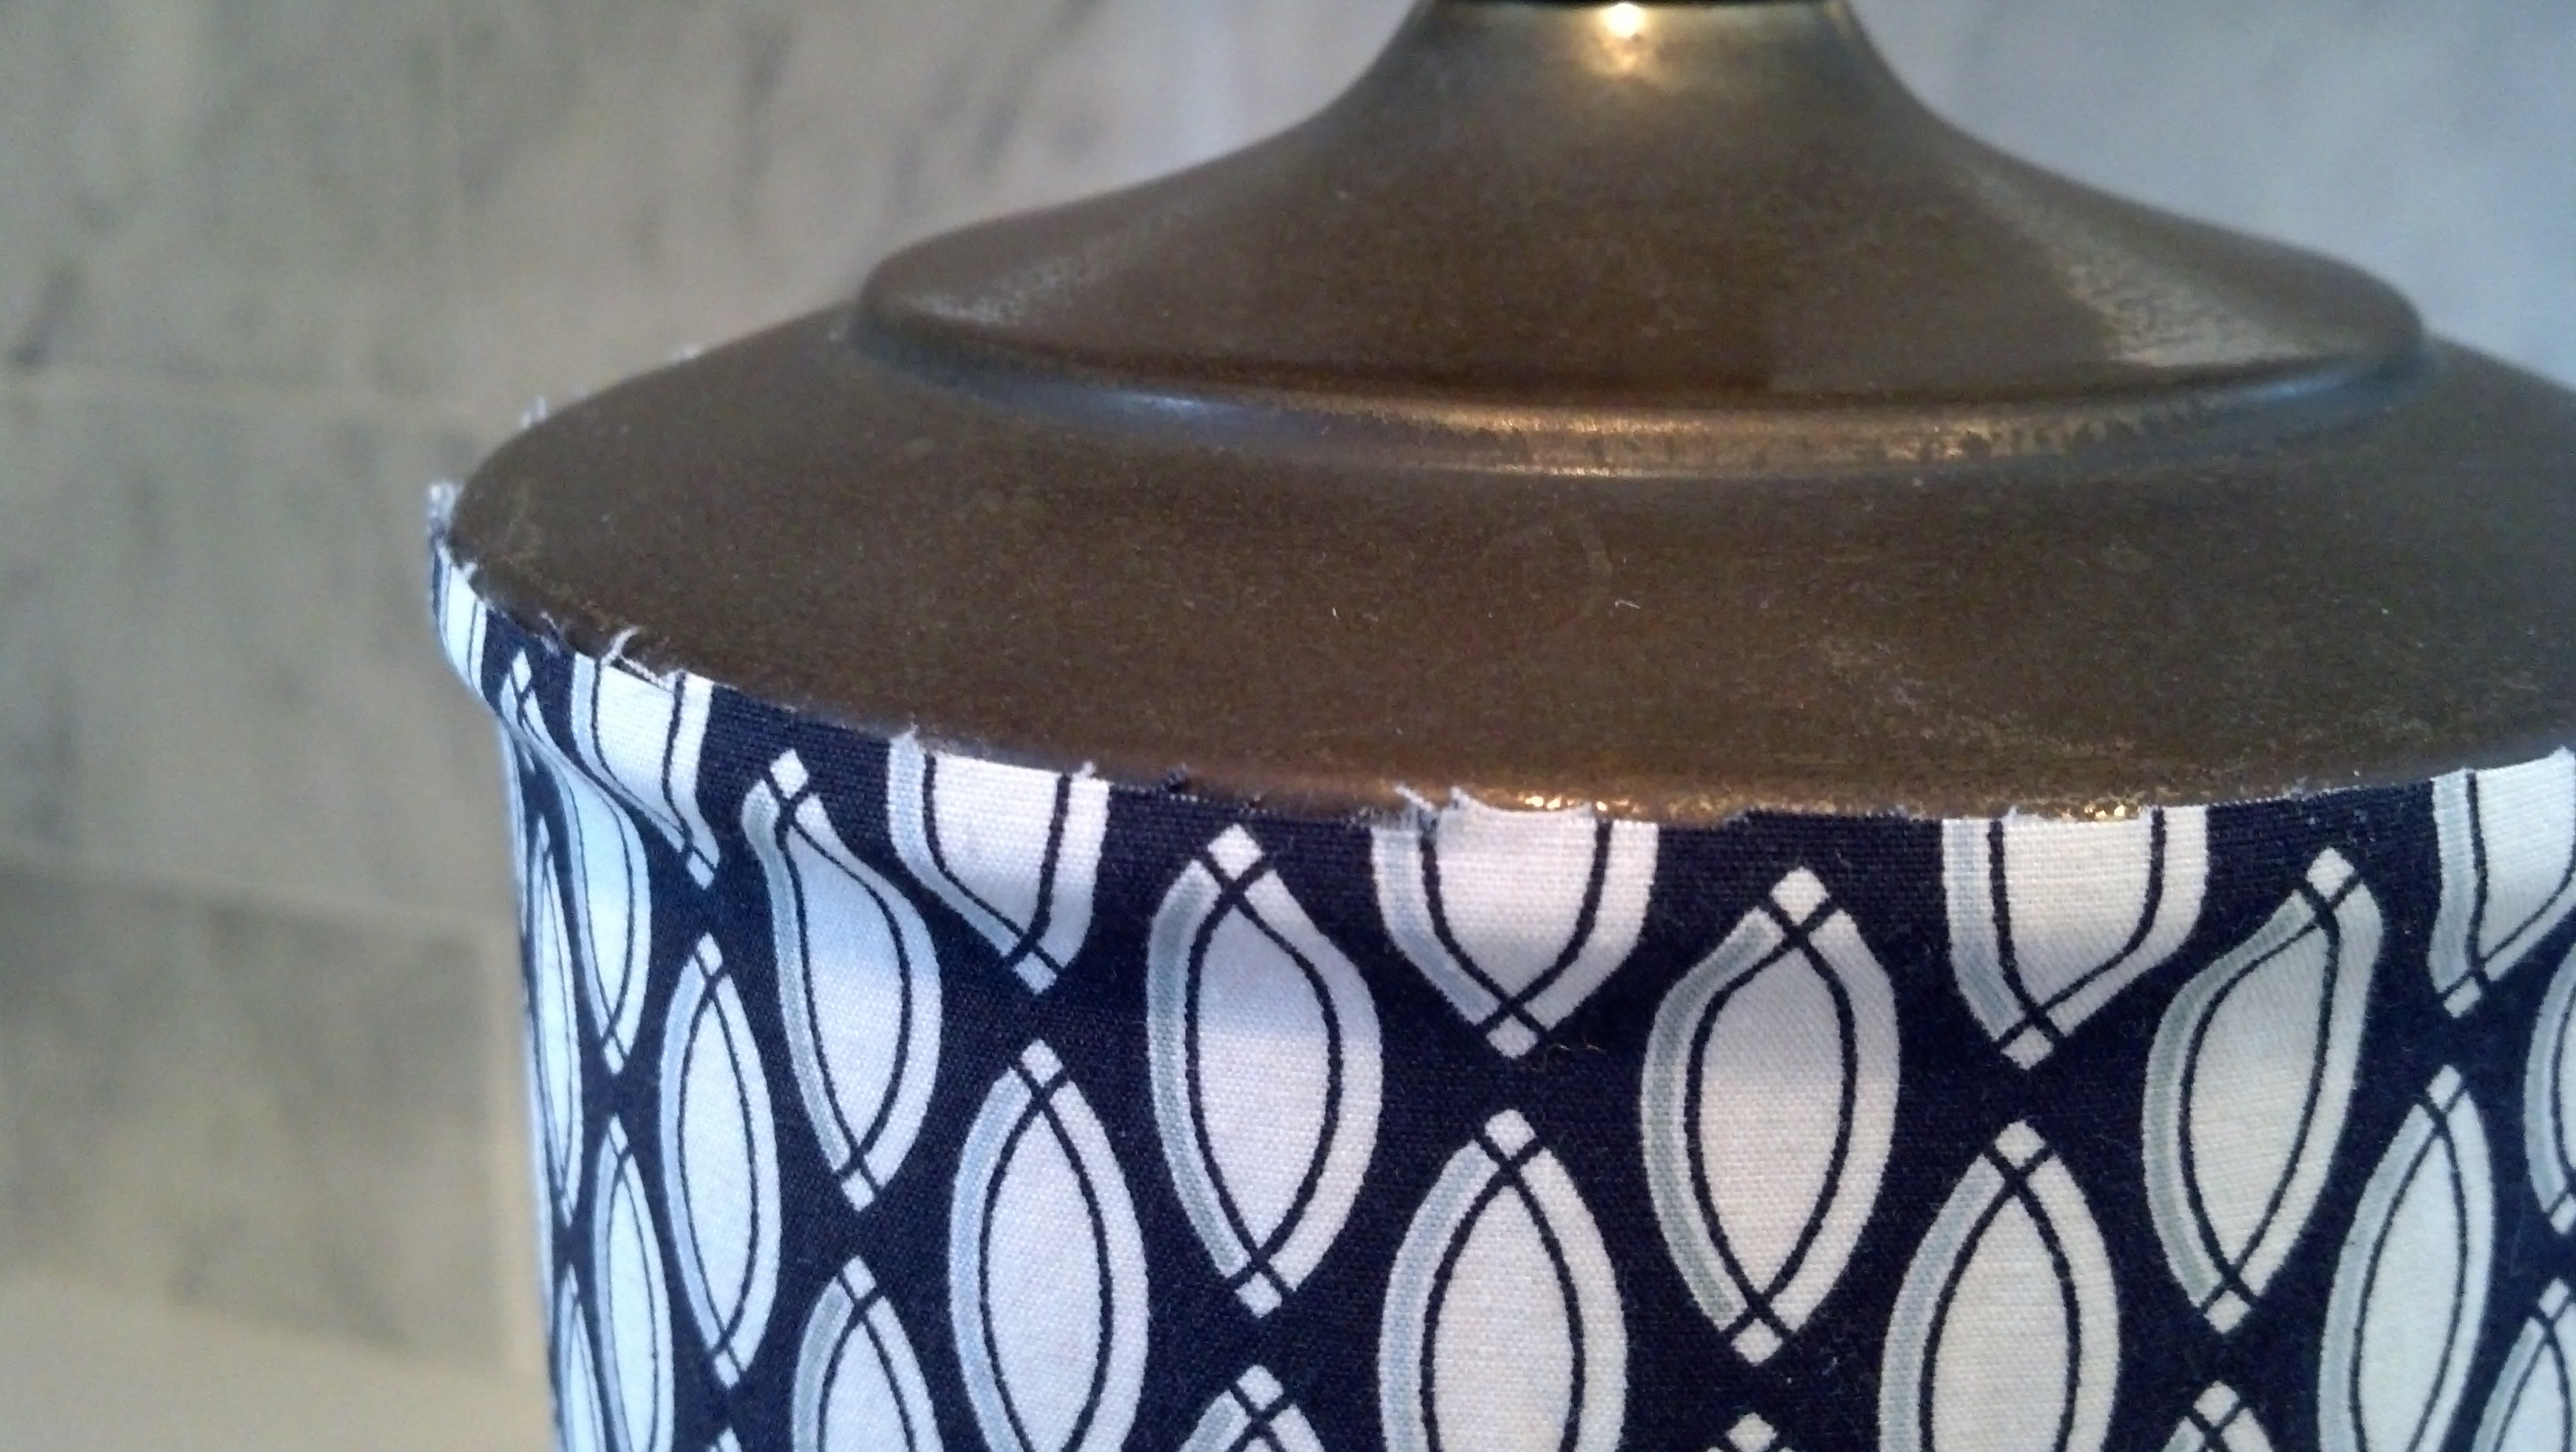
I then trimmed the excess fabric along the top and left a slight overlap so that I would have extra to finish the top with.

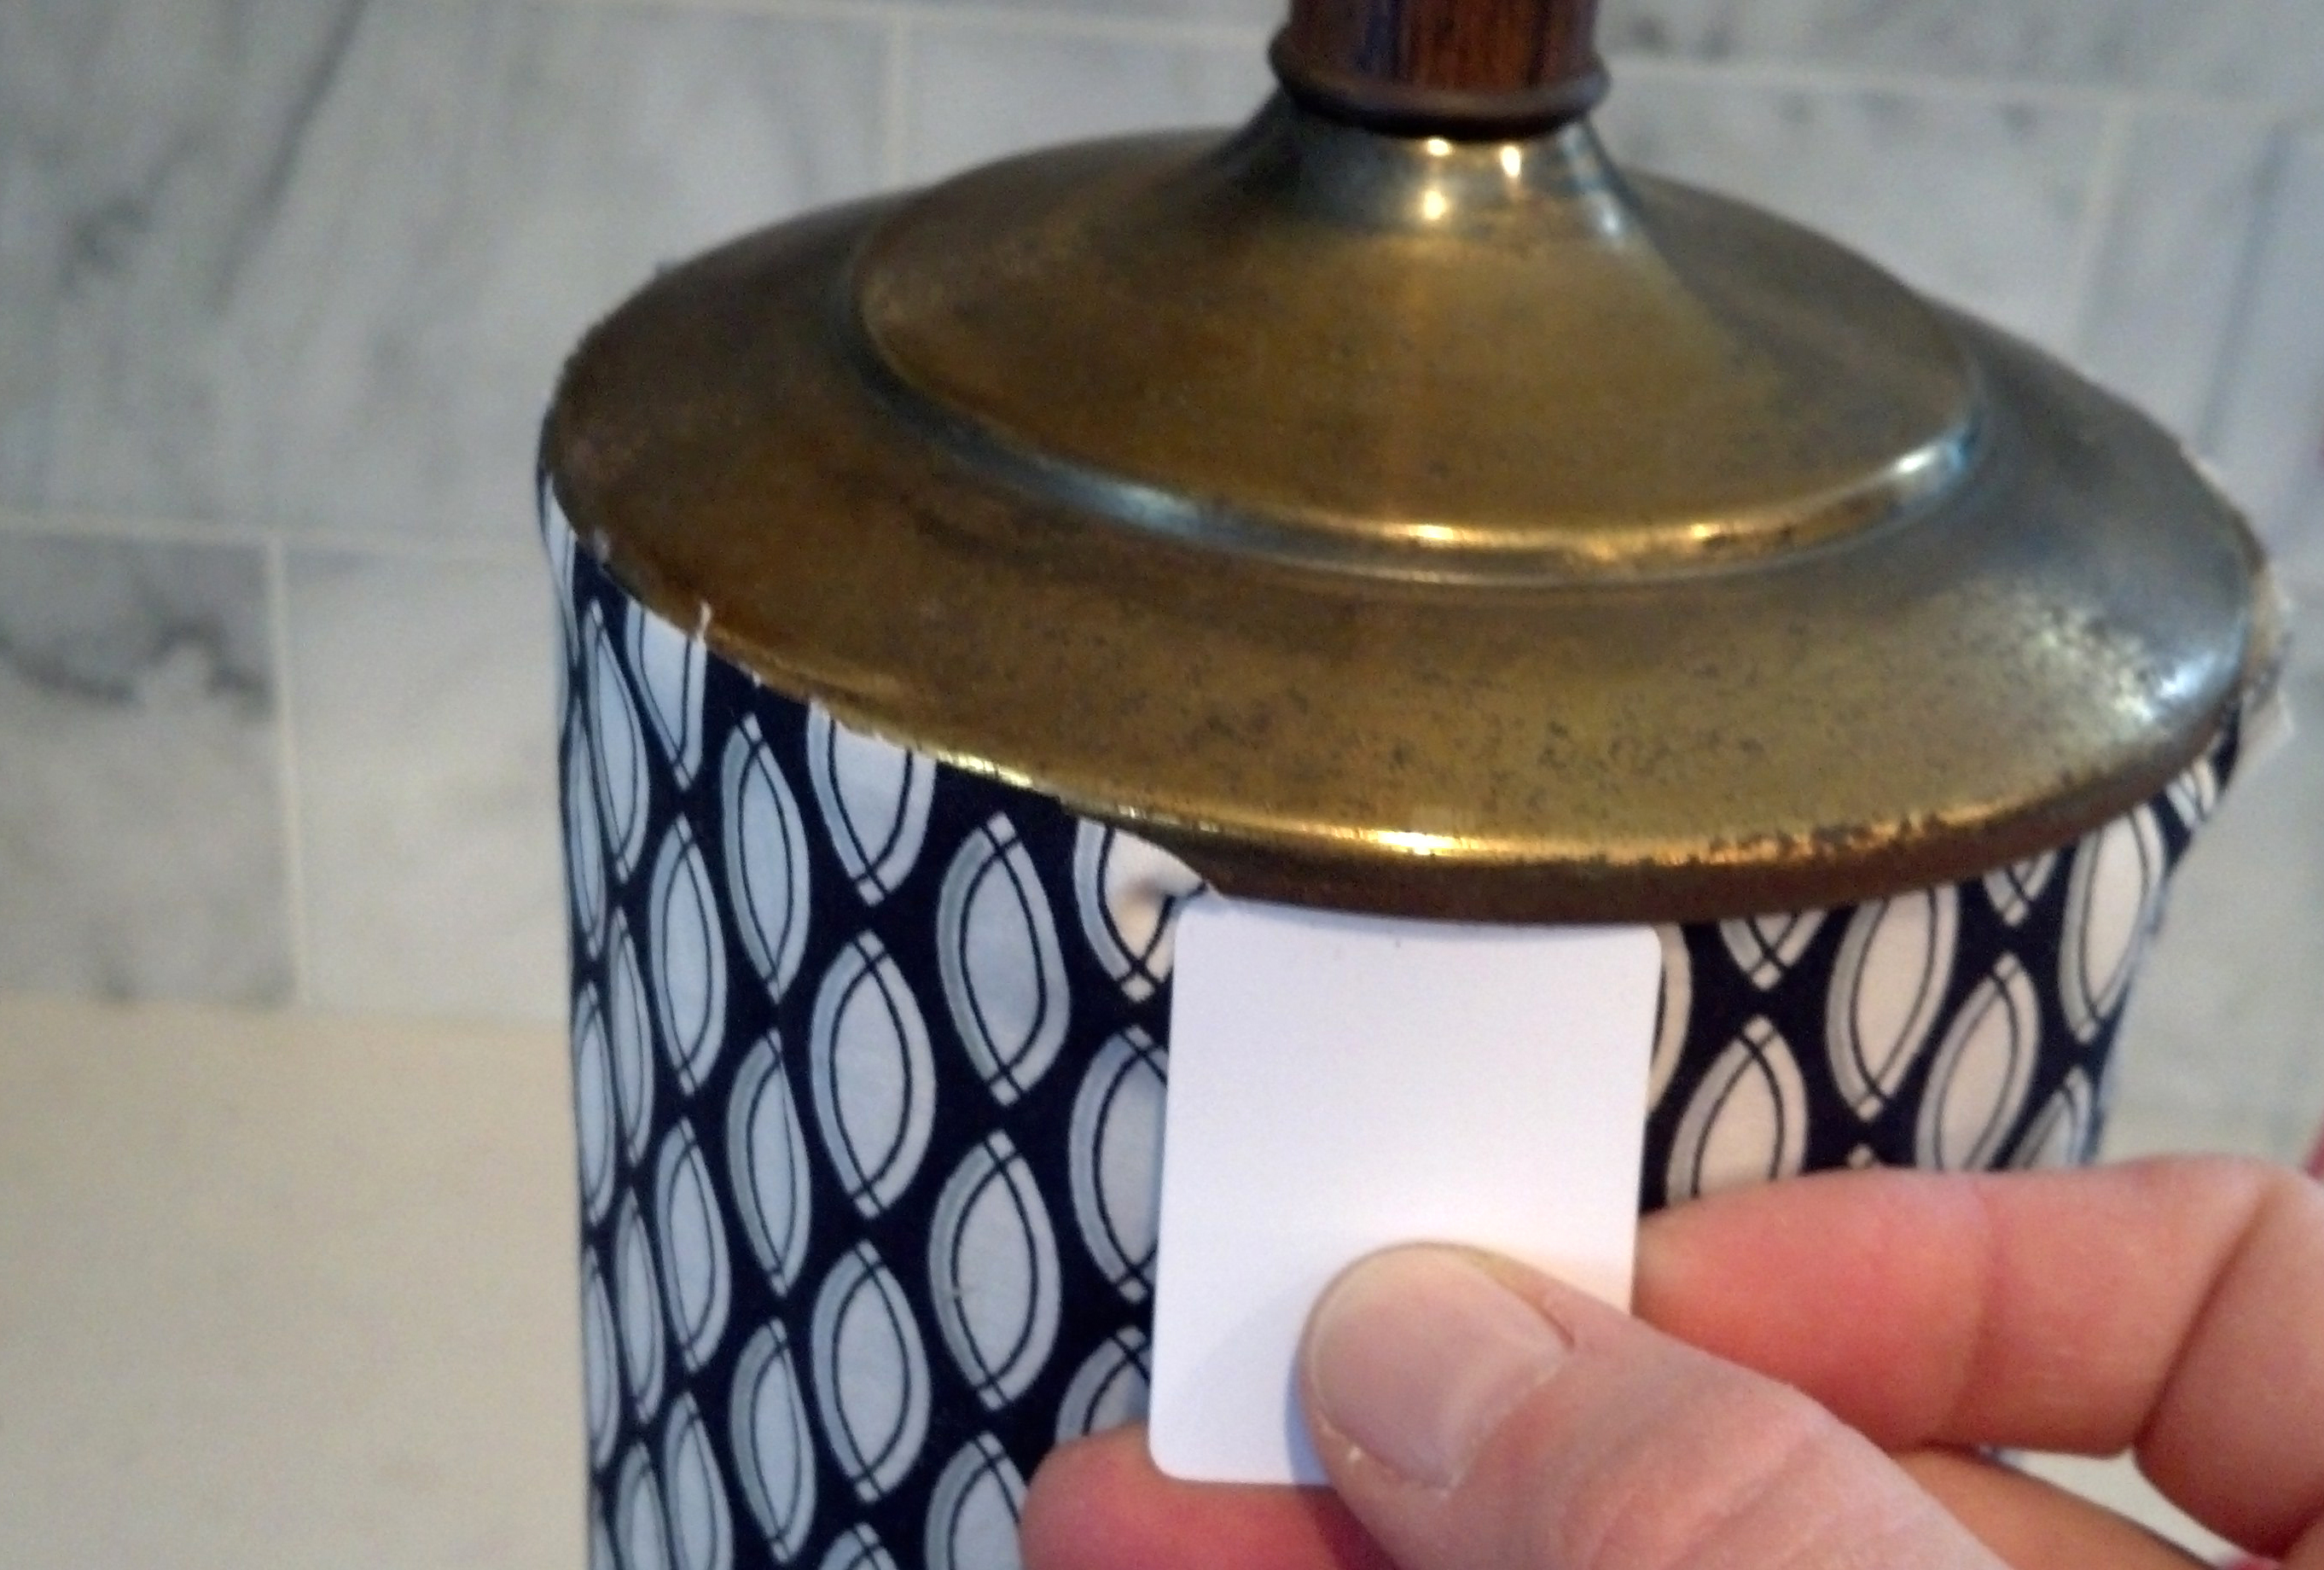
With a small plastic card (you could use the corner of a credit card or a thick business card), I tucked the extra lip of fabric under the metal collar at the top of the lamp.

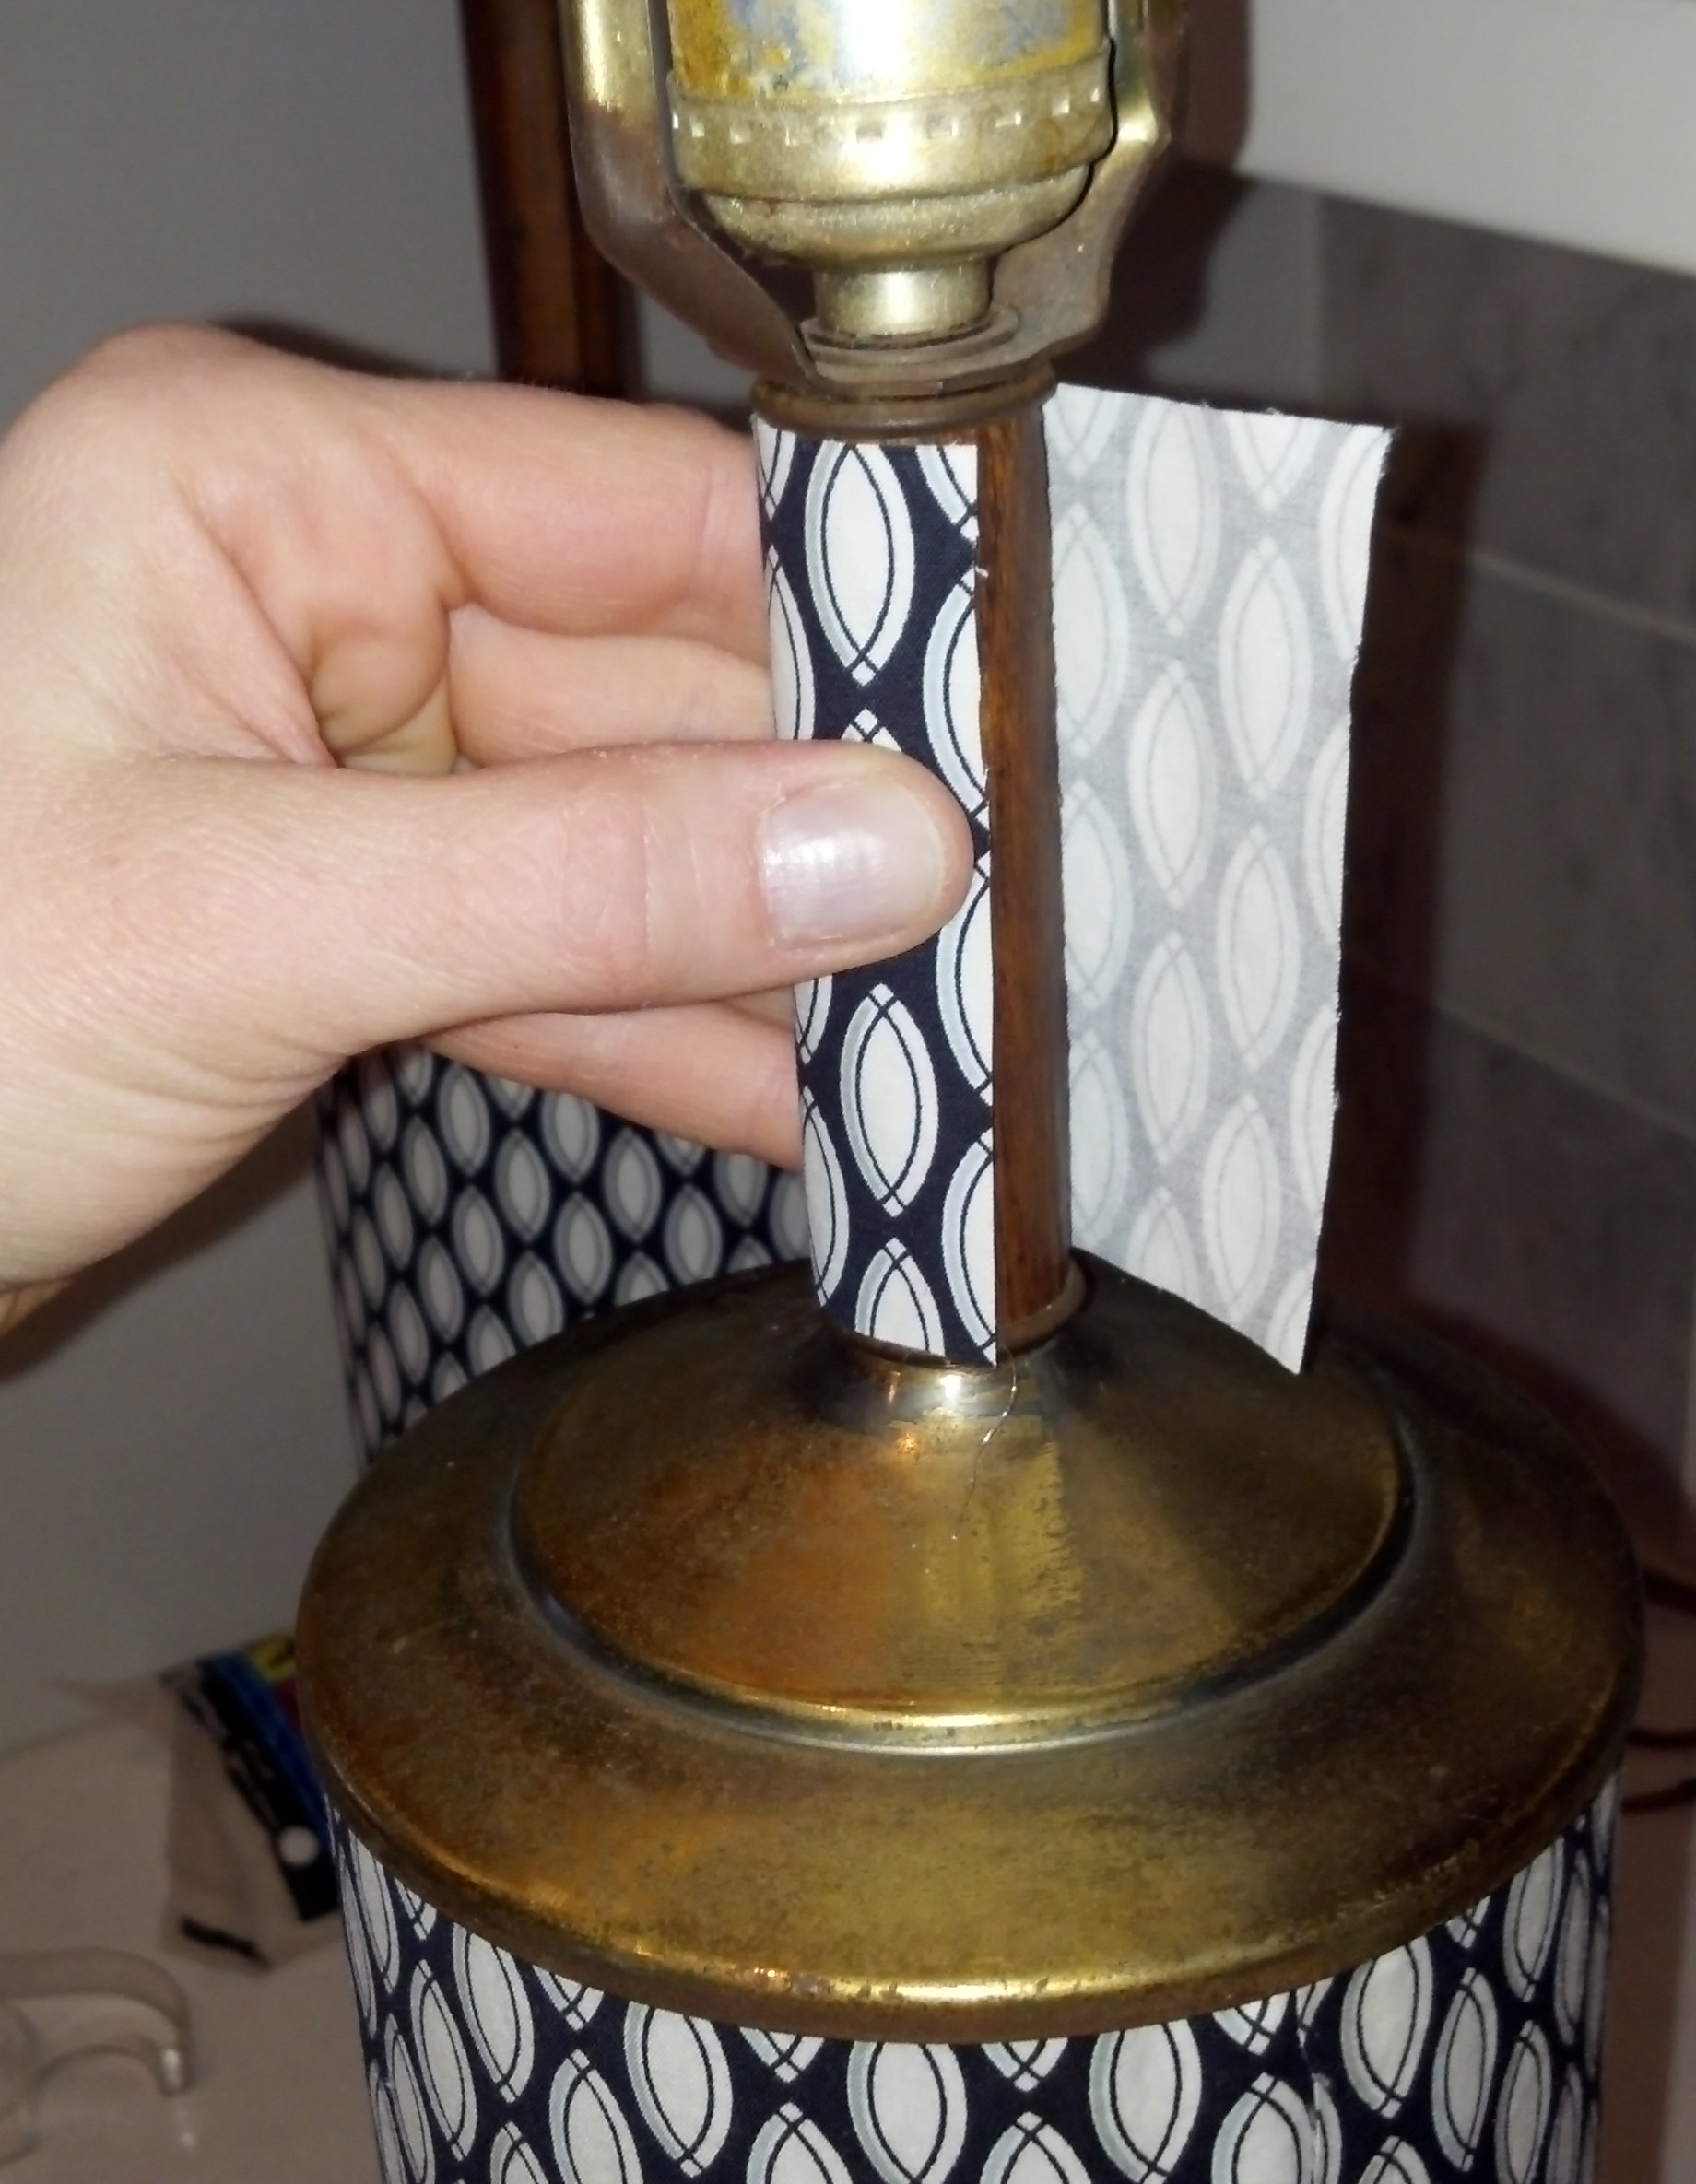
I then measured and cut strips for the two remaining wood veneer areas.

Again, I applied the perfectly cut fabric strips to the lamp and glued as I rotated

And then did the same with the last section.

Here’s what they looked like after all was said and done. The tight pattern on the fabric gives the two tired lamps a very sleek new look.

And at last, they find a home in our guest room, flanking the bed.

The painting above is by Ellen Reinkraut. Throw pillows are similar to these ones by Pottery Barn.

Rhinestone Retro Rehab

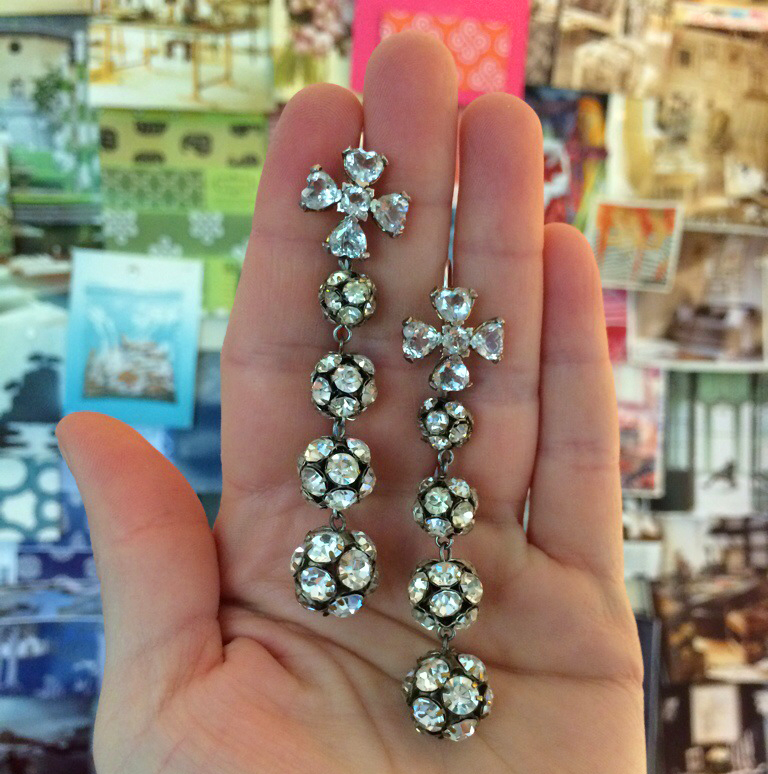
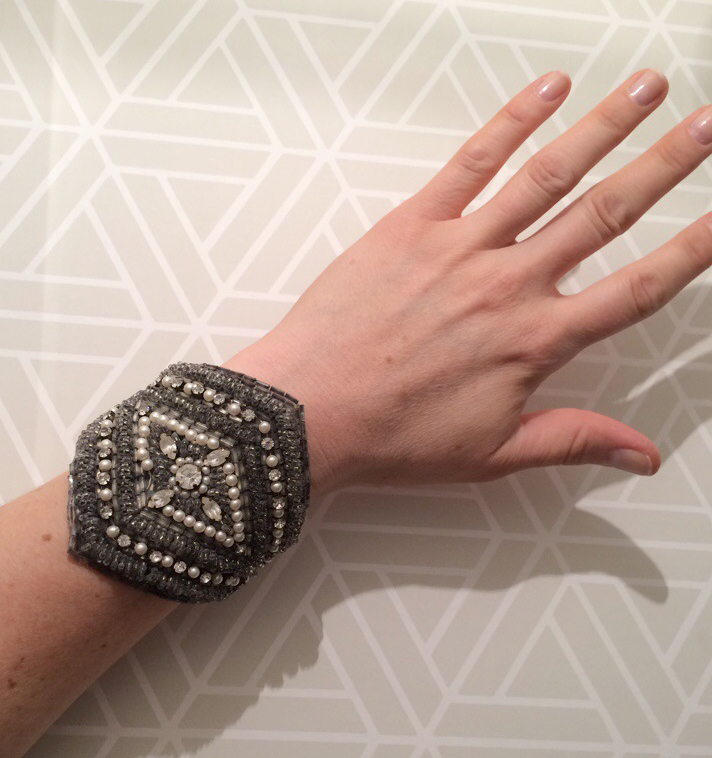
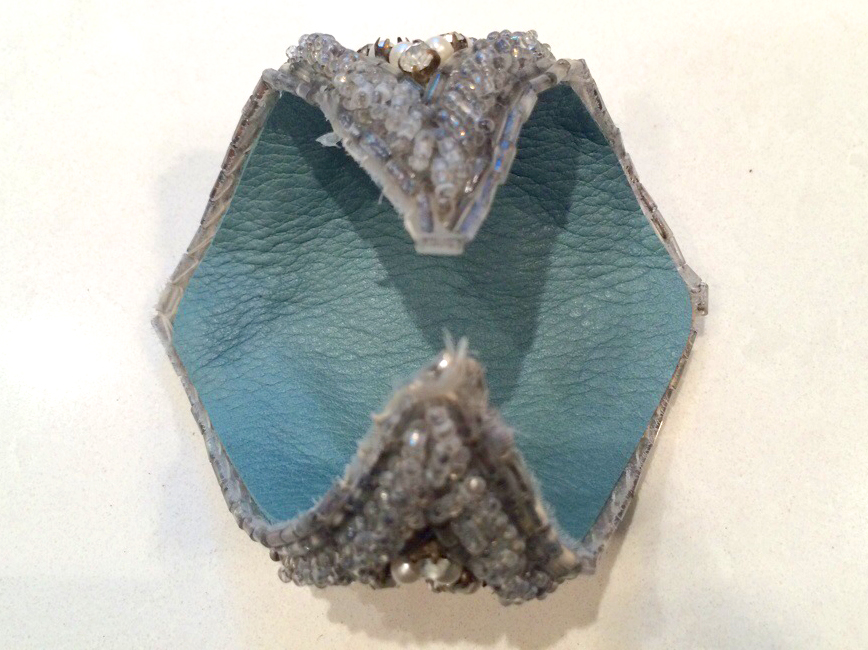
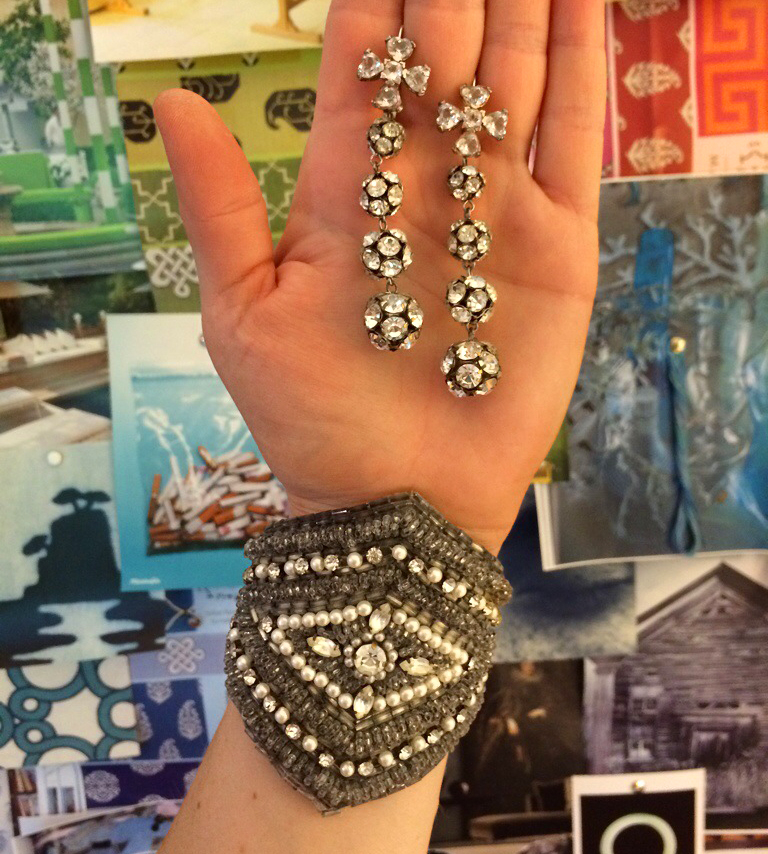
I rehabbed a few pairs of damaged vintage deco earrings today and made a cuff bracelet to match with a salvaged beaded appliqué from a beat-up vintage dress from Salvation Army.

Earrings: I removed both the clip-on backs and post backs from the 2 pairs of earrings, to start. With fine, but heavy weight fiber wire I strung the earrings together and fastened them to new, stainless steel (hypo-allergenic) earring hooks. Side story, my grandmother wore the long rhinestone-cluster ones—that look like lincoln center’s huge exterior chandeliers—to Nixon’s inaugural ball in the late 60’s. They are my absolute favorite but were both missing a bead at the top… and were clip-on.


Here’s what I did to make the bracelet:

 1. Using crazy glue I secured the beads around the edges and trimmed excess fabric and thread.
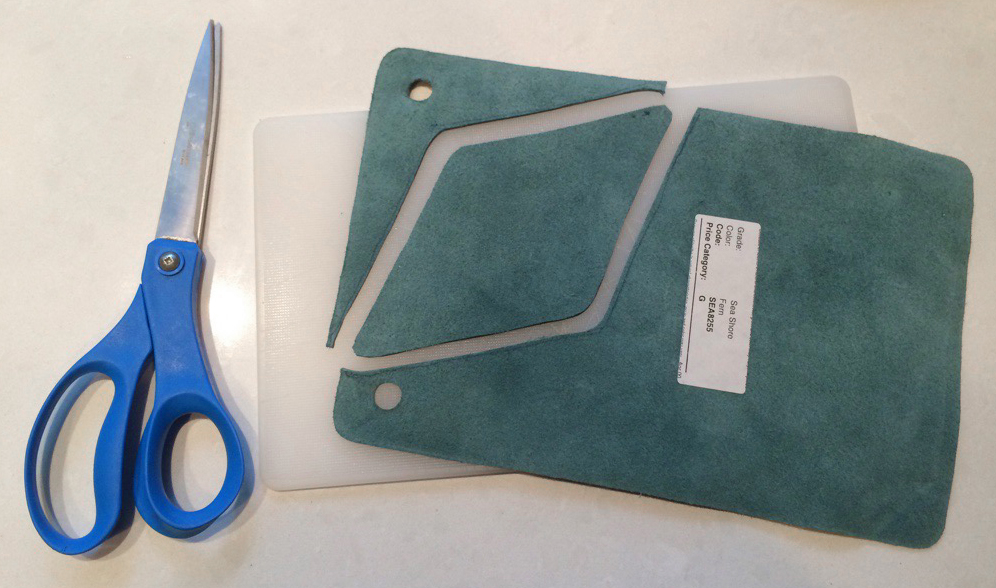
2. I traced the appliqué onto the back of a leather sample (I used turquoise for a pop of color) and cut the leather smaller by an eighth of an inch all the way around so that it would not show from the other side once bent into shape.
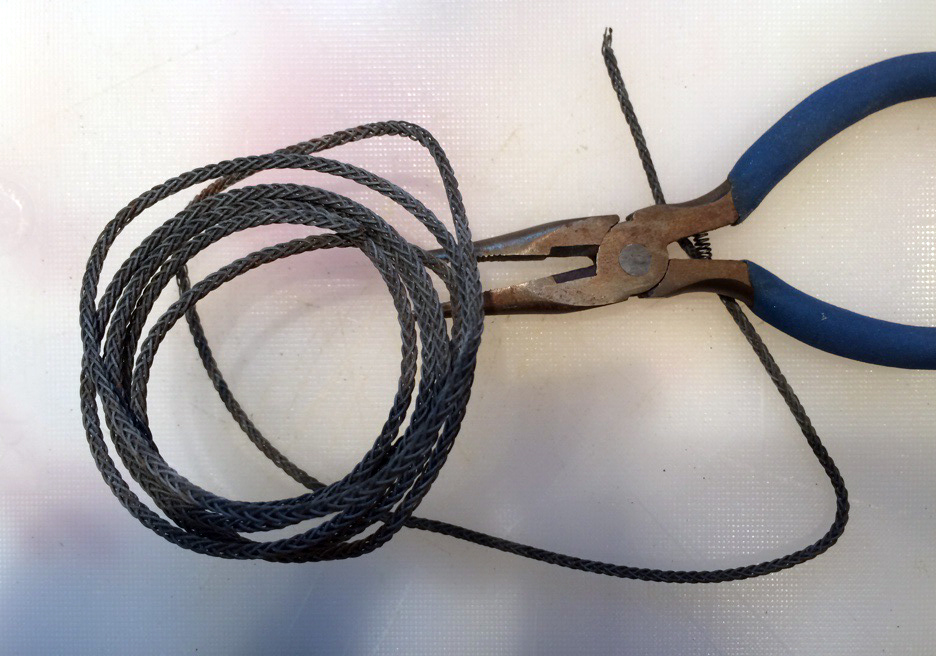
3. Using thick, heavy-duty woven art-hanging wire and a pair of wire cutters, I ran a spiral around the leather piece—with about a half-inch setback from the edges—and secured it in place with hot glue. (sorry, forgot to shoot his part!)
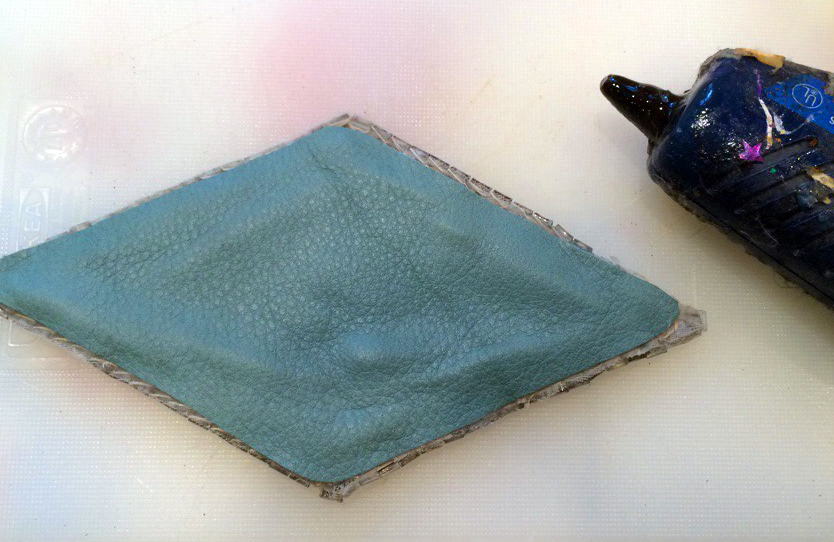
4. Once the wire was set in place on the leather, I ran a bead of hot glue around the outside edge of leather piece and several more lines along the center and then adhered it to the back of my beaded appliqué. I pressed firmly on both sides to secure them together.
5. Once glue had cooled and set completely, I bent the piece to form a cuff and fit it around my wrist an adjusted as necessary.

Re-soul a Slipper

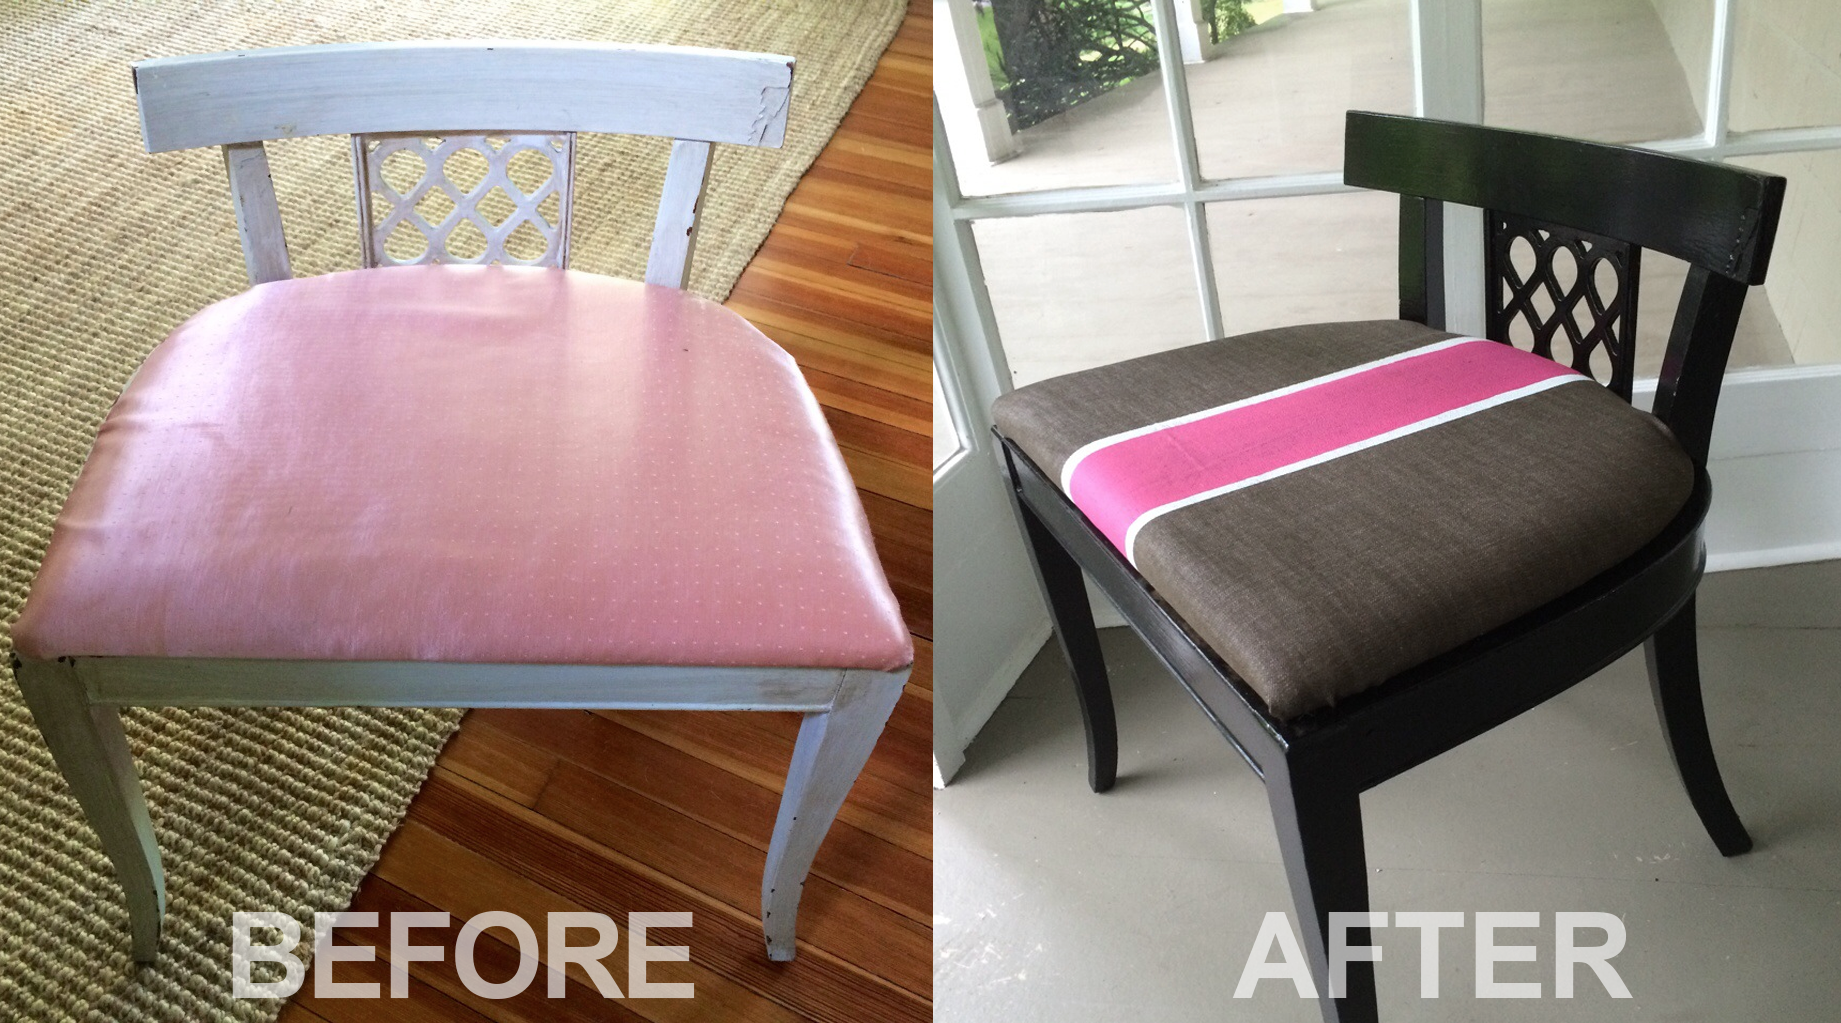
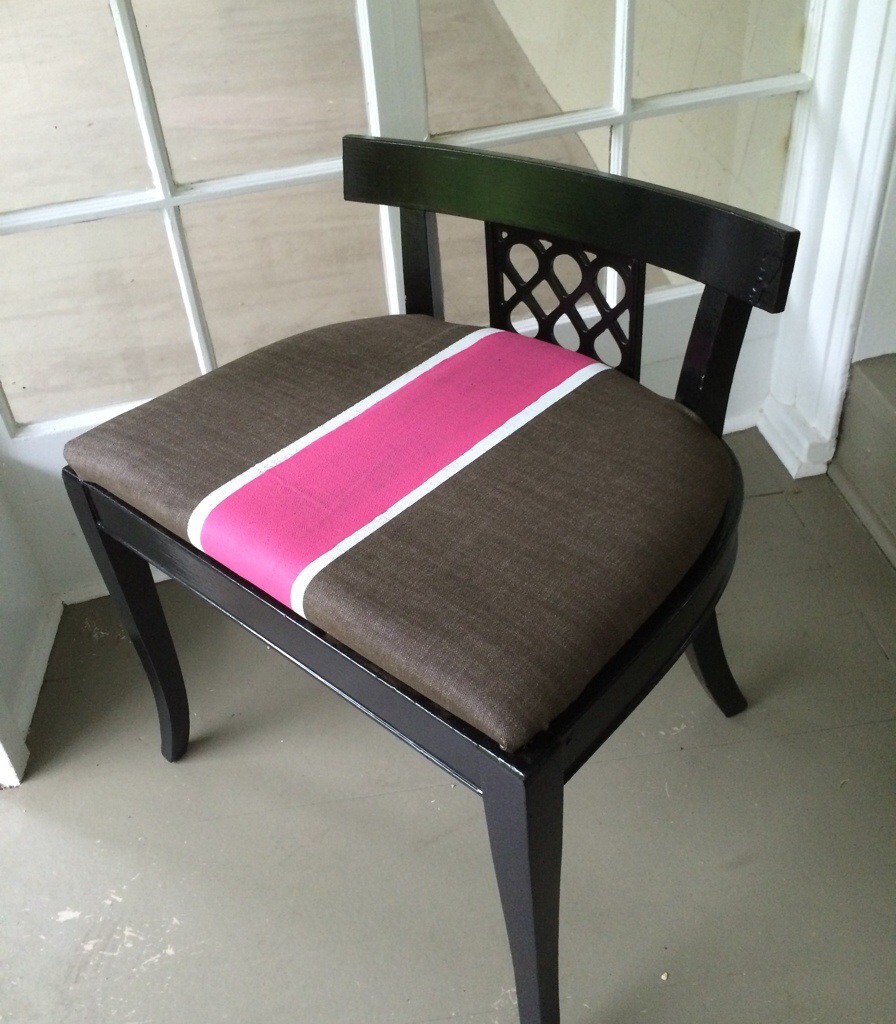
Give new life to  garage sale find this weekend. Whether it be a new purchase from your Memorial Day weekend hunting or one of the pieces you’ve been hanging onto, just rip the bandaid off and do it. Here’s a quick slipper chair remodel I did in a few hours yesterday. All it entailed was a fresh coat of glossy spray paint, a piece of fabric and 2 samples of latex wall paint from my local hardware store. Directions below. Good luck and happy hunting this weekend!

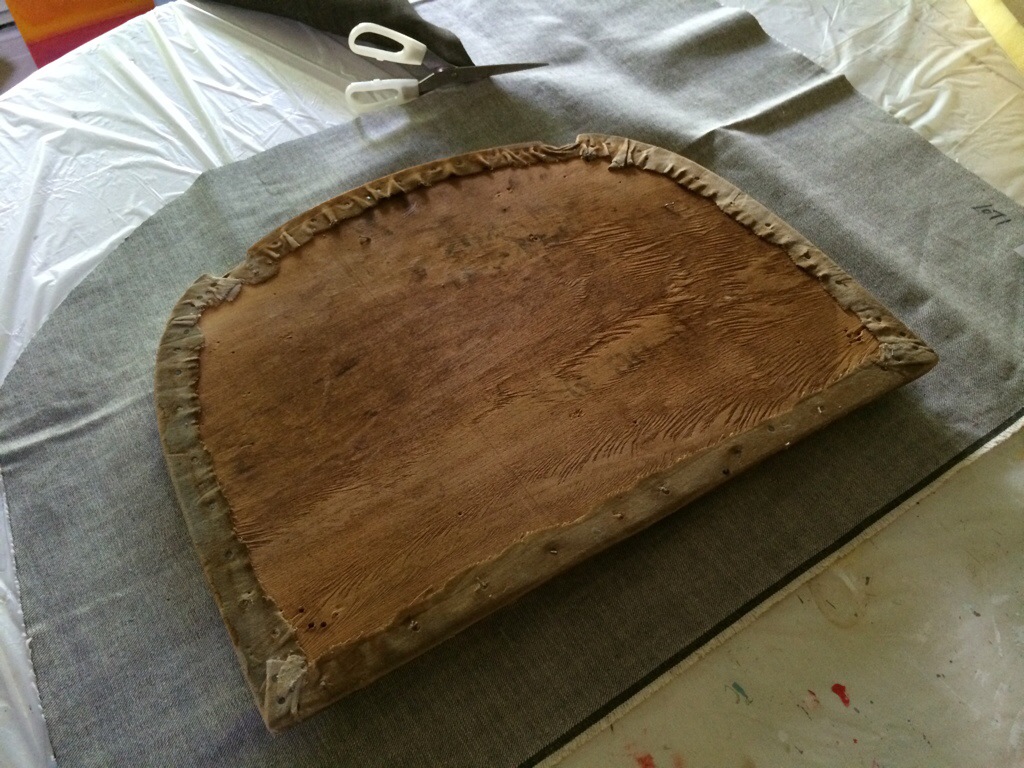
Cut a piece of fabric large enough to wrap around and be stapled. Always give yourself a little extra.

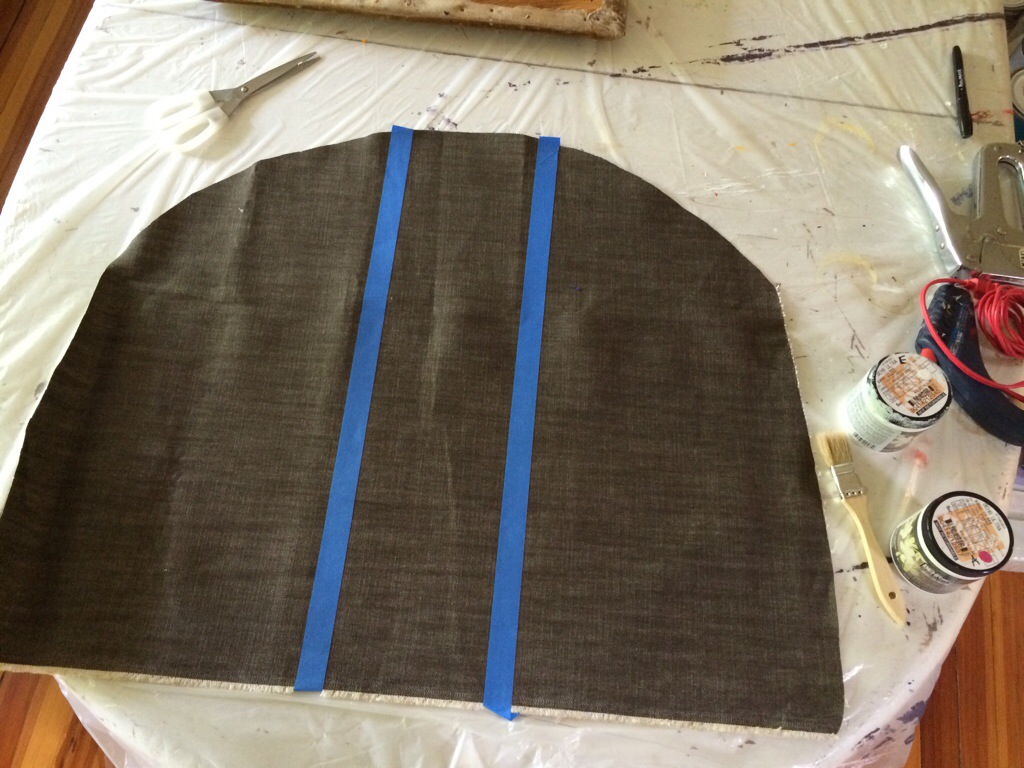
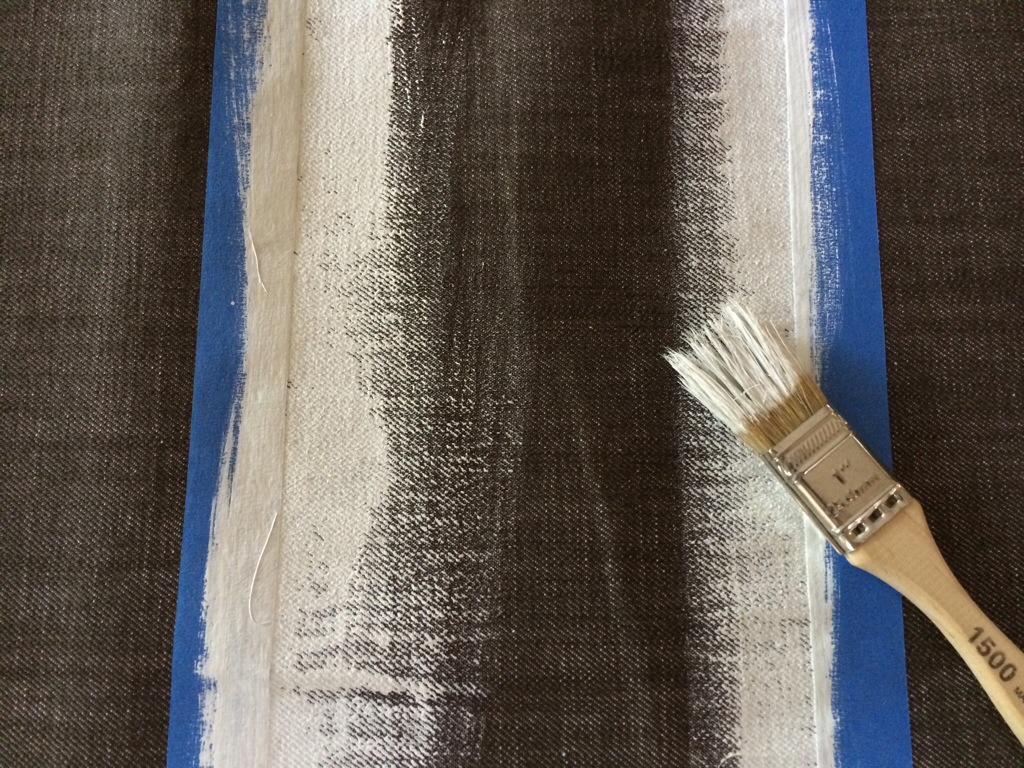
I taped off o wide stripe down the center of the fabric. Measure from each side to make sure your pretty centered.

I brushed on white latex paint for a white edge

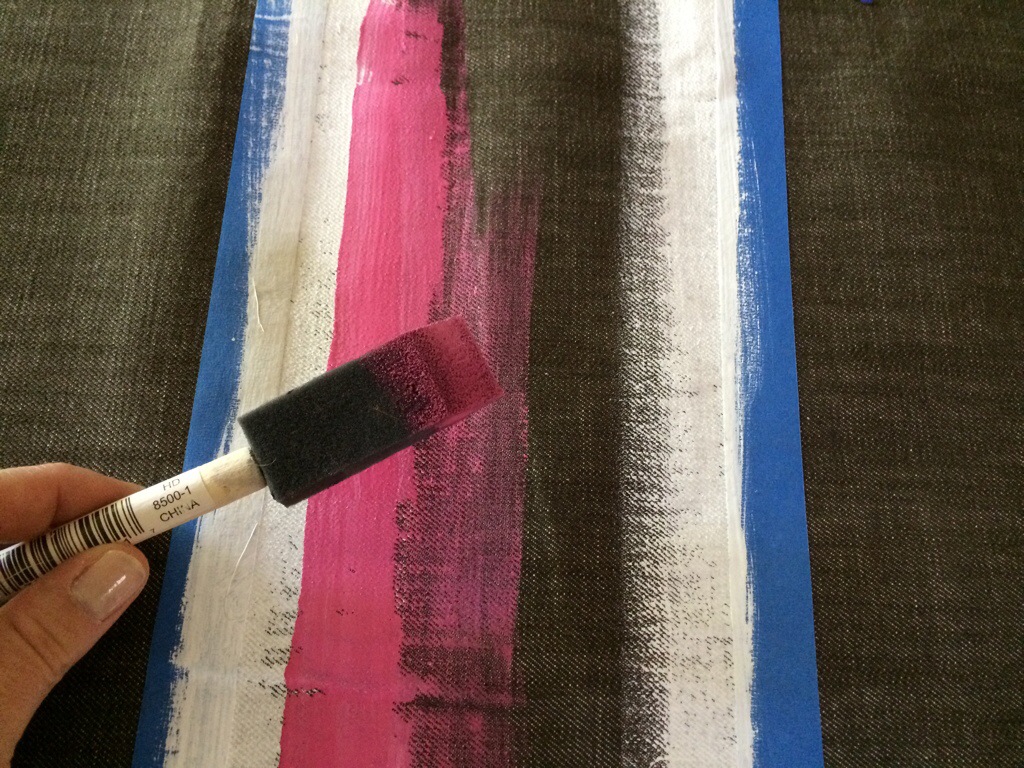
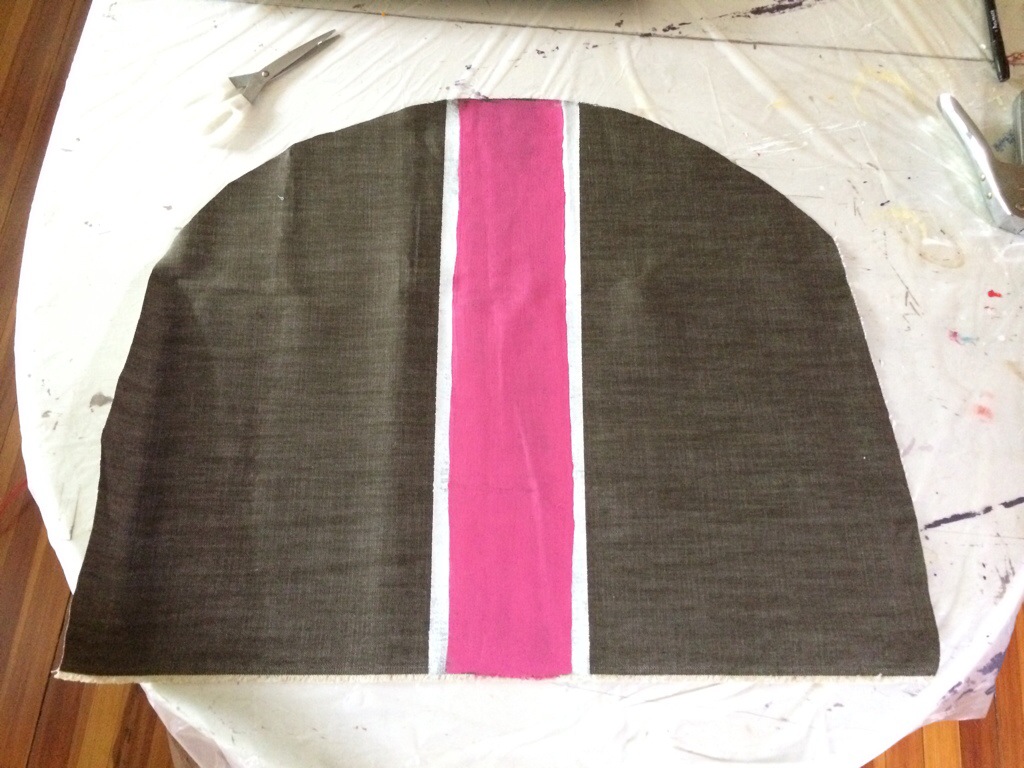
Then pink. If you want the lines to be perfect, let the white dry, then tape a new line for the pink. I wanted mine to be a little organic so i freehanded it

remove the tape and let it dry thoroughly

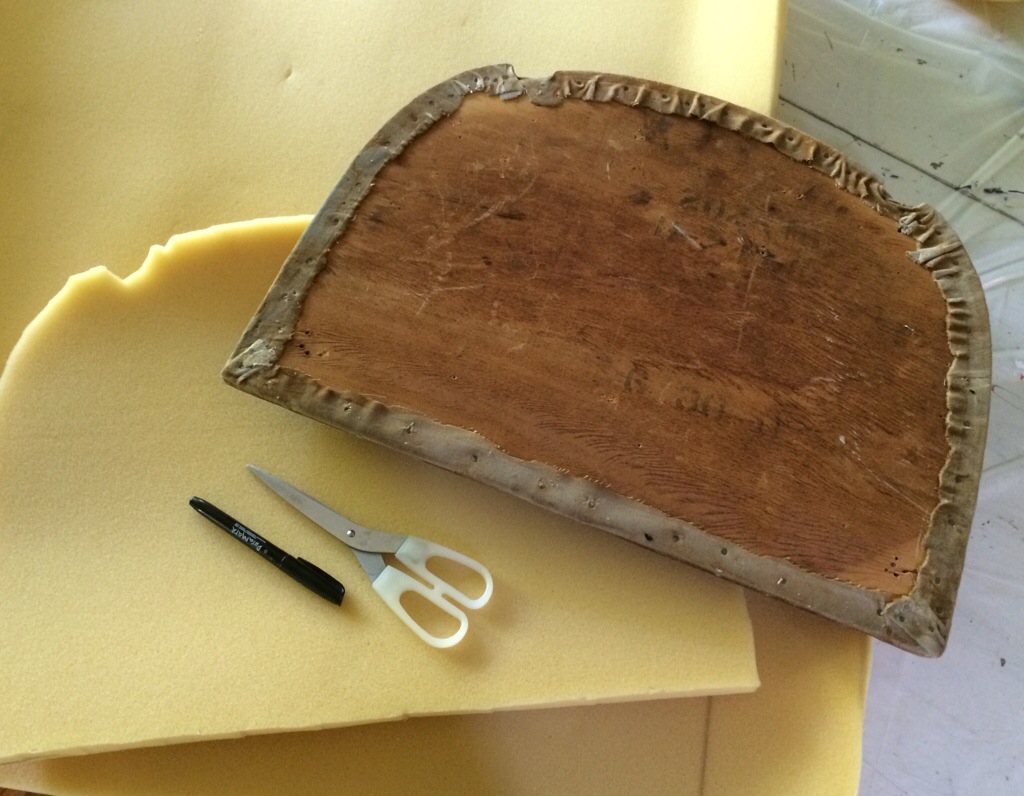
if you need to replace the foam, do so by tracing the seat onto the foam and then cut it out with scissors.

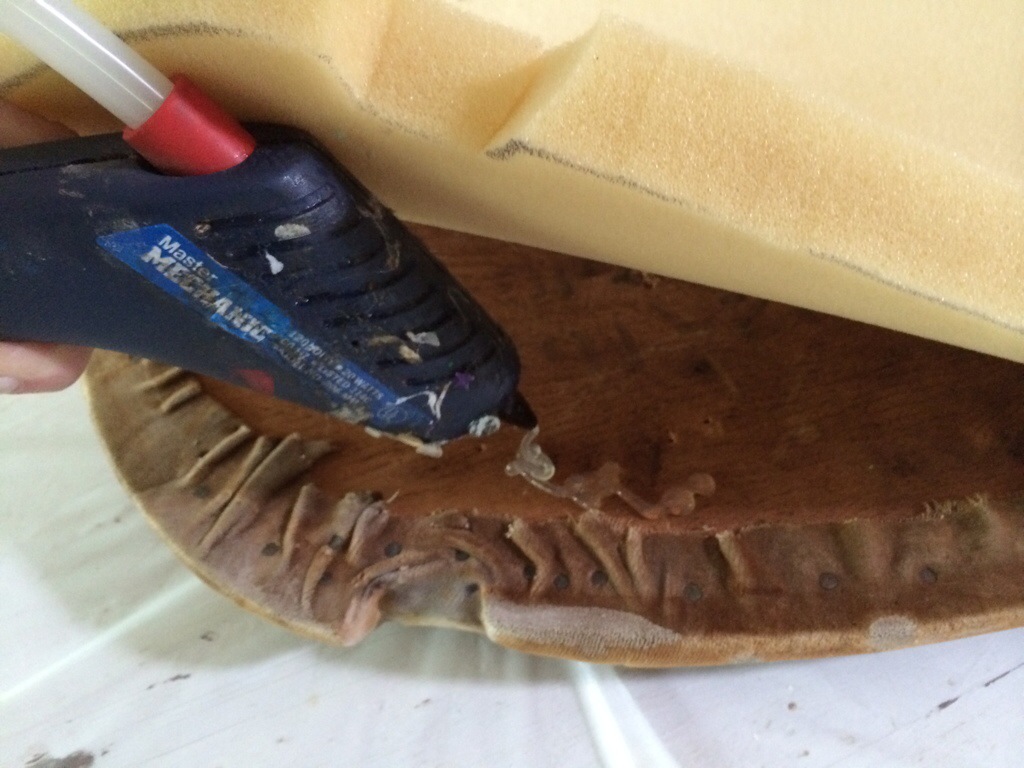
Once lined up precisely, glue your foam in place so that it doesn’t shift while you’re upholstering or in the future

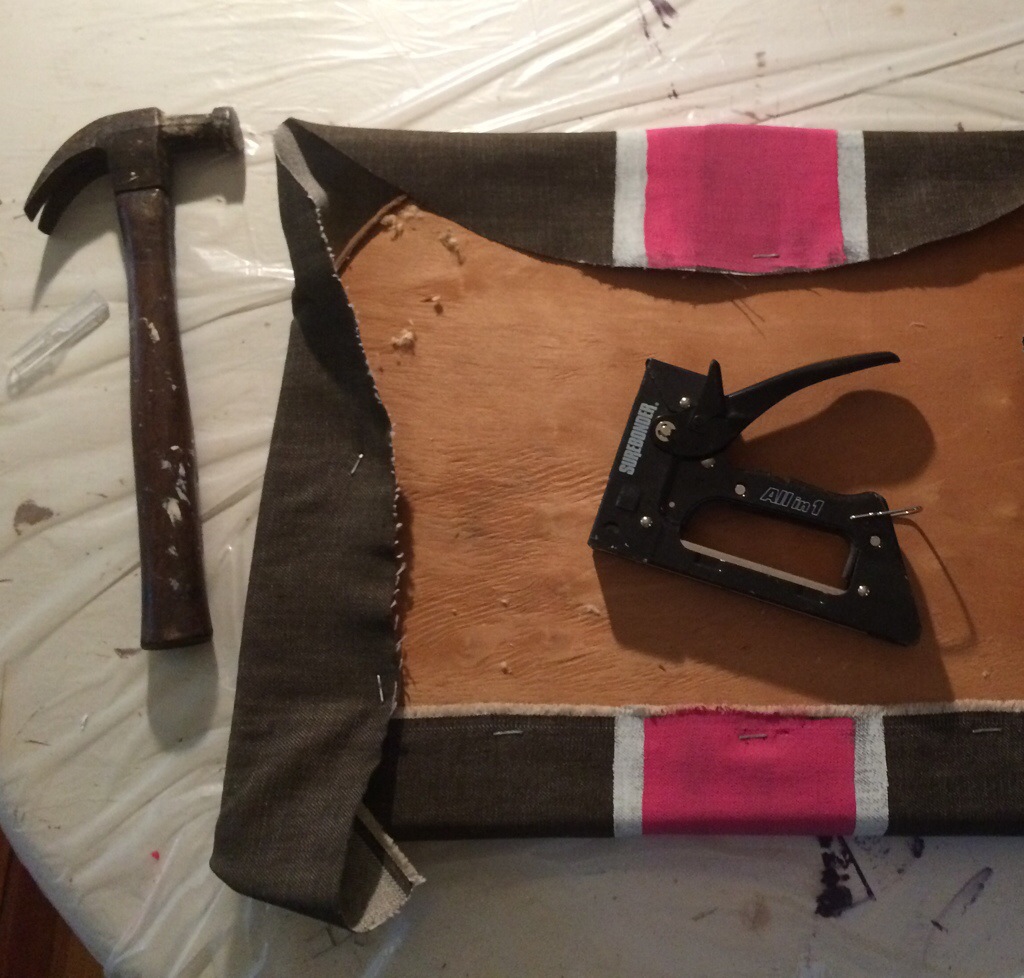
I staple-gunned the fabric taught to the wooden seat, pulling the foam to a rounded edge along the sides of the cushion. Again, measure to make sure your stripe is centered and straight before you staple.

Et Voila! A new soul for your Slipper chair!


Thanksgiving with Style

Thanksgiving is only two weeks away! For all you hosts out there, don’t wait for the panic to set in. Take care of your tabletop(s) now so that you can put your heart into the food preparation later… and actually enjoy it.

Whether you have a game plan or not, I’d recommend popping into The Little Flower Shoppe in Ridgewood, NJ for their Stress-free Holiday Decorating Party tomorrow night (Thursday, Nov 14, 2013, 6-8pm). RSVP: 201 652 7600 or info@raimondihg.com. Fabulous flower extraordinaire, Anne Miller (who has worked with the likes of Preston Bailey and David Tutera) will be giving floral advice and dishing inspirational tabletop ideas. Ridgewood Fare will be serving up delicious bites and giving pointers on cuisine. And in the proper spirit of Thanksgiving, a portion of the evenings sales proceeds will be going to Children’s Aid and Family Services.

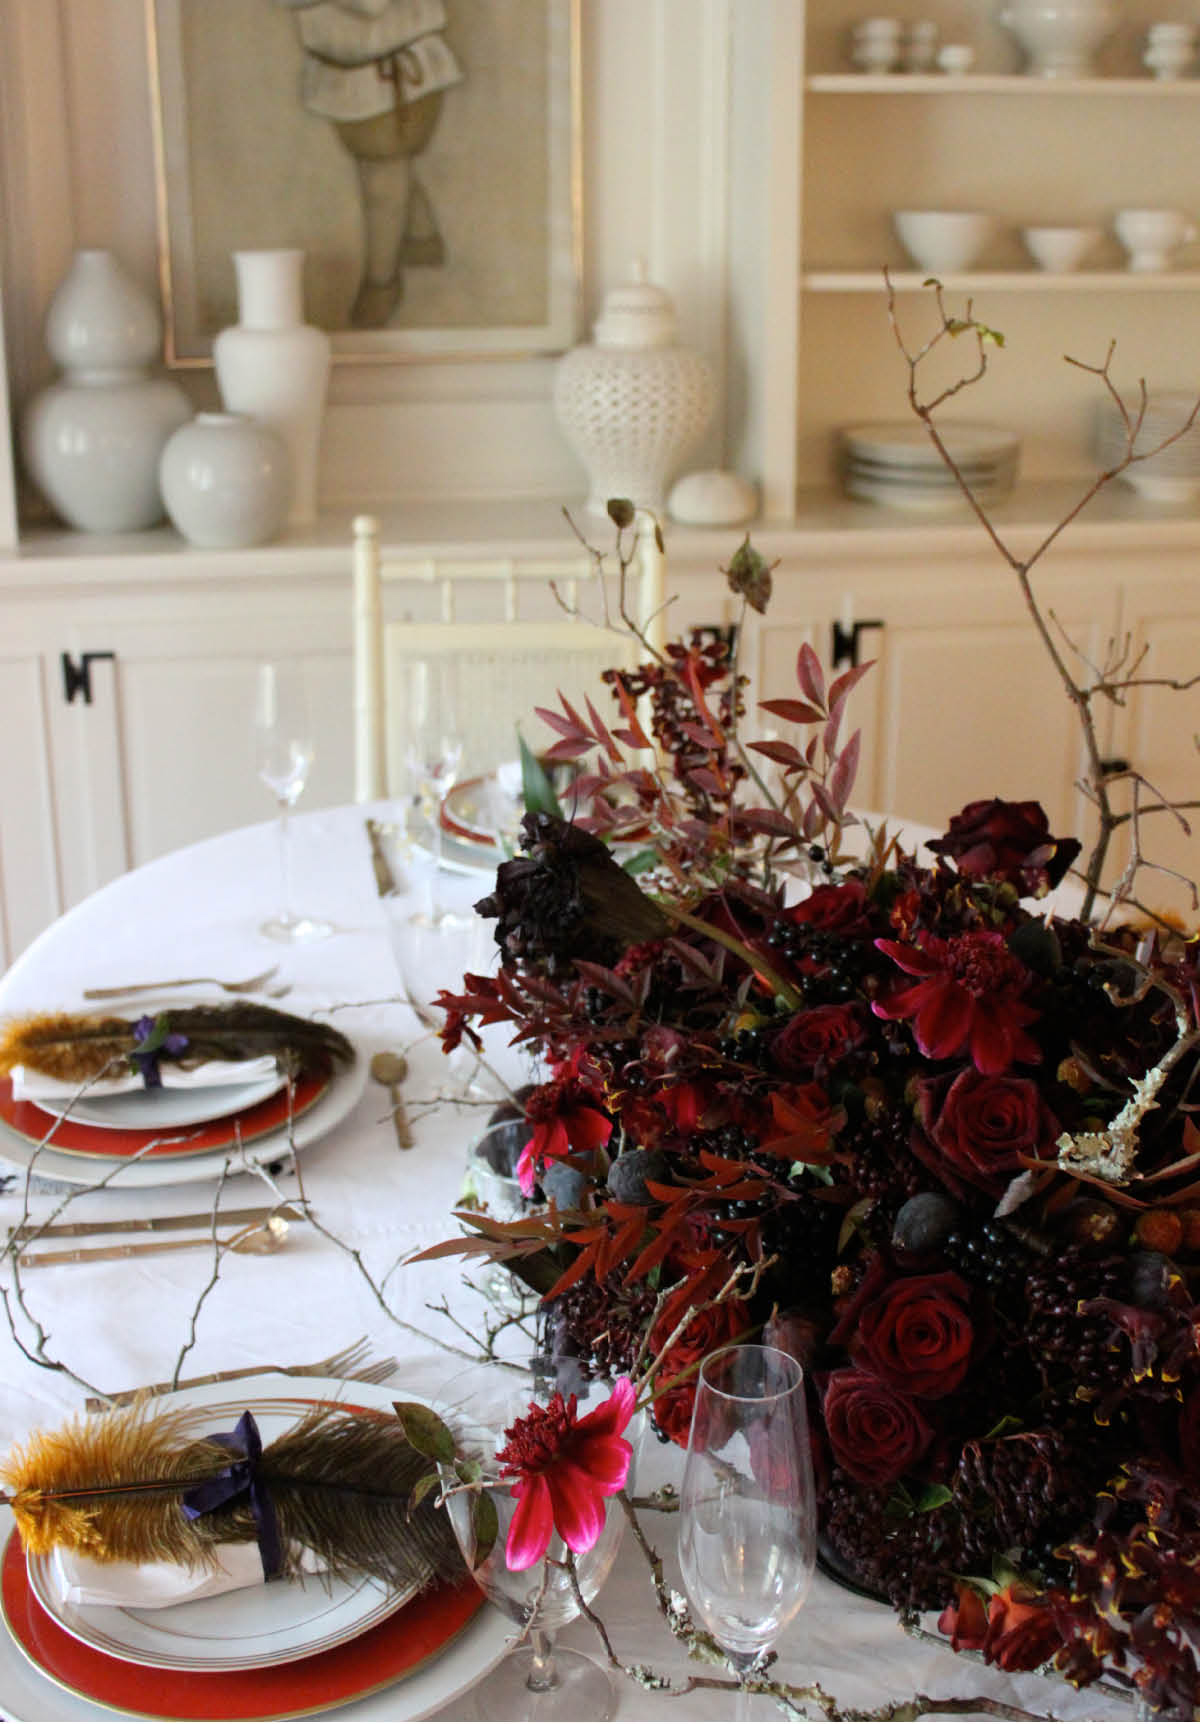
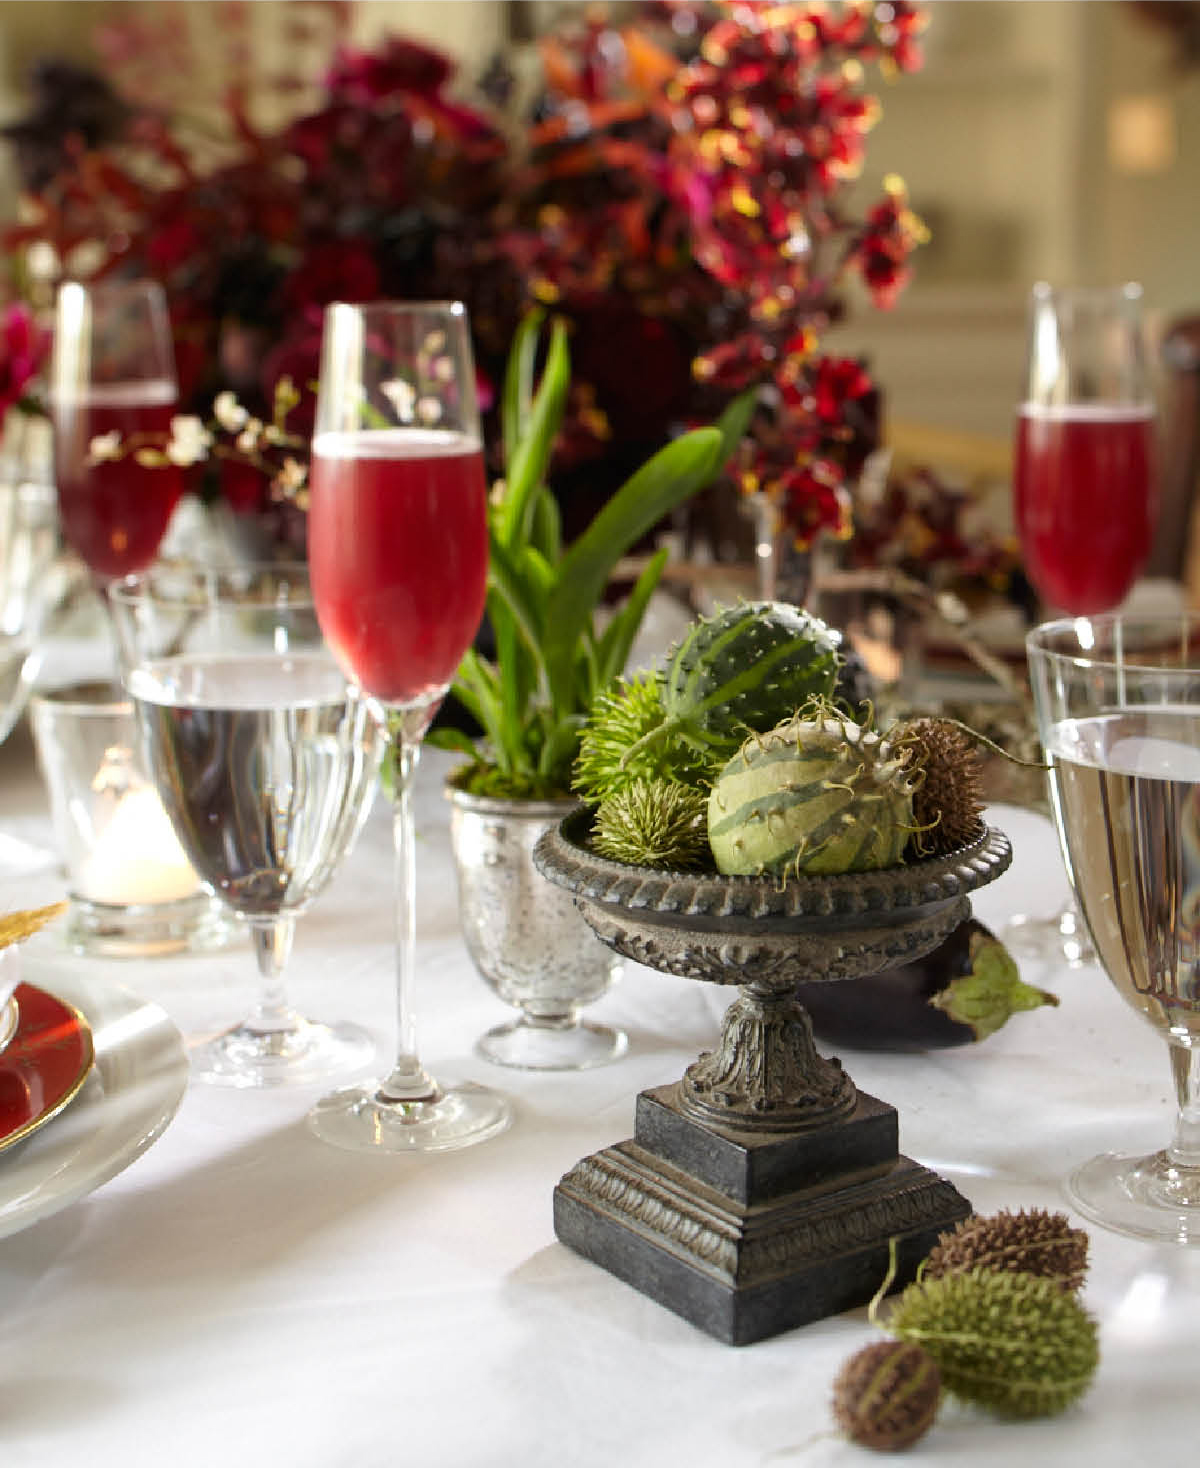
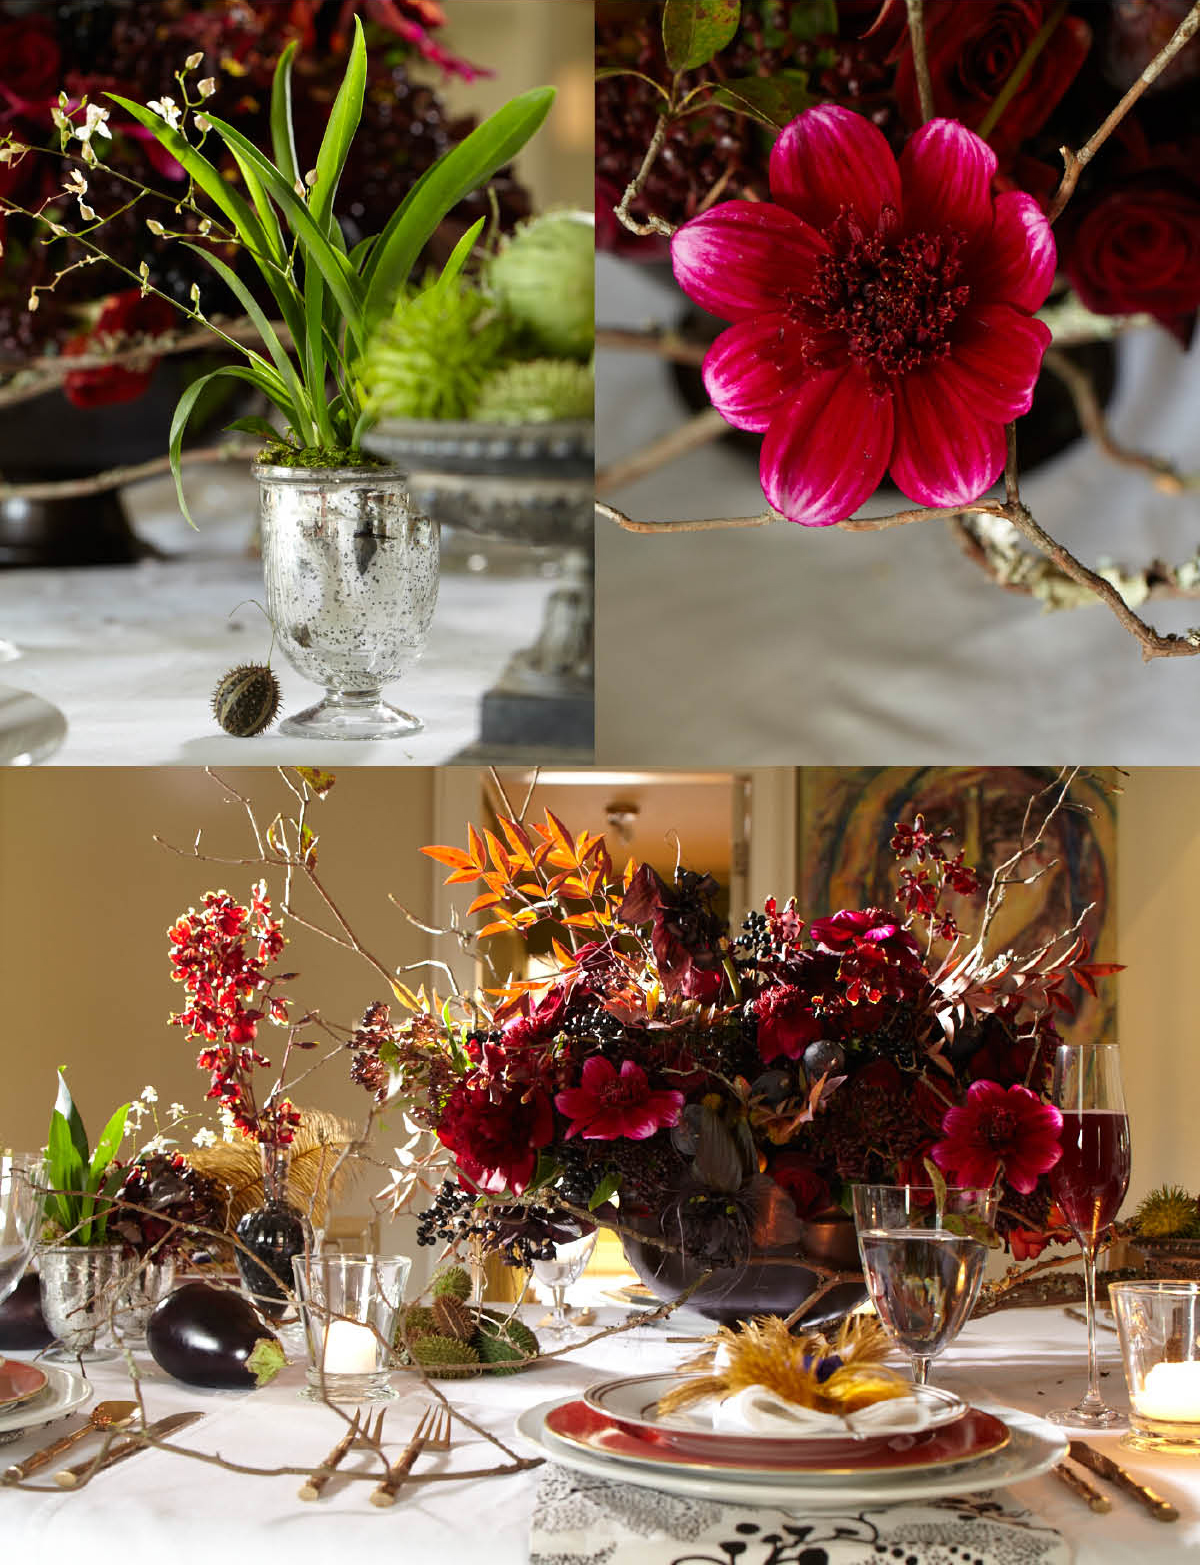
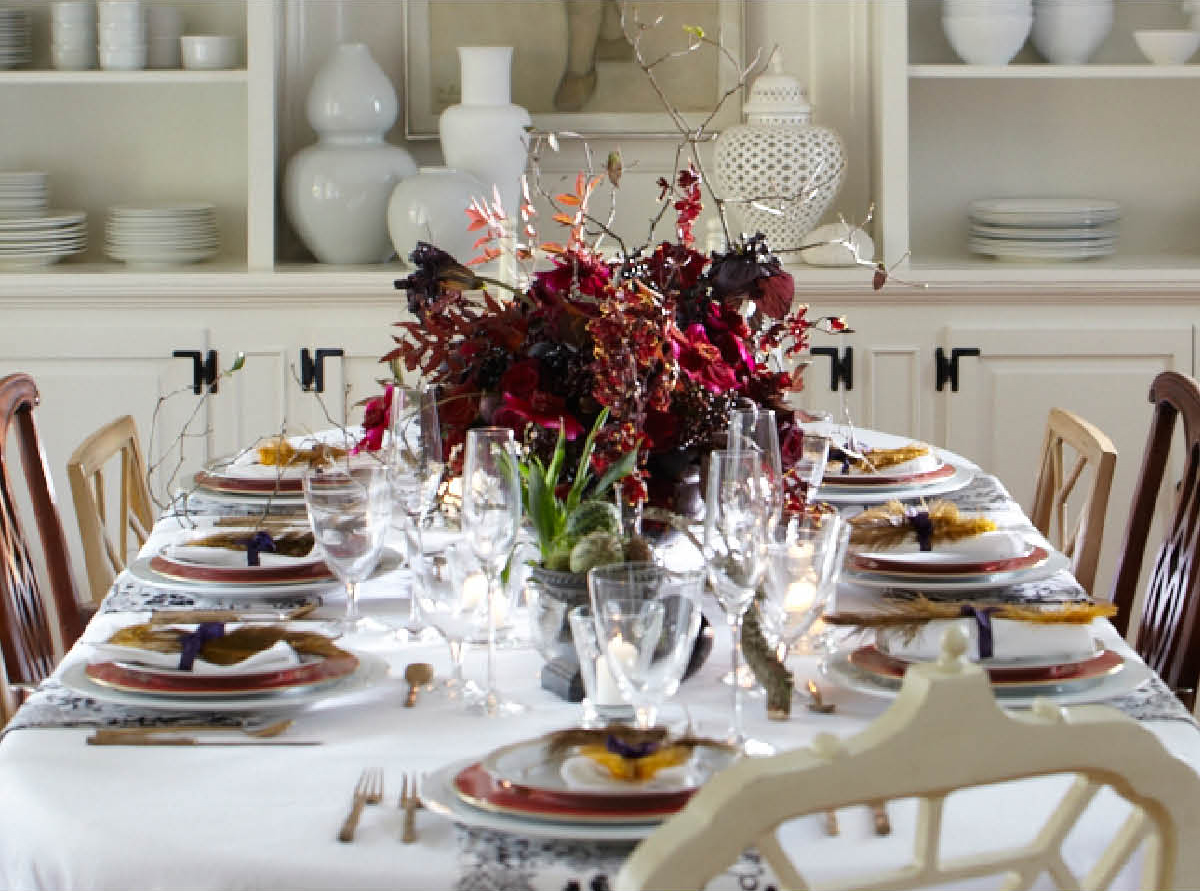
Here is the Thanksgiving table I styled with florals and frills from said Anne Miller. I asked for “dark, rich and deadly” and she delivered:

Photography by Laura Moss.
Anne sourced all the flowers (and miniature orchids) and fruit (miniature eggplants, figs, gourds, grapes, various berries, and these incredible little green spiky seedpods) directly from the flower district in New York. Bring her any vessel that’s right for your table, mantle, doorway, etc and she will fill it with the the most beautiful work you’ve ever seen.

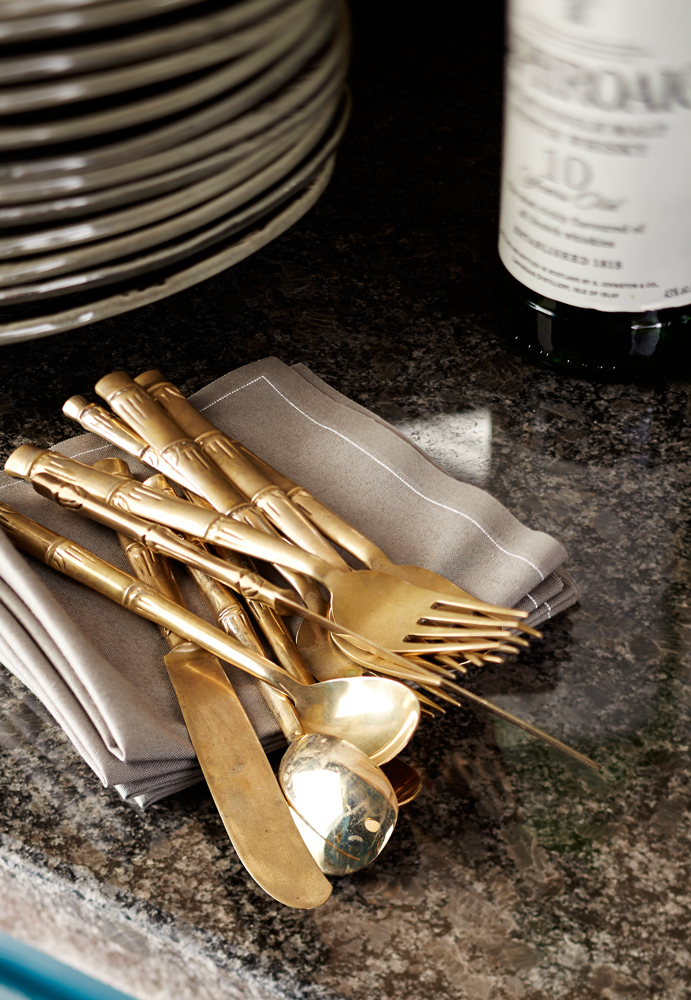
The salad plates and dinner plates are from a totally fabulous buying trip to 200+ year-old porcelain factory, Royal Limoges—the oldest existing porcelain factory in all of Limoges, France—but you can pull this look off with whatever whites you have at home. Throw a pop color in there for fun: I found these celadon green dinner plates at Crate & Barrel that at first I thought were a knock off, but I they appear to actually be made by Jars, a very well respected stoneware factory in France (I also have a set of this exact dinnerware in a dark green: it’s totally awesome and totally rustic and totally perfect for a hearty Thanksgiving meal). The flatware is a vintage brass set I picked up at an estate sale years ago, but I found a ton of Ricci Argentieri’s “Bamboo d’Oro” on (my favorite website) replacements.com. Frankly I’d recommend the electroplated gold over the brass any day because mine is nearly impossible to keep polished. There are tons of sets on online auction houses too… happy hunting and happy thanksgiving! xx Mere

Entertaining on Halloween


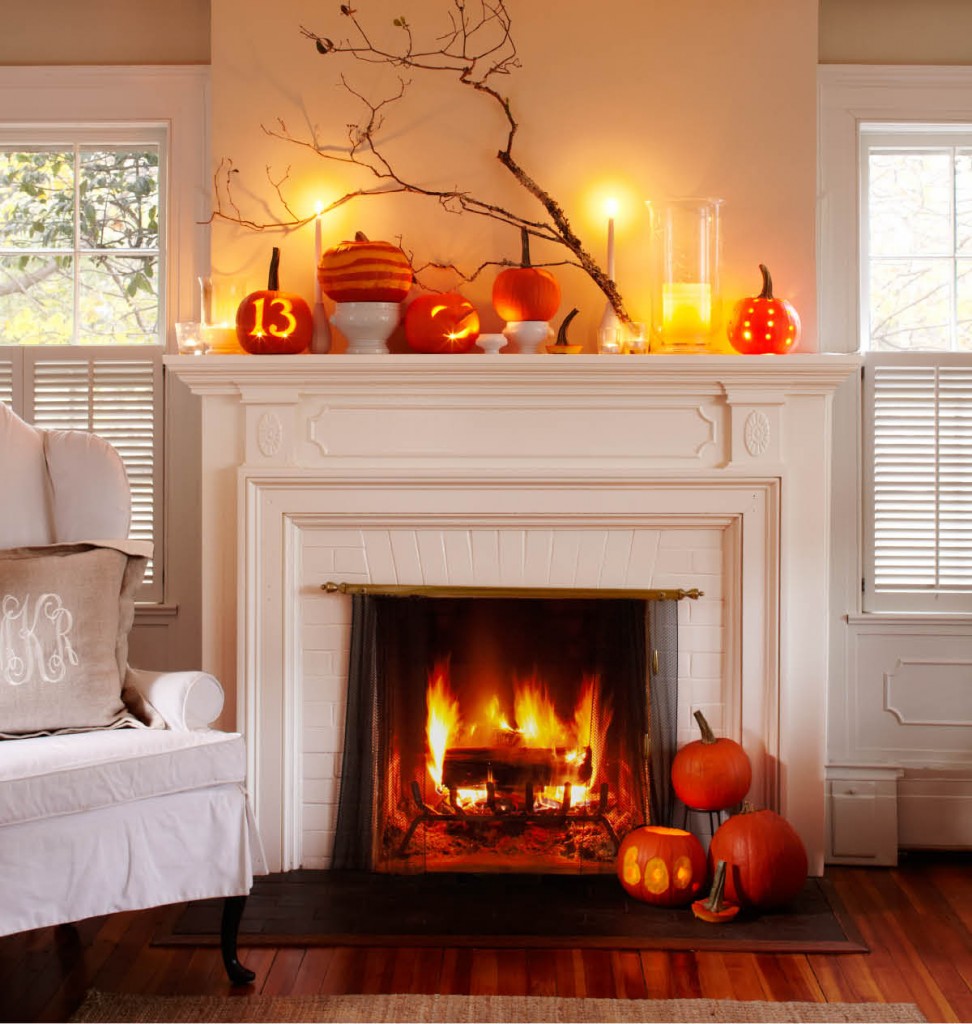
Photography by Laura Moss. Styling by me, Meredith McBride Kipp

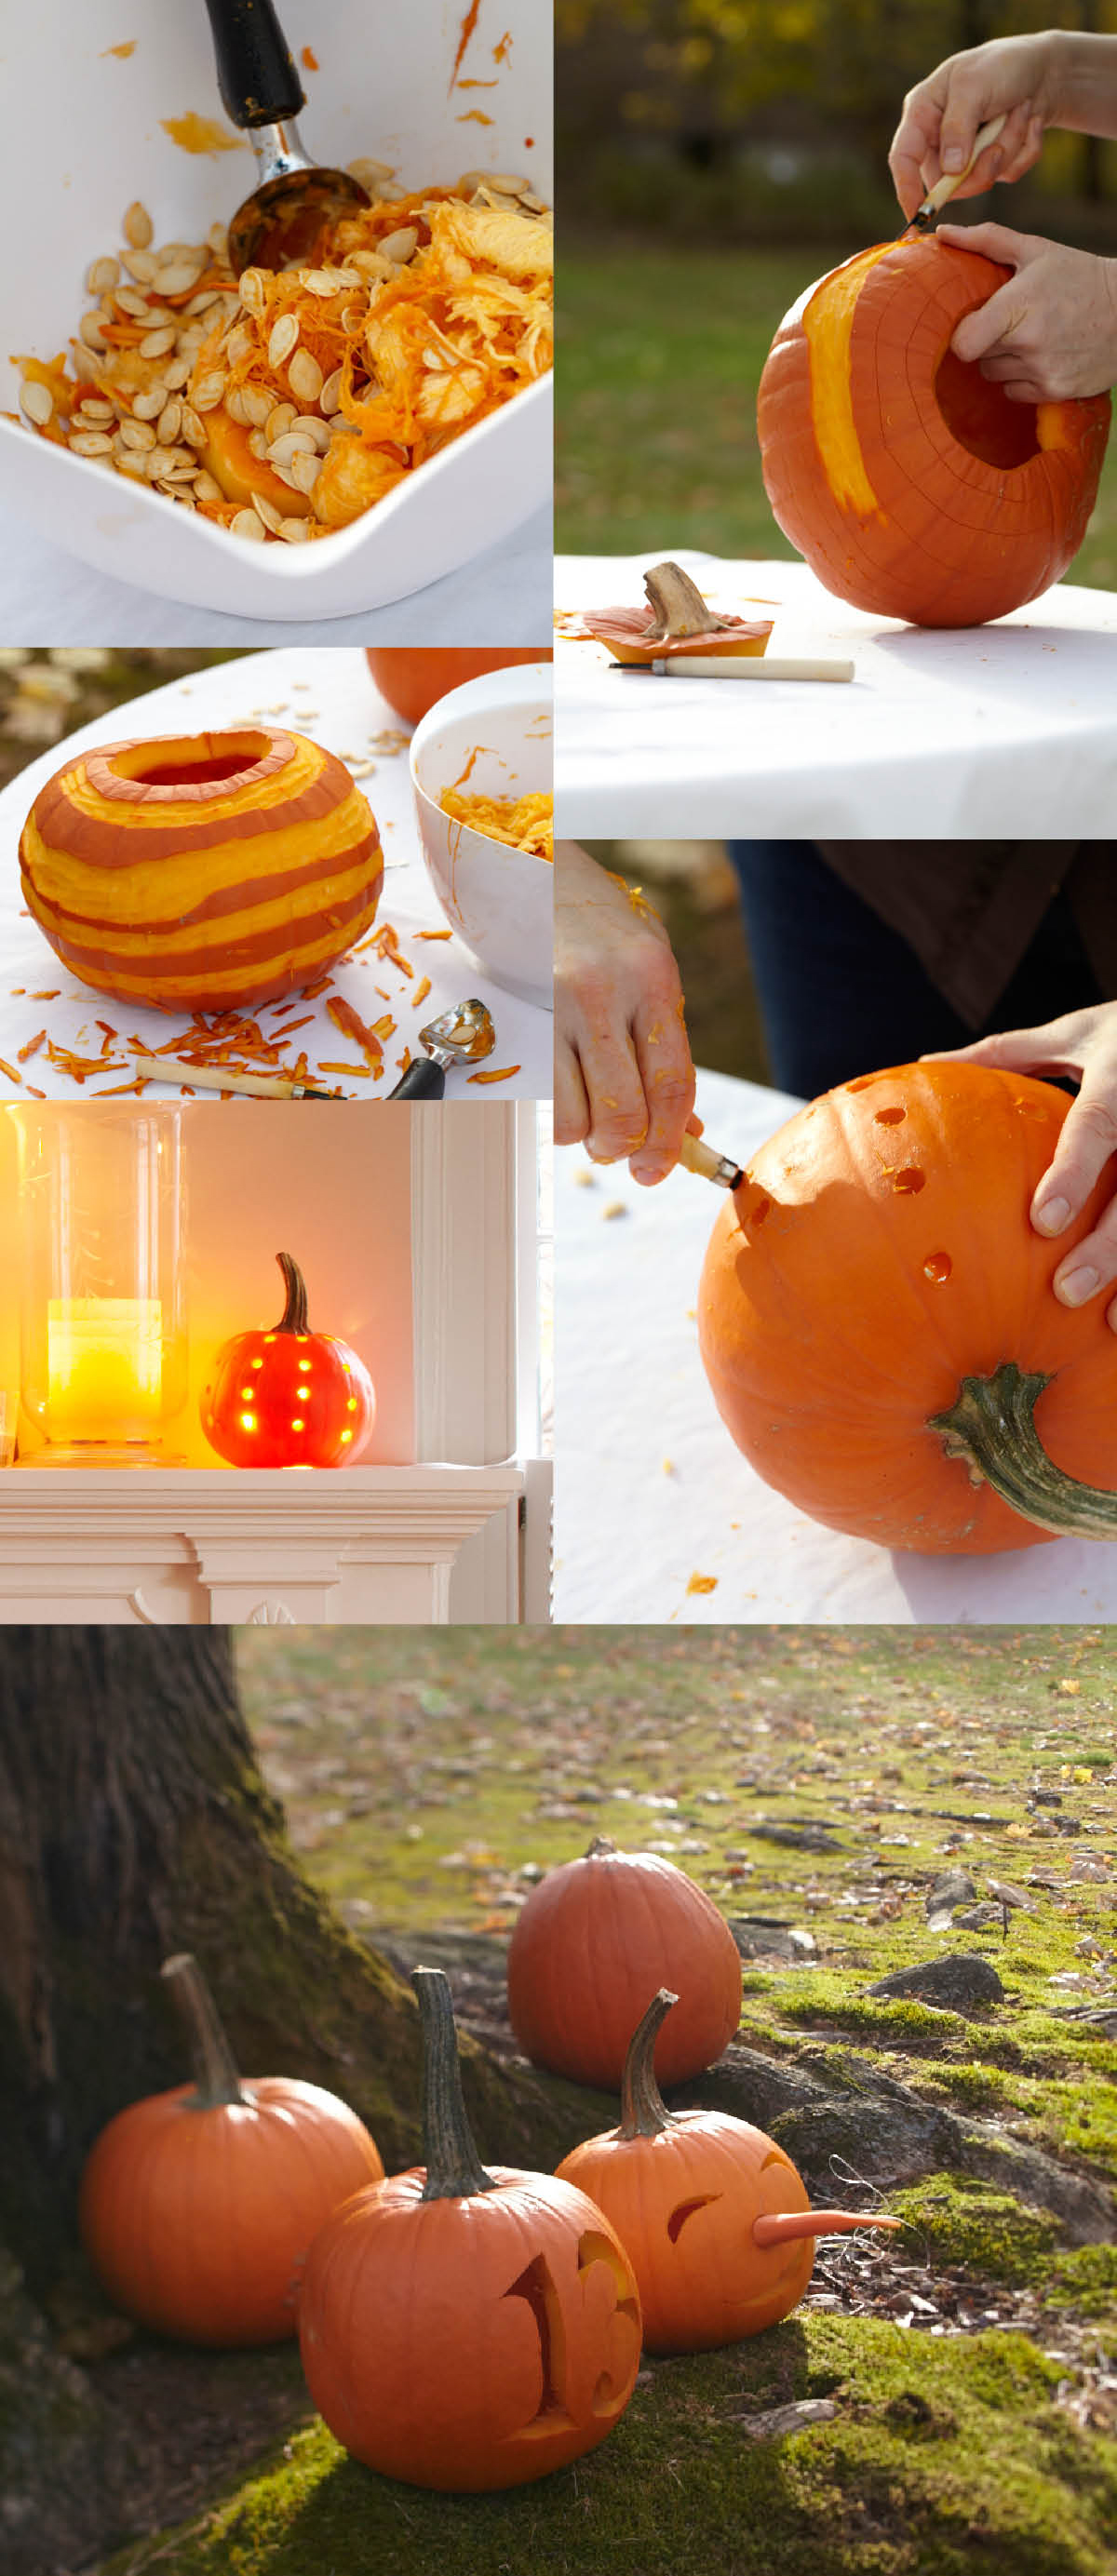
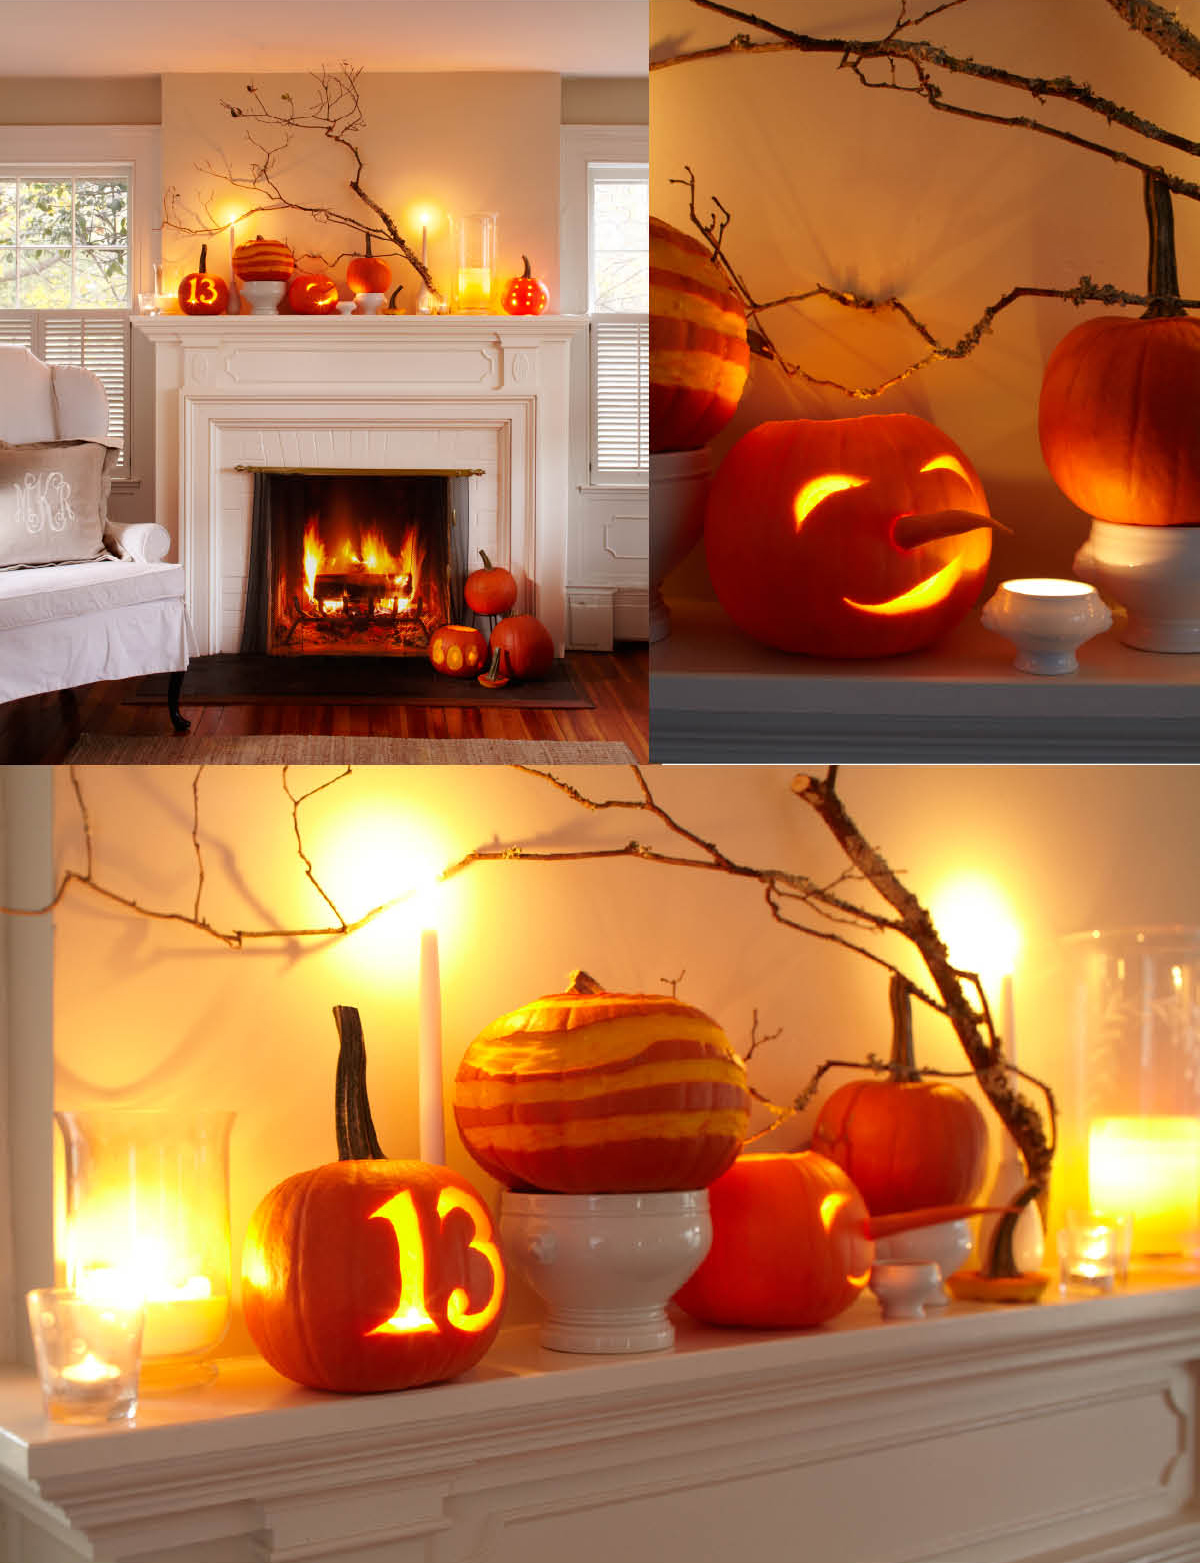
It’s that time of year again to get out the pumpkin-carving tools, invite some friends over, and get a fire going in the fire pit. Don’t forget your costumes!
Here’s a no-pressure solution to pulling the ones you love together without making too much of a fuss.


Designate a table for pumpkins (outside ideally) an cover it to make your cleanup easy. You don’t have to be an artisan to carve a pumpkin, just have fun! For a change, stay away from scary faces: try stripes, polka dots and even words. Instead of going through the top of the pumpkin, try cutting an access hole into the bottom. I used a round linoleum-cutting tool from a local craft store to puncture holes in my pumpkin. After I’d covered it in perforations, I stuffed the pumpkin with a strand of white Christmas lights and stuck lights through each of the holes; the cord running out the bottom.

Invite your guests inside for a little fire-side dinner and drinks. I made a simple butternut squash soup the night before and garnished it with shredded roast turkey, creme fresh, cracked pepper, a drizzle of truffle oil and chives. We whipped up some “Blood Transfusion” cocktails (a take on Martha Stewart’s spiked grape punch) topped off with a pair of eyeballs (peeled grapes).

Then onto s’mores around the fire-pit…

Have a great Halloween and don’t be too spooked to throw it together last minute! xx Mere

Hypertufa Potting Party

Photography by Laura Moss, styling by Meredith McBride Kipp

Now that the hectic summer is behind us, it’s a great time to catch up with friends over an outdoor art project. Eccentric artist/collectors Jorge & Katie Lengyel invited a few pals (along with photographer Laura Moss and me) to their custom-built swiss chalet on Lake Mohawk for an afternoon of crafting.

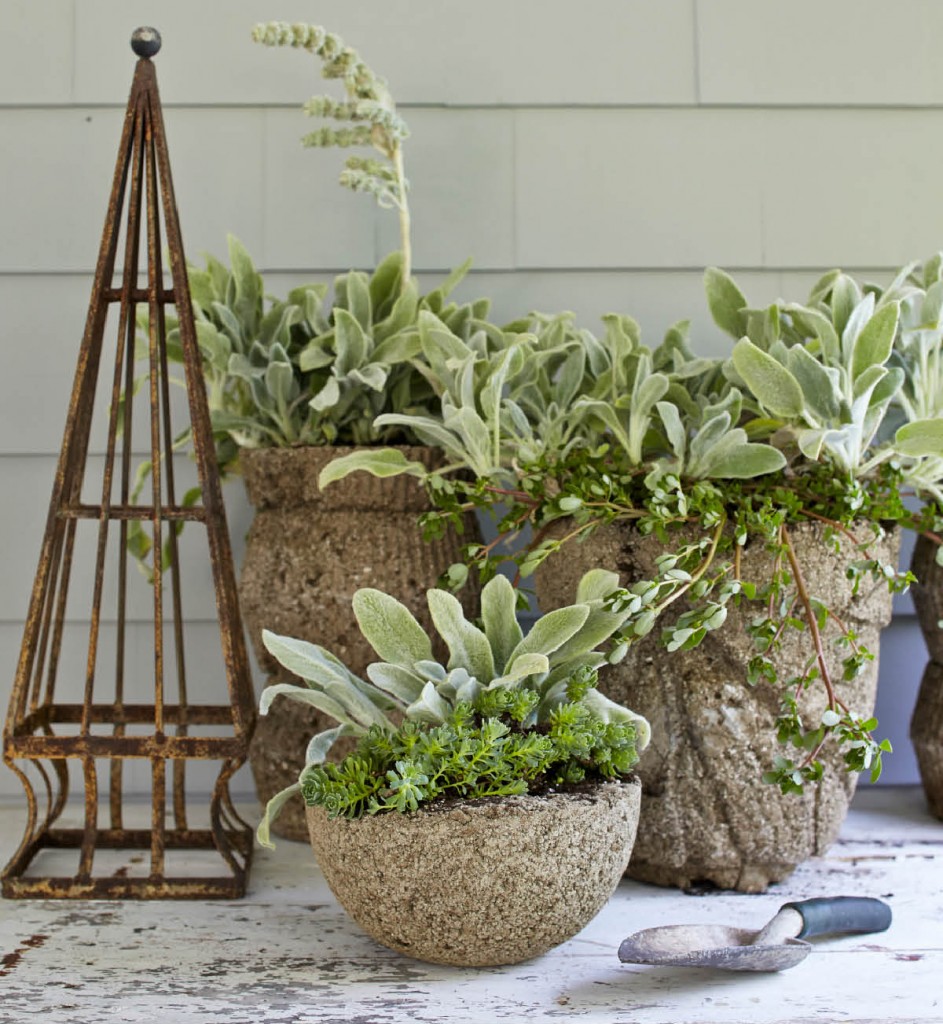
On the agenda: Hypertufa garden containers. Hypertufa is a material that looks a lot like cement (tufa is a volcanic rock found in nature) but quite a bit lighter in weight. It’s easy to do and you can use just about anything for a mold.

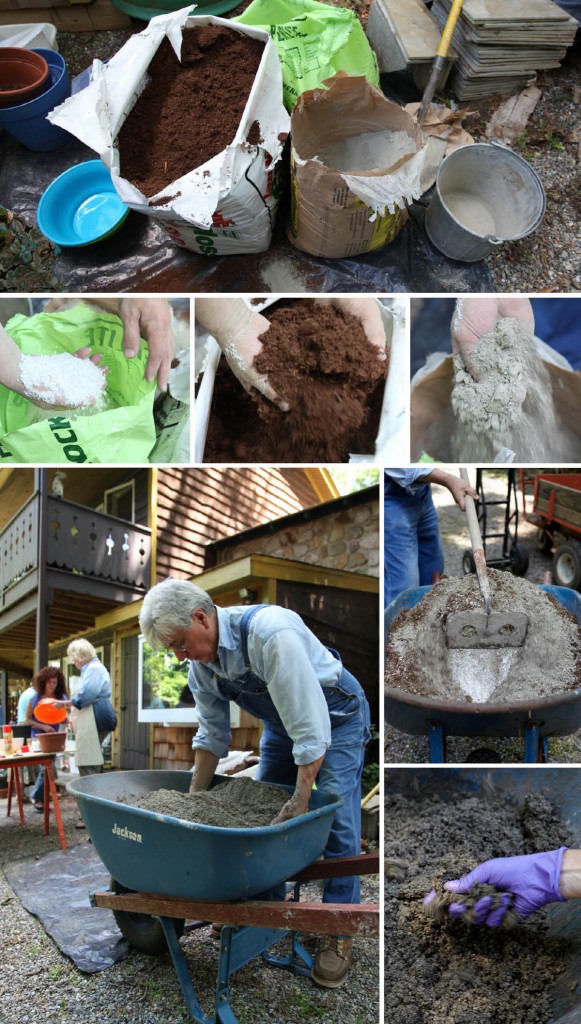
What you’ll need (you can find at Home Depot, a grocery store, or at home):
•    Rubber gloves
•    Dust mask (very important when working w/cement)
•    Perlite
•    Peat moss
•    Portland cement
•    Plastic tub (or wheelbarrow)
•    Water (nearby hose ideally)
•    Spray cooking oil
•    Mold  (box, nursery pot, large bowl, etc)
•    Plastic garbage bags
•    Large leaves or branches for surface texture (optional)
•    Wire brush

Martha Stewart’s (with my edits and additions) How-to Instructions:
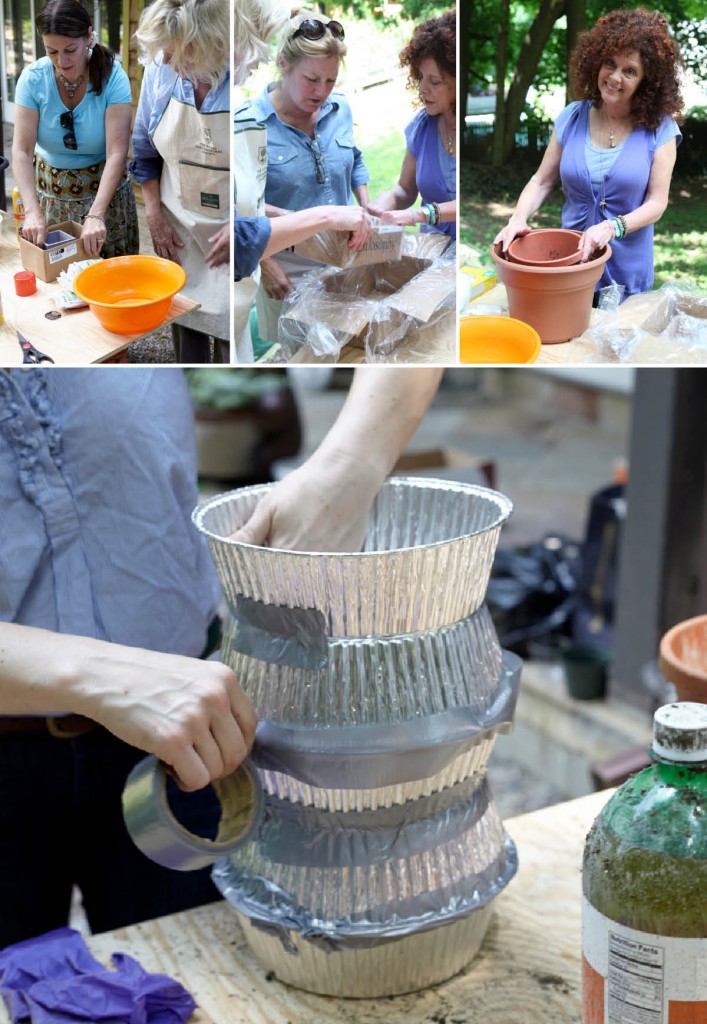
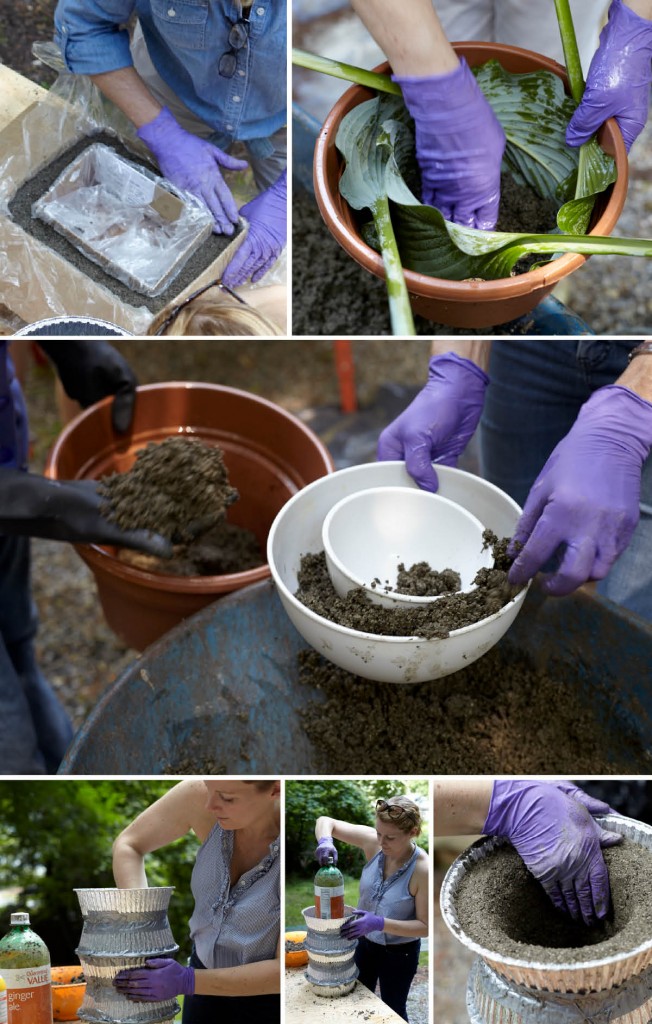
1. Set up your mold(s) so they are ready to go and (if porous) line them with a plastic garbage bag. If they are smooth, non-porous surfaces, merely spray inside of mold with cooking oil. I was going for a Kelly Wearstler/mid-century shape, so I built my molds out of aluminum pie tins (with the centers cut out) and duct tape.

2. Wearing rubber gloves and a dust mask, mix 3 parts perlite, 3 parts peat moss, and 2 parts Portland cement in a plastic tub or wheelbarrow. Add water to tub, a bit at a time, until the mixture has the consistency of moist cottage cheese.

3. Push a handful of wet hypertufa mixture firmly against the bottom of the mold (if you are lining the mold with leaves or branches for texture make sure that goes in before the hypertufa). Repeat until you have made a bottom base that is approximately 1 inch thick. Push handfuls of wet hypertufa mixture firmly against the sides of container approximately 3/4 inches in thickness. Continue until rim of mold is reached. Press bottom and sides firmly to remove air pockets. I used a large soda bottle to help support and shape the inside of the vessel because of its height.

4. Create drainage hole by pushing finger or small dowell through the bottom of mold so that it penetrates the hypertufa mixture.
5. Cover with plastic bag, let dry for about 48 hours.
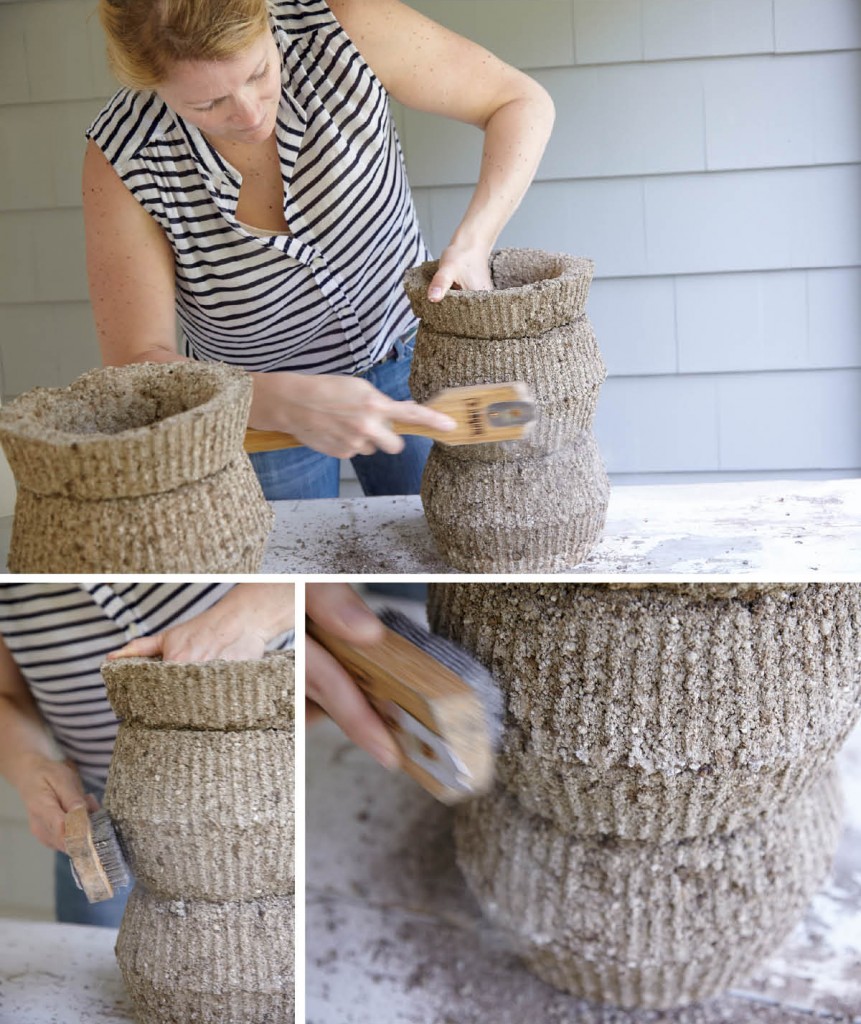
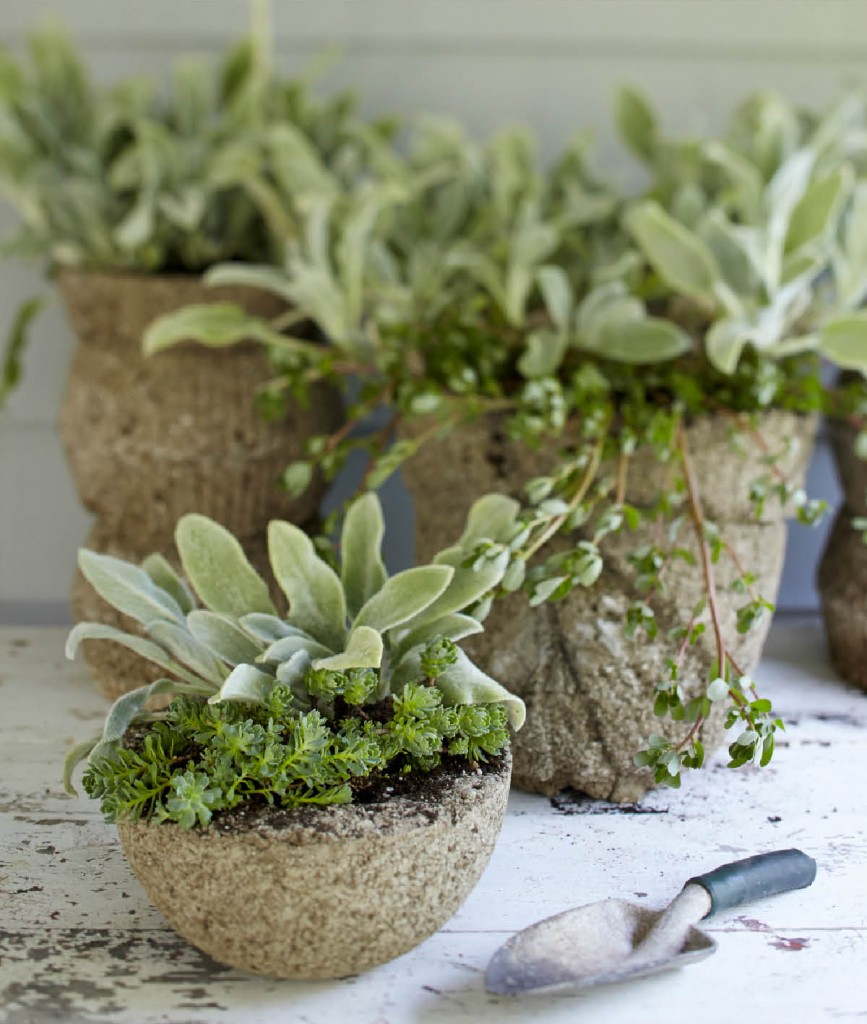
6. Take off plastic bag and remove pot from mold (pot with be slightly wet). Using a wire brush, rough up the surface of the hypertufa for a more rustic appearance. Let sit for 2 to 3 weeks to cure completely. Now you’ll be all set for your early spring plantings!

Creative Commons License
amerelife.com by Meredith McBride Kipp is licensed under a Creative Commons Attribution-NonCommercial-NoDerivs 3.0 Unported License.

© Meredith McBride Kipp and amerelife.com. Unauthorized use and/or duplication of this material without express and written permission from this blog’s author and/or owner is strictly prohibited. Excerpts and links may be used, provided that full and clear credit is given to Meredith McBride Kipp and amerelife.com with appropriate and specific direction to the original content.